


In this post we are going to create a Flutter Login page user Interface. This Login Page UI contains Textfields for user inputs (User name and Password) and FlatButton for user event on submitting the user credentials.
We are going to create below login page
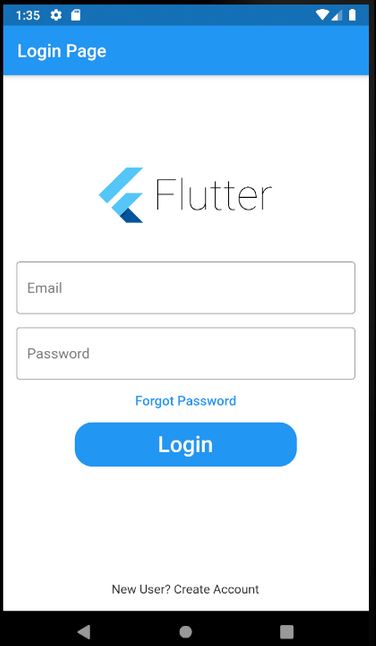
Let's get started
This Login page starts with main.dart file. inside the main.dart file we will call MyApp where we are going to implement our Login page UI
|
class MyApp extends StatelessWidget {
// This widget is the root of your application.
@override
Widget build(BuildContext context) {
return MaterialApp(
debugShowCheckedModeBanner: false,
title: 'Login Page',
theme: ThemeData(
primarySwatch: Colors.blue,
),
home: MyHomePage(title: 'Login Page'),
);
}
}
|
The complete Login page UI code will be like below
|
import 'package:flutter/material.dart';
void main() => runApp(MyApp());
class MyApp extends StatelessWidget {
// This widget is the root of your application.
@override
Widget build(BuildContext context) {
return MaterialApp(
debugShowCheckedModeBanner: false,
title: 'Flutter Demo',
theme: ThemeData(
primarySwatch: Colors.blue,
),
home: MyHomePage(title: 'Flutter Login'),
);
}
}
class MyHomePage extends StatefulWidget {
MyHomePage({Key key, this.title}) : super(key: key);
final String title;
@override
_MyHomePageState createState() => _MyHomePageState();
}
class _MyHomePageState extends State<MyHomePage> {
TextStyle style = TextStyle(fontFamily: 'Montserrat', fontSize: 20.0);
@override
Widget build(BuildContext context) {
// This method is rerun every time setState is called, for instance as done
// by the _incrementCounter method above.
//
// The Flutter framework has been optimized to make rerunning build methods
// fast, so that you can just rebuild anything that needs updating rather
// than having to individually change instances of widgets.
final emailField = TextField(
obscureText: true,
style: style,
decoration: InputDecoration(contentPadding: EdgeInsets.fromLTRB(20.0, 15.0, 20.0, 15.0), hintText: "Email", border: OutlineInputBorder(borderRadius: BorderRadius.circular(32.0))),
);
final passwordField = TextField(
obscureText: true,
style: style,
decoration: InputDecoration(contentPadding: EdgeInsets.fromLTRB(20.0, 15.0, 20.0, 15.0), hintText: "Password", border: OutlineInputBorder(borderRadius: BorderRadius.circular(32.0))),
);
final loginButon = Material(
elevation: 5.0,
borderRadius: BorderRadius.circular(30.0),
color: Color(0xff01A0C7),
child: MaterialButton(
minWidth: MediaQuery.of(context).size.width,
padding: EdgeInsets.fromLTRB(20.0, 15.0, 20.0, 15.0),
onPressed: () {},
child: Text("Login", textAlign: TextAlign.center, style: style.copyWith(color: Colors.white, fontWeight: FontWeight.bold)),
),
);
return Scaffold(
backgroundColor: Colors.grey,
body: SingleChildScrollView(
child: Center(
child: Container(
color: Colors.white,
child: Padding(
padding: const EdgeInsets.all(36.0),
child: Column(
crossAxisAlignment: CrossAxisAlignment.center,
mainAxisAlignment: MainAxisAlignment.center,
children: <Widget>[
SizedBox(
height: 155.0,
child: Image.asset(
"assets/logo.jpg",
fit: BoxFit.contain,
),
),
SizedBox(height: 45.0),
emailField,
SizedBox(height: 25.0),
passwordField,
SizedBox(
height: 35.0,
),
loginButon,
SizedBox(
height: 15.0,
),
],
),
),
),
),
));
}
}
|
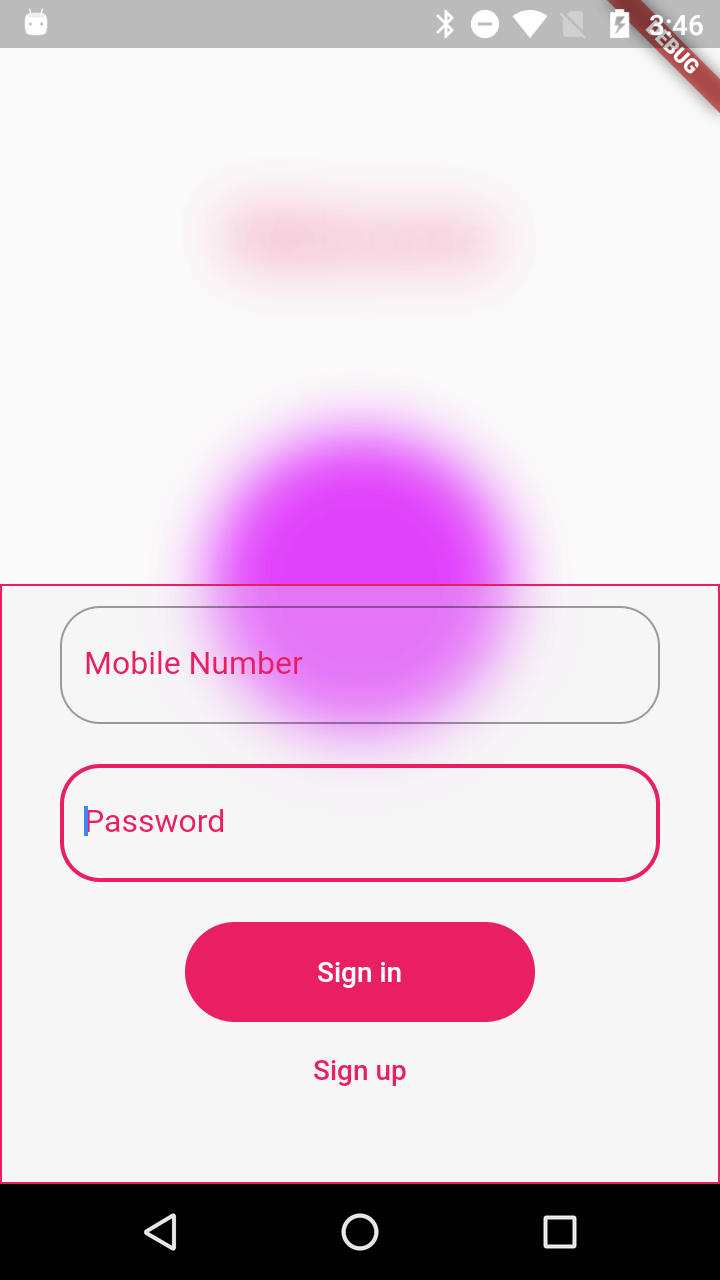
Flutter Login Page Example with FrostedGlass background.
To add FrostedGlass effect to the background of any page we will use BackdropFilter
|
BackdropFilter( |
Complete code for Login Page with FrostedGlass background
import 'package:flutter/material.dart';
import 'dart:ui' as dartUI;
class FrostedGlass extends StatefulWidget {
  @override
  FrostedGlassState createState() => FrostedGlassState();
}

class FrostedGlassState extends State {

  Align buildTitle(BuildContext context) {
    return Align(
      alignment: Alignment.topCenter,
      child: Padding(
        padding: const EdgeInsets.only(top: 100.0),
        child: Text('Welcome', style: TextStyle(fontSize: 32.0, color: Theme
            .of(context)
            .primaryColor,),),
      ),
    );
  }

  Align buildCircle() {
    return Align(
      alignment: Alignment.bottomCenter,
      child: Padding(
        padding: const EdgeInsets.only(bottom: 225.0),
        child: Container(
          height: 150.0,
          width: 150.0,
          decoration: BoxDecoration(
            shape: BoxShape.circle,
            color: Colors.purpleAccent,
          ),
        ),
      ),
    );
  }

  Align buildFrostedGlass() {
    return Align(
      alignment: Alignment.bottomCenter,
      child: Container(
        child: BackdropFilter(
          filter: dartUI.ImageFilter.blur(sigmaX: 15.0, sigmaY: 15.0),
          child: Container(
            height: 300.0,
            width: double.infinity,
            decoration: BoxDecoration(
              color: Colors.grey.shade200.withOpacity(0.3),
              border: Border.all(color: Colors.pink,width: 1)
            ),
            child: Align(
              alignment: Alignment.bottomCenter,
              child: Container(

                child: Column(
                  children: [
                    Container(
                      width: 300,
                      margin: EdgeInsets.all(10),
                      child: TextField(
                        decoration: InputDecoration(
                        hintText: "Mobile Number",
                        labelStyle: TextStyle(color: Colors.pink),
                        hintStyle: TextStyle(
                          color: Colors.pink
                        ),
                        border: OutlineInputBorder(
                          borderRadius: BorderRadius.circular(20),
                        )
                      ),),
                    ),
                    Container(
                      width: 300,
                      margin: EdgeInsets.all(10),
                      child: TextField(
                        decoration: InputDecoration(
                            hintText: "Password",
                            labelStyle: TextStyle(color: Colors.pink),
                            hintStyle: TextStyle(
                                color: Colors.pink
                            ),
                            border: OutlineInputBorder(
                              borderRadius: BorderRadius.circular(20),
                            )
                        ),),
                    ),
                    SizedBox(height: 10,),
                    buildButton()
                  ],
                ),
              ),
            ),
          ),
        ),
      ),
    );
  }

  Column buildButton() {
    final theme = Theme.of(context);
    return Column(
      children: [
        SizedBox(
          width: 175.0,
          height: 50.0,
          child: FlatButton(
              onPressed: () {},
              color: theme.primaryColor,
              shape: RoundedRectangleBorder(borderRadius: BorderRadius.circular(30.0)),
              child: Text('Sign in', style: theme.primaryTextTheme.button,)
          ),
        ),
        FlatButton(
            onPressed: () {},
            shape: RoundedRectangleBorder(borderRadius: BorderRadius.circular(30.0)),
            child: Text('Sign up', style: TextStyle(color: theme.primaryColor),)
        )
      ],
    );
  }

  @override
  Widget build(BuildContext context) {
    return Scaffold(
      body: Stack(
        children: [
          buildTitle(context),
          buildCircle(),
          buildFrostedGlass(),
        ],
      ),
    );
  }
}
|
void main() => runApp(MyApp());

class MyApp extends StatelessWidget{
  @override
  Widget build(BuildContext context) {
    // TODO: implement build
    return MaterialApp(
      theme: ThemeData(
        primaryColor: Colors.pink
      ),
      home: FrostedGlass(),
    );
  }

}
|
Conclusion: In this post we covered create a Flutter Login page UI and How to create a FrostedGlass background for the UI pages.
|
Article Contributed By :
|
|

|
|
|
2001 Views |
|