


In this example we are going to learn how to use snackbar and create Custom Snackbar in Android.
Step 1 − Create a new project in Android Studio, go to File ⇒ New Project and fill all required details to create a new project.
Step 2 − Add the following code to activity_sanckbar.xml
<?xml version="1.0" encoding="utf-8"?>
<RelativeLayout xmlns:android="https://schemas.android.com/apk/res/android"
                xmlns:tools="https://schemas.android.com/tools"
                android:layout_width="match_parent"
                android:layout_height="match_parent"
                tools:context=".MainActivity">

    <Button
            android:id="@+id/callbackButton"
            android:layout_width="wrap_content"
            android:layout_height="wrap_content"
            android:layout_centerInParent="true"
          android:background="@color/colorPrimary"
            android:textColor="@color/white"
            android:ems="8"
            android:textAllCaps="false"
            android:layout_marginTop="16sp"
            android:text="Click To Display SnackBar"
            android:textStyle="bold"
            android:textSize="18sp"/>
</RelativeLayout>
|
Step 3 – Update build.gradle(Module app)
implementation "com.google.android.material:material:1.1.0-alpha06"
|
Step 4 − Add the following code to SanckbarActivity.kt
import androidx.appcompat.app.AppCompatActivity
import android.os.Bundle
import android.graphics.Color
import android.view.View
import android.widget.TextView
import com.google.android.material.snackbar.Snackbar
import kotlinx.android.synthetic.main.activity_sanckbar.*
import android.widget.FrameLayout
import androidx.coordinatorlayout.widget.CoordinatorLayout
class SanckbarActivity : AppCompatActivity() {
override fun onCreate(savedInstanceState: Bundle?) {
super.onCreate(savedInstanceState)
setContentView(com.rrtutors.androidsamples.R.layout.activity_sanckbar)
callbackButton.setOnClickListener(object : View.OnClickListener {
override fun onClick(v: View) {
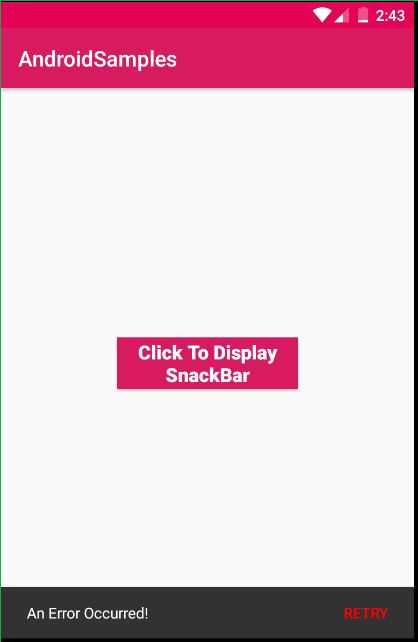
val snackBar = Snackbar.make(v, "An Error Occurred!", Snackbar.LENGTH_LONG)
.setAction("RETRY", object : View.OnClickListener{
override fun onClick(view: View) {}
})
snackBar.setActionTextColor(Color.RED)
val snackBarView = snackBar.getView()
val textView = snackBarView.findViewById<TextView>(com.google.android.material.R.id.snackbar_text)
textView.setTextColor(Color.WHITE)
snackBar.show()
}
})
}
} |
Step 5: Let's run the application
How to create custom Snackbar?
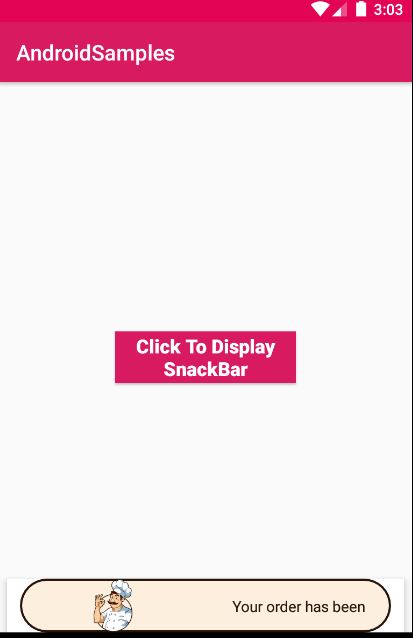
create layout snackbar_layout.xml and update below code
<?xml version="1.0" encoding="utf-8"?>
<LinearLayout xmlns:android="https://schemas.android.com/apk/res/android"
              android:orientation="horizontal"
              android:gravity="center_vertical"
              android:layout_width="match_parent"
              android:background="@drawable/background_chef_message"
               xmlns:app="https://schemas.android.com/apk/res-auto"
               android:layout_height="wrap_content">
    <ImageView
                android:id="@+id/chef_image"
                android:layout_width="wrap_content"
                android:layout_height="wrap_content"
                android:scaleType="centerInside"
                app:layout_constraintBottom_toBottomOf="parent"
                app:layout_constraintLeft_toLeftOf="parent"
                app:layout_constraintStart_toStartOf="parent"
                app:srcCompat="@drawable/img_chef"/>

        <TextView
                android:id="@+id/message"
                android:layout_width="wrap_content"
                android:layout_height="wrap_content"
android:layout_weight="1"
                android:gravity="center"
                android:padding="16dp"
                android:text="Your order has been placed!"
                android:textColor="#28140c"
               />


</LinearLayout>
|
Function to Custom Snackbar
private fun showSnackbar( duration: Int): Snackbar { // Create the Snackbar
    val snackbar = Snackbar.make(root, "", duration)
    // 15 is margin from all the sides for snackbar
    val marginFromSides = 15

    val height = 100f

    //inflate view
    val snackView = layoutInflater.inflate(com.rrtutors.androidsamples.R.layout.snackbar_layout, null)

    // White background
    snackbar.view.setBackgroundColor(Color.WHITE)
    // for rounded edges
    //snackbar.view.background = resources.getDrawable(com.rrtutors.androidsamples.R.drawable.round_edges)

    val snackBarView = snackbar.view as Snackbar.SnackbarLayout
    val parentParams = snackBarView.layoutParams as FrameLayout.LayoutParams
    parentParams.setMargins(marginFromSides, 0, marginFromSides, marginFromSides)
    parentParams.height = height.toInt()
    parentParams.width = FrameLayout.LayoutParams.MATCH_PARENT
    snackBarView.layoutParams = parentParams

    snackBarView.addView(snackView, 0)
    return snackbar
}
|
|
Article Contributed By :
|
|

|
|
|
850 Views |
|