


Now a days every mobile application will do updates and push their apps to play store or app store often, but the users doesn't n know about this update on the fly, to inform the app users about their app update we will send push notifications to the user. There are many ways to send notifications to the user, in this flutter example we will learn how to implement firebase push notifications service in flutter app
What we will cover
 |
Using this Flutter Plugin we can use the Firebase Cloud Messaging Service (FCM) and also add Firebase core plugin to handle other firebase related events.
Open pubspec.yaml file and under dependencies: line add this
|
dependencies: firebase_core: ^1.11.0 firebase_messaging: ^11.2.5
flutter_local_notifications: ^9.2.0
|
Open Firebase Console
1. Add / Create Project :
Give a name to your firebase project as “Firebase-Push-Notification”, Just fill all the common required details for creating the firebase project.
2. Add firebase to your android application
Then, After successful creating firebase project, you will see an Add app with list of platform where you can integrate firebase eg : android, iOS, web, unity3D.
Select Android platform
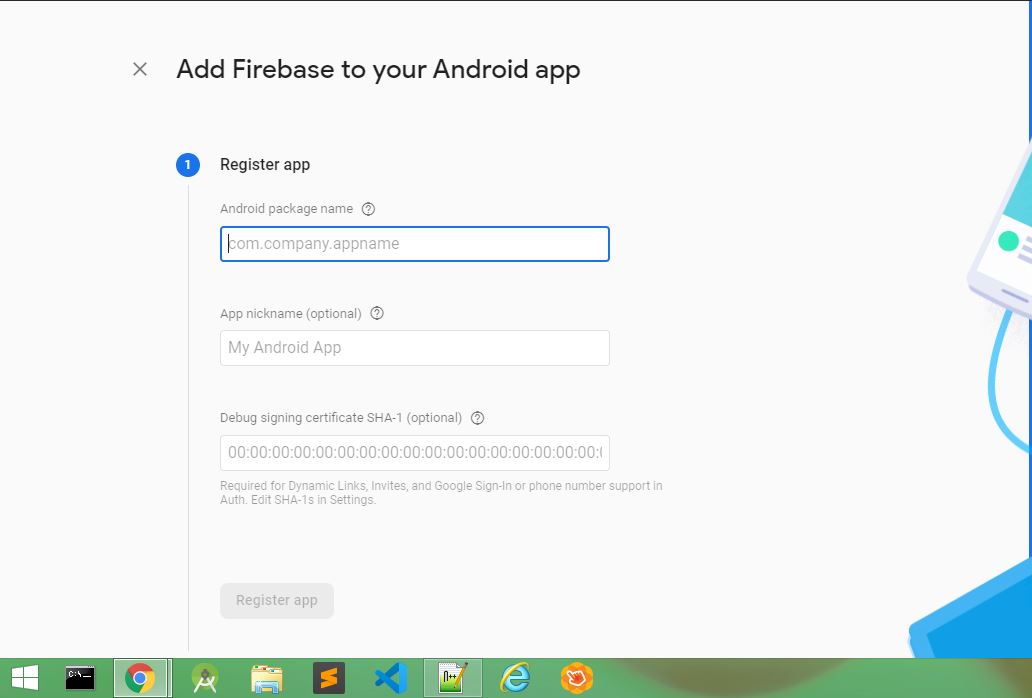
3. Register app with android package name
Came back to IDE (Android Studio) Navigate towards Androidmanifest.xml file to get android package name
Flutter Project > Android > app > src > main > AndroidManifest.xml
Under this manifest file you will find package name copy it and paste it into firebase console as below screenshot
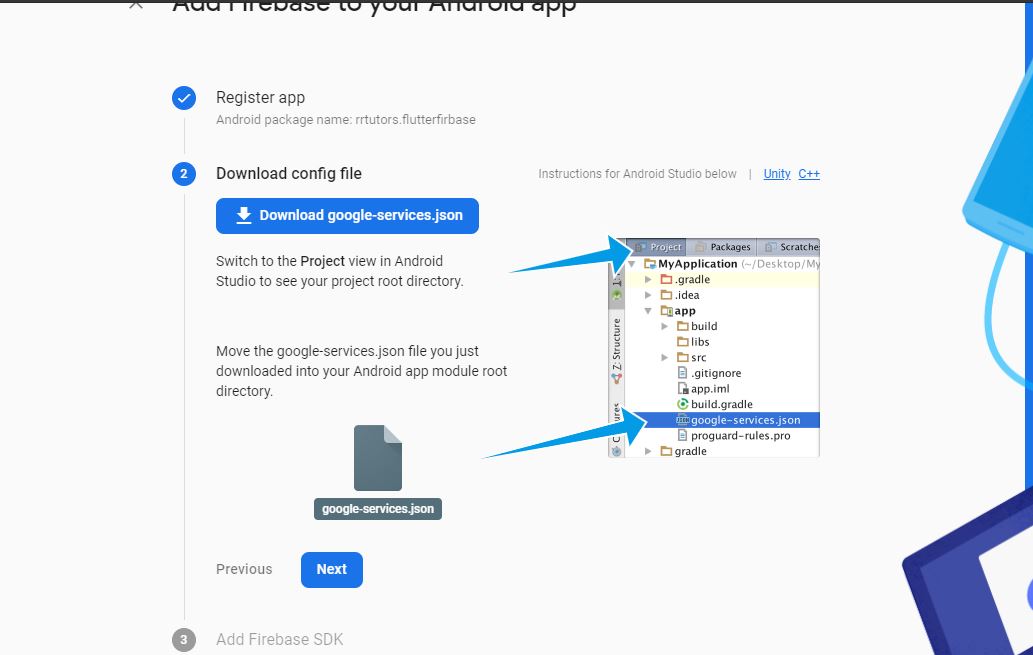
Download the firebase google-services.json file and paste it in your flutter project in android section
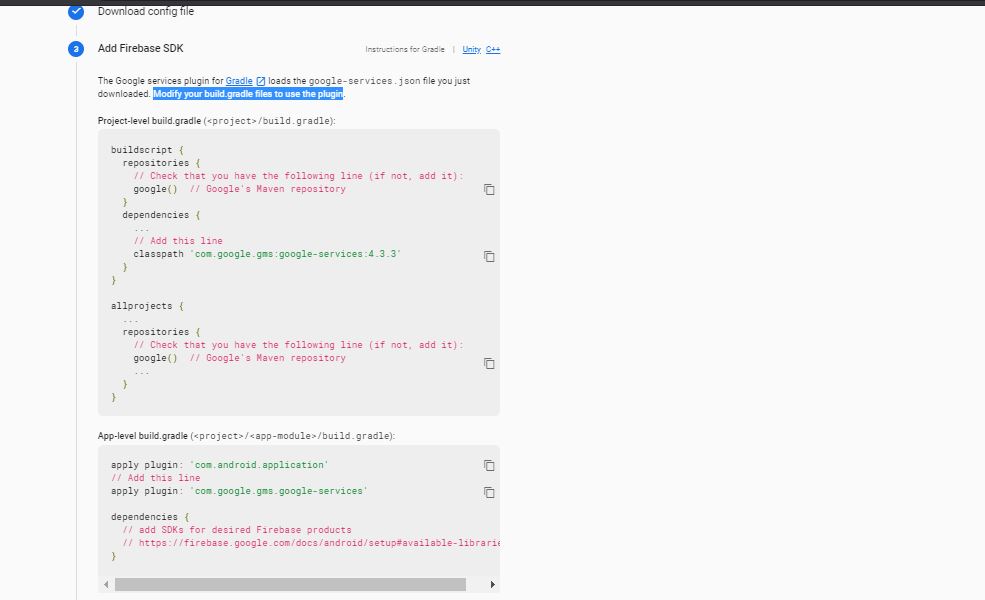
Open build-gradle ( project level )
futter project > Android > build-gradle(project level)
buildscript {
    repositories {
        google() // add this if not there
        jcenter()
    }

    dependencies {

        classpath 'com.google.gms:google-services:4.3.3' //add here line
    }
}
|
Note: check if google() repositories is added, if not then add it
Then, open build-gradle(app level)
project > Android > app > build-gradle
|
apply plugin: 'com.android.application' apply plugin: 'com.google.gms.google-services' // add the plugin on top or at the bottom og build-gradle (app-level) |
Open AndroidManifest.xml file and add the intent-filter
project > Android > app > main > AndroidManifest.xml
|
<intent-filter> <action android:name="FLUTTER_NOTIFICATION_CLICK" /> <category android:name="android.intent.category.DEFAULT" /> </intent-filter> |
Step 5: Add Notification icons in Android manifest file
<meta-data android:name="com.google.firebase.messaging.default_notification_icon" android:resource="@drawable/notification" /> <meta-data android:name="com.google.firebase.messaging.default_notification_color" android:resource="@color/colorPrimary" /> |
Step 6: Initialize Firebase Message inside flutter application
await Firebase.initializeApp(); Future<void> _firebaseMessagingBackgroundHandler(RemoteMessage message) async { // If you're going to use other Firebase services in the background, such as Firestore, // make sure you call `initializeApp` before using other Firebase services. await Firebase.initializeApp(options: FirebaseOptions( appId: 'ADD_APP_ID', apiKey: 'API_KEY', projectId: 'PROJECT_ID', messagingSenderId: '', ));//For ios add ios app id which we can get from firebase console } /// Create a [AndroidNotificationChannel] for heads up notifications late AndroidNotificationChannel channel; /// Initialize the [FlutterLocalNotificationsPlugin] package. late FlutterLocalNotificationsPlugin flutterLocalNotificationsPlugin; FirebaseMessaging.onBackgroundMessage(_firebaseMessagingBackgroundHandler); |
Add Notification Channel settings specific to android
if (!kIsWeb) { channel = const AndroidNotificationChannel( 'notification_channel_id', // id 'Notification Title', // title importance: Importance.high, ); flutterLocalNotificationsPlugin = FlutterLocalNotificationsPlugin(); /// Create an Android Notification Channel. /// /// We use this channel in the `AndroidManifest.xml` file to override the /// default FCM channel to enable heads up notifications. await flutterLocalNotificationsPlugin .resolvePlatformSpecificImplementation< AndroidFlutterLocalNotificationsPlugin>() ?.createNotificationChannel(channel); /// Update the iOS foreground notification presentation options to allow /// heads up notifications. await FirebaseMessaging.instance .setForegroundNotificationPresentationOptions( alert: true, badge: true, sound: true, ); } |
Now we are done with setting the firebase message to our flutter application,
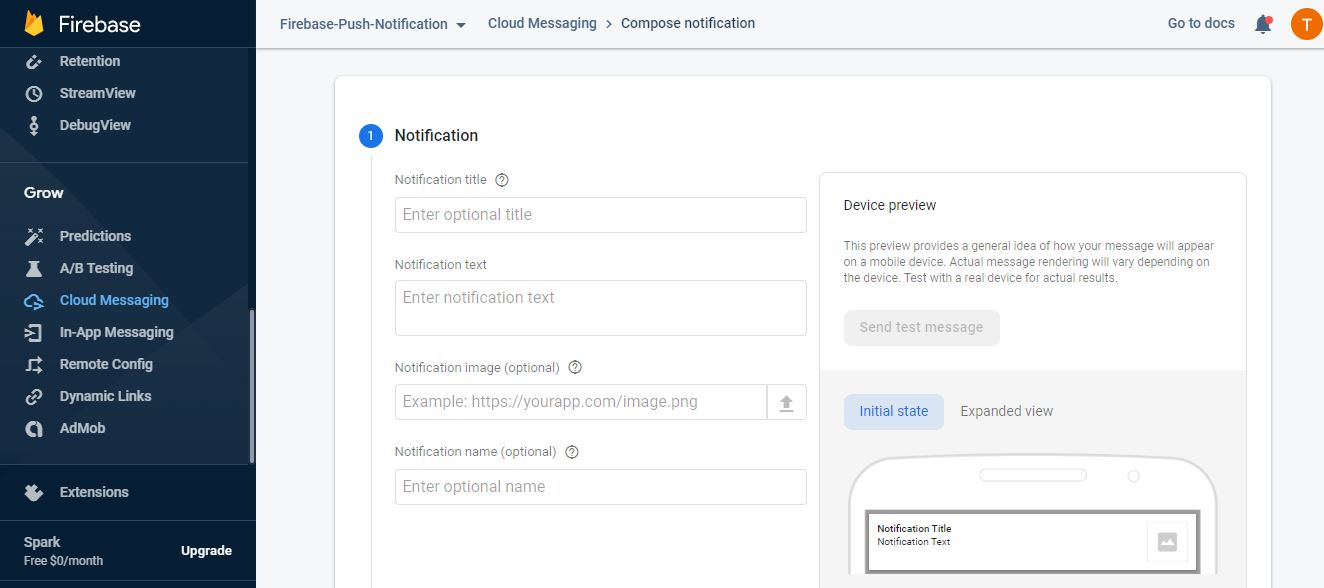
Go to firebase console to send push notification to your flutter project application.
On the left navigation bar Grow > Cloud Messaging
Click on send your first message
Now when we send notification from the firebase console we will not seen that in notification bar, to display notifications when we receve messages we need to add below code
FirebaseMessaging.onMessage.listen((RemoteMessage message) { RemoteNotification? notification = message.notification; AndroidNotification? android = message.notification?.android; if (notification != null && android != null && !kIsWeb) { FlutterLocalNotificationsPlugin().show( notification.hashCode, notification.title, notification.body, NotificationDetails( android: AndroidNotificationDetails( "tutorialspoint_notification", "Tutorialspoint Online", channelDescription: "", // TODO add a proper drawable resource to android, for now using // one that already exists in example app. icon: 'notification', ), ), ); } }); |
This method will trigger when we received notification from firebase and create notification and display it on Status Bar.
 |
Complete source code for Flutter Firebase Push Notification feature
import 'package:firebase_core/firebase_core.dart'; import 'package:firebase_messaging/firebase_messaging.dart'; import 'package:flutter/foundation.dart'; import 'package:flutter/material.dart'; import 'package:flutter_local_notifications/flutter_local_notifications.dart'; void main() async { WidgetsFlutterBinding.ensureInitialized(); await Firebase.initializeApp(); Future<void> _firebaseMessagingBackgroundHandler(RemoteMessage message) async { // If you're going to use other Firebase services in the background, such as Firestore, // make sure you call `initializeApp` before using other Firebase services. await Firebase.initializeApp(options: FirebaseOptions( appId: 'Add APP_IS', apiKey: 'ADD API_KEY', projectId: 'ADD_PROJECT_ID', messagingSenderId: '', )); } /// Create a [AndroidNotificationChannel] for heads up notifications late AndroidNotificationChannel channel; /// Initialize the [FlutterLocalNotificationsPlugin] package. late FlutterLocalNotificationsPlugin flutterLocalNotificationsPlugin; FirebaseMessaging.onBackgroundMessage(_firebaseMessagingBackgroundHandler); if (!kIsWeb) { channel = const AndroidNotificationChannel( 'tutorialspoint_notification', // id 'Tutorialspoint Online', // title importance: Importance.high, ); flutterLocalNotificationsPlugin = FlutterLocalNotificationsPlugin(); /// Create an Android Notification Channel. /// /// We use this channel in the `AndroidManifest.xml` file to override the /// default FCM channel to enable heads up notifications. await flutterLocalNotificationsPlugin .resolvePlatformSpecificImplementation< AndroidFlutterLocalNotificationsPlugin>() ?.createNotificationChannel(channel); /// Update the iOS foreground notification presentation options to allow /// heads up notifications. await FirebaseMessaging.instance .setForegroundNotificationPresentationOptions( alert: true, badge: true, sound: true, ); } runApp(const MyApp()); } class MyApp extends StatelessWidget { const MyApp({Key? key}) : super(key: key); // This widget is the root of your application. @override Widget build(BuildContext context) { FirebaseMessaging.onMessage.listen((RemoteMessage message) { RemoteNotification? notification = message.notification; AndroidNotification? android = message.notification?.android; if (notification != null && android != null && !kIsWeb) { FlutterLocalNotificationsPlugin().show( notification.hashCode, notification.title, notification.body, NotificationDetails( android: AndroidNotificationDetails( "tutorialspoint_notification", "Tutorialspoint Online", channelDescription: "", // TODO add a proper drawable resource to android, for now using // one that already exists in example app. icon: 'notification', ), ), ); } }); return MaterialApp( title: 'Flutter Demo', theme: ThemeData( // This is the theme of your application. // // Try running your application with "flutter run". You'll see the // application has a blue toolbar. Then, without quitting the app, try // changing the primarySwatch below to Colors.green and then invoke // "hot reload" (press "r" in the console where you ran "flutter run", // or simply save your changes to "hot reload" in a Flutter IDE). // Notice that the counter didn't reset back to zero; the application // is not restarted. primarySwatch: Colors.blue, ), home: const MyHomePage(title: 'Flutter Demo Home Page'), ); } } class MyHomePage extends StatefulWidget { const MyHomePage({Key? key, required this.title}) : super(key: key); // This widget is the home page of your application. It is stateful, meaning // that it has a State object (defined below) that contains fields that affect // how it looks. // This class is the configuration for the state. It holds the values (in this // case the title) provided by the parent (in this case the App widget) and // used by the build method of the State. Fields in a Widget subclass are // always marked "final". final String title; @override State<MyHomePage> createState() => _MyHomePageState(); } class _MyHomePageState extends State<MyHomePage> { int _counter = 0; void _incrementCounter() { setState(() { // This call to setState tells the Flutter framework that something has // changed in this State, which causes it to rerun the build method below // so that the display can reflect the updated values. If we changed // _counter without calling setState(), then the build method would not be // called again, and so nothing would appear to happen. _counter++; }); } @override Widget build(BuildContext context) { // This method is rerun every time setState is called, for instance as done // by the _incrementCounter method above. // // The Flutter framework has been optimized to make rerunning build methods // fast, so that you can just rebuild anything that needs updating rather // than having to individually change instances of widgets. return Scaffold( appBar: AppBar( // Here we take the value from the MyHomePage object that was created by // the App.build method, and use it to set our appbar title. title: Text(widget.title), ), body: Center( // Center is a layout widget. It takes a single child and positions it // in the middle of the parent. child: Column( // Column is also a layout widget. It takes a list of children and // arranges them vertically. By default, it sizes itself to fit its // children horizontally, and tries to be as tall as its parent. // // Invoke "debug painting" (press "p" in the console, choose the // "Toggle Debug Paint" action from the Flutter Inspector in Android // Studio, or the "Toggle Debug Paint" command in Visual Studio Code) // to see the wireframe for each widget. // // Column has various properties to control how it sizes itself and // how it positions its children. Here we use mainAxisAlignment to // center the children vertically; the main axis here is the vertical // axis because Columns are vertical (the cross axis would be // horizontal). mainAxisAlignment: MainAxisAlignment.center, children: <Widget>[ const Text( 'You have pushed the button this many times:', ), Text( '$_counter', style: Theme.of(context).textTheme.headline4, ), ], ), ), floatingActionButton: FloatingActionButton( onPressed: _incrementCounter, tooltip: 'Increment', child: const Icon(Icons.add), ), // This trailing comma makes auto-formatting nicer for build methods. ); } } |
Now How to Open Particular Screen on Clicking on Push Notification in flutter?
We already implemented receive push notification from firebase, now when we click on that notification we need to navigate to specific screen.
To do this feature when we send notification from firebase console add required payload data to the notification message and handle that data when we open the notification from the status bar
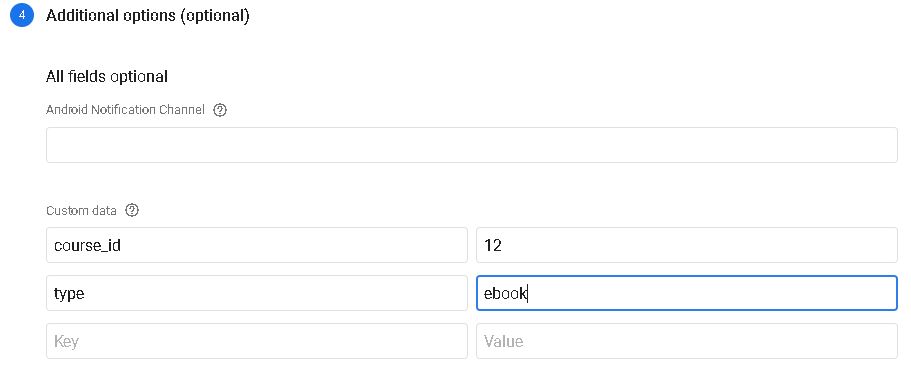 |
FirebaseMessaging.onMessageOpenedApp.listen((RemoteMessage message) {
  Log.d("Printing on Message Notification click");
  message.data.keys.forEach((element) {
    Log.d("Printing on Message Notification click keys ${element}");
  });
  if (message != null) {
    if(message.data.isNotEmpty)
      {
        String course_id=message.data['course_id'] as String;
        String type=message.data['type'] as String;


      }
    Navigator.of(context).pushNamedAndRemoveUntil(
      AppRoutes.landing,
          (Route<dynamic> route) => false,
    );
  }
});
|
Now based on your requirement condition navigate to specific screen inside your flutter application.
Conclusion: In this Flutter Firebase tutorial we have implemented Firebase Message in flutter application and display notification when we receive notification from Firebase.
|
Article Contributed By :
|
|

|
|
|
3901 Views |
|