Linear Layout is a simple layout used in Android applications.
In the Linear Layout All the elements are displayed in linear manners, that means all the child items will be arranged in vertical or horizontal manner.
This arrangement can be defined by one of its property orientation.
The values of orientation will be decides how to display its child elements
Types of Linear Layout Orientations
In Android Linear Layout we have two orientations
Horizontal
Vertical
This orientation defines how to display its child items one by one in horizontal line or vetical line.
We can set this orientation in two ways
- By XML layout property
- By Programmatically
By XML layout property
Vertical orientation
|
<LinearLayout xmlns:android="http://schemas.android.com/apk/res/android"
android:layout_width="fill_parent"
android:layout_height="wrap_content"
android:orientation="vertical"> <!-- Vertical Orientation set -->
<!-- Child Views(In this case 2 Button) are here -->
<Button
android:layout_width="wrap_content"
android:layout_height="wrap_content"
android:text="Button1"
android:id="@+id/button"
android:textColor="#FFF"
android:background="@color/purple_500" />
<Button
android:layout_width="wrap_content"
android:layout_height="wrap_content"
android:text="Button2"
android:id="@+id/button2"
android:textColor="#FFF"
android:background="@color/teal_700" />
</LinearLayout>
|
The above layout will display items in Vertical line
Horizontal
|
<?xml version="1.0" encoding="utf-8"?>
<LinearLayout xmlns:android="http://schemas.android.com/apk/res/android"
android:layout_width="fill_parent"
android:layout_height="wrap_content"
android:orientation="horizontal"> <!-- Vertical Orientation set -->
<!-- Child Views(In this case 2 Button) are here -->
<Button
android:layout_width="wrap_content"
android:layout_height="wrap_content"
android:text="Button1"
android:id="@+id/button"
android:textColor="#FFF"
android:background="@color/purple_500" />
<Button
android:layout_width="wrap_content"
android:layout_height="wrap_content"
android:text="Button2"
android:id="@+id/button2"
android:textColor="#FFF"
android:background="@color/teal_700" />
</LinearLayout>
|
The above code will display the layout child items in Horizontal line

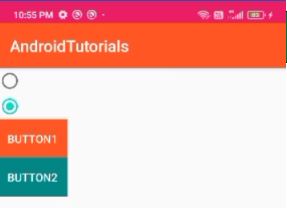
How to set Orientation Programmatically in Android?
we can set Orienation of Linear Layout programmatically by below code
|
set Horizontal Orientation
linearlayout.orientation=LinearLayout.HORIZONTAL
set Vertical Orientation
linearlayout.orientation=LinearLayout.VERTICAL
|
Example
Kotlin Activity class
|
class LinearLayout : AppCompatActivity() {
override fun onCreate(savedInstanceState: Bundle?) {
super.onCreate(savedInstanceState)
setContentView(R.layout.activity_linear_layout)
radio_group.setOnCheckedChangeListener(RadioGroup.OnCheckedChangeListener { radioGroup, i ->
when(i)
{
R.id.radio_horizontal->{
linearlayout.orientation=LinearLayout.HORIZONTAL
}
R.id.radio_vertical->{
linearlayout.orientation=LinearLayout.VERTICAL
}
}
})
}
}
|
|
<?xml version="1.0" encoding="utf-8"?>
<LinearLayout xmlns:android="http://schemas.android.com/apk/res/android"
android:layout_width="fill_parent"
android:layout_height="wrap_content"
android:id="@+id/linearlayout"
> <!-- Vertical Orientation set -->
<!-- Child Views(In this case 2 Button) are here -->
<RadioGroup
android:id="@+id/radio_group"
android:layout_width="wrap_content"
android:layout_height="wrap_content">
<RadioButton
android:id="@+id/radio_horizontal"
android:layout_width="wrap_content"
android:checked="true"
android:layout_height="wrap_content"
/>
<RadioButton
android:id="@+id/radio_vertical"
android:layout_width="wrap_content"
android:layout_height="wrap_content"
/>
</RadioGroup>
<Button
android:layout_width="wrap_content"
android:layout_height="wrap_content"
android:text="Button1"
android:id="@+id/button"
android:textColor="#FFF"
android:background="@color/purple_500" />
<Button
android:layout_width="wrap_content"
android:layout_height="wrap_content"
android:text="Button2"
android:id="@+id/button2"
android:textColor="#FFF"
android:background="@color/teal_700" />
</LinearLayout>
|
Linear Layout Main Properties
Now we will read all about main properties of Linear Layout which will useful while arrange its child widgets.
Orientation
This property will use to arrange child items in Vertical/Horizontal direction
Linear Layout default orientaion is "Vertical"
Gravity
This property will use to arrange the child item position like
left,right,center,top etc...
|
<LinearLayout xmlns:android="http://schemas.android.com/apk/res/android"
android:layout_width="match_parent"
android:layout_height="match_parent"
android:gravity="right"
android:orientation="horizontal">
<!--Button Child View Here--->
<Button
android:layout_width="wrap_content"
android:layout_height="wrap_content"
android:text="Button1"
android:id="@+id/button"
android:textColor="#FFF"
android:background="@color/purple_500" />
<Button
android:layout_width="wrap_content"
android:layout_height="wrap_content"
android:text="Button2"
android:id="@+id/button2"
android:textColor="#FFF"
android:background="@color/teal_700" />
</LinearLayout>
|
layout_weight
The weight property will set the portion of child widget to take place

weightSum
weightSum is the sum up of all its child widget weight properties. This property is required if we define weight property of the child widgets
Linear Layout without Weight property example
Linear Layout without weight property
|
<!-- Vertical Orientation is set -->
<LinearLayout xmlns:android="http://schemas.android.com/apk/res/android"
android:layout_width="match_parent"
android:layout_height="match_parent"
android:orientation="vertical">
<!-- Text Displayed At Top -->
<TextView
android:layout_width="wrap_content"
android:layout_height="wrap_content"
android:textAppearance="?android:attr/textAppearanceLarge"
android:text="Linear Layout (Without Weight)"
android:id="@+id/textView"
android:layout_gravity="center_horizontal" />
<!-- Button Used -->
<Button
android:layout_width="fill_parent"
android:layout_height="wrap_content"
android:text="Button 1"
android:background="@color/purple_200" />
<Button
android:layout_width="fill_parent"
android:layout_height="wrap_content"
android:text="Button 2"
android:background="@color/purple_900" />
<Button
android:layout_width="fill_parent"
android:layout_height="wrap_content"
android:text="Button 3"
android:background="@color/purple_500" />
<Button
android:layout_width="fill_parent"
android:layout_height="wrap_content"
android:text="Button 4"
android:background="@color/purple_700" />
</LinearLayout>
|
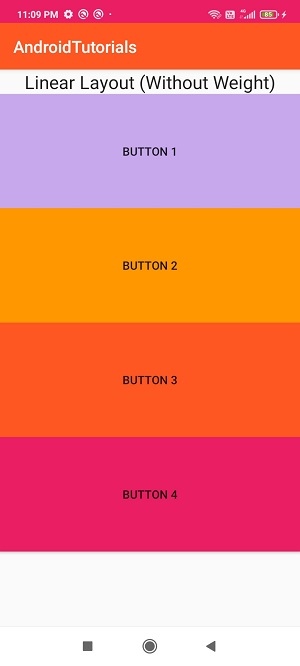
With Weight Property
|
<!-- Vertical Orientation is set -->
<LinearLayout xmlns:android="http://schemas.android.com/apk/res/android"
android:layout_width="match_parent"
android:layout_height="match_parent"
android:weightSum="5"
android:orientation="vertical">
<!-- Text Displayed At Top -->
<TextView
android:layout_width="wrap_content"
android:layout_height="wrap_content"
android:layout_weight="0"
android:textAppearance="?android:attr/textAppearanceLarge"
android:text="Linear Layout (Without Weight)"
android:id="@+id/textView"
android:layout_gravity="center_horizontal" />
<!-- Button Used -->
<Button
android:layout_width="fill_parent"
android:layout_height="wrap_content"
android:text="Button 1"
android:layout_weight="1"
android:background="@color/purple_200" />
<Button
android:layout_width="fill_parent"
android:layout_height="wrap_content"
android:text="Button 2"
android:layout_weight="1"
android:background="@color/purple_900" />
<Button
android:layout_width="fill_parent"
android:layout_height="wrap_content"
android:text="Button 3"
android:layout_weight="1"
android:background="@color/purple_500" />
<Button
android:layout_width="fill_parent"
android:layout_height="wrap_content"
android:text="Button 4"
android:layout_weight="1"
android:background="@color/purple_700" />
</LinearLayout>
|
Set Linear Layout Properties programmatically
linearLayout.gravity=Gravity.CENTER
linearLayout.orientation=LinearLayout.HORIZONTAL
linearLayout.weightSum=5.0f
linearLayout.layoutParams= ViewGroup.LayoutParams(100,100) |
Conclusion: In this post we learn how use Linear layout in android application and its properties. how to set Linear Layout Properties Programmaticaly in Android with Kotlin.