Android - Drag and Drop with Kotlin Example
The Android drag and drop framework allows us to use graphical drag and drop gestures to move data from one view to another within the current layout. Starting from API 11, drag and drop views onto other views or viewgroups is supported. The framework includes the following three important components to support drag and drop functionality −
- Drag event class.
- Drag listeners.
- Helper methods and classes.
Drag and drop process in Android Graphical Layout
There are basically four steps or states in the drag and drop process −
Started - Occurs when you start dragging an item in the layout, and your application calls the startDrag() method to tell the system to start dragging. The parameters in the startDrag() method provide the data to be dragged, metadata for this data, and a callback to draw the drag shadow.
The system first responds by calling back to your application to obtain the drag shadow. It then shows the drag shadow on the device.
Next, the system sends a drag event with action type ACTION_DRAG_STARTED to the registered drag event listeners of all View objects in the current layout.
To continue receiving drag events, including possible drag events, the drag event listener must return true. If the drag event listener returns false, the system will not receive the current operation until the system sends a drag event of type action drag event
Continuing - The user continues dragging. The system sends an ACTION_DRAG_ENTERED action followed by an ACTION_DRAG_LOCATION action to the registered drag event listeners of the view the drag point entered. A listener can choose to change the appearance of its View object in response to the event, or it can react by highlighting its View.
Drag event listeners receive an ACTION_DRAG_EXITED action after the user moves the drag shadow outside the view's bounding box.
Dropped - The user drops the dragged item within the view's bounding box. The system sends a drag event with action type ACTION_DROP to the listener of the View object.
Ended - After an action of type ACTION_DROP, the system emits a drag event of action type ACTION_DRAG_ENDED to indicate the end of the drag operation
Android DragEvent Class
DragEvent represents events emitted by the system at various times during a drag-and-drop operation. This class provides some constants and important methods that we use during drag and drop
The following are the constant values which provided by DragEvent class to handle the different dra actions
ACTION_DRAG_STARTED : Signals the start of a drag and drop operation.
ACTION_DRAG_ENTERED : Signals to a View that the drag point has entered the bounding box of the View
ACTION_DRAG_LOCATION : Sent to a View after ACTION_DRAG_ENTERED if the drag shadow is still within the View object's bounding box
ACTION_DRAG_EXITED : Signals that the user has moved the drag shadow outside the bounding box of the View
ACTION_DROP : Signals to a View that the user has released the drag shadow, and the drag point is within the bounding box of the View
ACTION_DRAG_ENDED : Signals to a View that the drag and drop operation has concluded
DragEvent Methods
int getAction() : Inspect the action value of this event
ClipData getClipData() : Returns the ClipData object sent to the system as part of the call to startDrag()
ClipDescription getClipDescription() : Returns the ClipDescription object contained in the ClipData
boolean getResult() : Returns an indication of the result of the drag and drop operation
float getX() : Gets the X coordinate of the drag point
float getY() : Gets the Y coordinate of the drag point
String toString() : Returns a string representation of this DragEvent object
Drag Event Listener and Call-back Method
In android, a View object receives drag events from a drag event listener that implements View.OnDragListener or its onDragEvent(DragEvent) callback method. When the system calls a method or listener, it is passed the DragEvent object. We can use both listeners and callback methods on View objects, but in most cases, listeners are preferable. If we use both methods and listeners, first the system calls the listener, and then defines the callback method whenever the listener returns true. The combination of onDragEvent(DragEvent) method and View.OnDragListener is similar to the combination of onTouchEvent() and View.OnTouchListener for touch events
To perform Drag and Drop Feature on Android views below steps will easily understand the process
Starting a Drag Event
In android, if we want to start a drag event we willl use the drag gesture of the view, usually a long press on View object, to do this we need to follow the below things
First we need to create a ClipData and ClipData.item for the data(views) that is being moved. As a part of the ClipData object, we need to send metadata that is stored in a ClipDescription object within the ClipData. For a drag and drop operation that does not represent data movement, we may need to use null instead of an actual object.
In the next process, we need to use View.DragShadowBuilder(View) to create a drag shadow for the the View objects that are being moved. The View.DragShadowBuilder will create a default drag shadow that’s the same size as the View argument passed to it. In case, if we want to customize the drag shadow, then we need to extend the View.DragShadowBuilder functionality based on our requirements
Responding to a Drag Start Event
While doing the drag operation, the system emits drag events to the drag event listeners of View objects in the current UI. The listeners should react by calling getAction() to get the action type. When the drag start, the getAction() method returns ACTION_DRAG_STARTED
Handling an Events during the Drag
During the drag, listeners primarily use drag events such as ACTION_DRAG_ENTERED, ACTION_DRAG_LOCATION, ACTION_DRAG_EXITED, etc. to decide whether to change the appearance of the View to indicate that it is about to receive a drop.
Responding to a Drop Event
Whenever we release a drag shadow on the View that accepts a content being dragged, the system dispatches a drag event to that View with action type ACTION_DROP and the listener will do the following things
Let create a simple Drag and Drop events example with kotlin example
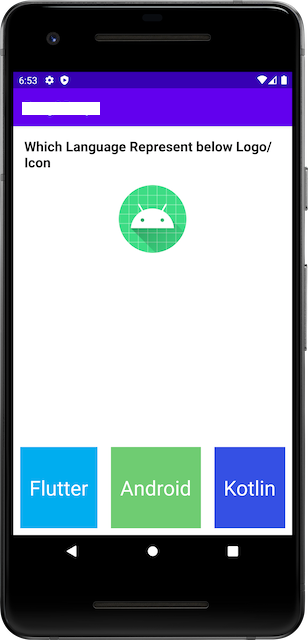
In this Android Drog and Drop example there will be a question and 3 options will be there which related to question, so use should drag his question view and drop it on respected answer view box.
The UI look like below
 |
Let get started
Step 1: Lanch and Studio and Create a Empty Activity Tempalte project
Step 2: Open activity xml file and add below code
<?xml version="1.0" encoding="utf-8"?>
<LinearLayout xmlns:android="http://schemas.android.com/apk/res/android"
    android:layout_width="match_parent"
    android:layout_height="match_parent"
    android:orientation="vertical">
    <LinearLayout android:id="@+id/layout1"
        android:layout_width="match_parent"
        android:layout_margin="16dp"
        android:layout_height="wrap_content"

        android:gravity="center"
        android:orientation="vertical">
        <TextView android:id="@+id/txt_qtn"
            android:layout_width="wrap_content"
            android:textColor="@color/black"
            android:textStyle="bold"
            android:layout_height="wrap_content"
            android:text="Which Language Represent below Logo/Icon"
            android:textSize="20sp" />
        <ImageView android:id="@+id/img"
            android:layout_margin="20dp"
            android:layout_width="wrap_content"
            android:layout_height="wrap_content"
            android:minHeight="100dp"

            android:minWidth="100dp"
            android:src="@mipmap/ic_launcher" />

    </LinearLayout>

    <TextView
        android:id="@+id/txt_answer"
        android:layout_width="match_parent"
        android:layout_height="wrap_content"
        android:text=""
        android:gravity="center"
        android:textSize="40dp"
        />
    <LinearLayout
        android:layout_width="match_parent"
        android:layout_weight="1"
        android:gravity="bottom"
        android:layout_height="match_parent">
        <LinearLayout android:id="@+id/option1"
            android:layout_width="wrap_content"
            android:layout_height="120dp"
            android:background="#00ADEF"
            android:gravity="center"
            android:layout_margin="10dp"
            android:layout_weight="1"
            android:orientation="vertical" >
            <TextView
                android:layout_width="wrap_content"
                android:layout_height="wrap_content"
                android:text="Flutter"
                android:textColor="@color/white"
                android:textSize="30dp"
                />
        </LinearLayout>
        <LinearLayout android:id="@+id/option2"
            android:layout_width="wrap_content"
            android:layout_height="120dp"
            android:layout_weight="1"
            android:background="#6FCC72"
            android:layout_margin="10dp"
            android:gravity="center"
            android:orientation="vertical" >
            <TextView
                android:layout_width="wrap_content"
                android:layout_height="wrap_content"
                android:text="Android"
                android:textColor="@color/white"
                android:textSize="30dp"
                />
        </LinearLayout>
        <LinearLayout android:id="@+id/option3"
            android:layout_width="wrap_content"
            android:layout_height="120dp"
            android:layout_weight="1"
            android:background="#3550E4"
            android:layout_margin="10dp"
            android:gravity="center"
            android:orientation="vertical" >
            <TextView
                android:layout_width="wrap_content"
                android:layout_height="wrap_content"
                android:text="Kotlin"
                android:textColor="@color/white"
                android:textSize="30dp"
                />
        </LinearLayout>
    </LinearLayout>

</LinearLayout>
|
Step 3: In this android example we are using the ViewBinding feature, to enable ViewBinding in the application open app level gradle file and add below code under android part
buildFeatures{
    viewBinding{
        enable true
    }
}
|
Step 4: Now access views inside activity file and implement the Drag and Drop feature
So our activity file will be like below
package com.example.drogdrop
import android.content.ClipData
import android.content.ClipData.Item
import android.content.ClipDescription
import android.graphics.Color
import android.graphics.PorterDuff
import android.os.Bundle
import android.util.Log
import android.view.DragEvent
import android.view.View
import android.view.View.DragShadowBuilder
import android.view.View.OnDragListener
import android.view.ViewGroup
import android.widget.LinearLayout
import android.widget.Toast
import androidx.appcompat.app.AppCompatActivity
import com.example.drogdrop.databinding.ActivityMainBinding
class MainActivity : AppCompatActivity(),OnDragListener {
lateinit var binder:ActivityMainBinding;
override fun onCreate(savedInstanceState: Bundle?) {
super.onCreate(savedInstanceState)
binder=ActivityMainBinding.inflate(layoutInflater)
setContentView(binder.root)
initUI()
}
fun initUI(){
binder.img.tag="1"
binder.img.setOnLongClickListener { v->
val item = Item(v.tag as CharSequence)
val mimeTypes = arrayOf(ClipDescription.MIMETYPE_TEXT_PLAIN)
val data = ClipData(v.tag.toString(), mimeTypes, item)
val dragshadow = DragShadowBuilder(v)
v.startDragAndDrop(
data // data to be dragged
, dragshadow // drag shadow builder
, v // local data about the drag and drop operation
, 0 // flags (not currently used, set to 0)
)
true
}
binder.option1.setOnDragListener(this)
binder.option2.setOnDragListener(this)
binder.option3.setOnDragListener(this)
}
override fun onDrag(v: View?, event: DragEvent?): Boolean {
val action = event!!.action
// Handles each of the expected events
when (action) {
DragEvent.ACTION_DRAG_STARTED -> {
// Determines if this View can accept the dragged data
return if (event!!.clipDescription.hasMimeType(ClipDescription.MIMETYPE_TEXT_PLAIN)) {
// if you want to apply color when drag started to your view you can uncomment below lines
// to give any color tint to the View to indicate that it can accept data.
// v.getBackground().setColorFilter(Color.BLUE, PorterDuff.Mode.SRC_IN);
// Invalidate the view to force a redraw in the new tint
// v.invalidate();
// returns true to indicate that the View can accept the dragged data.
true
} else false
// Returns false. During the current drag and drop operation, this View will
// not receive events again until ACTION_DRAG_ENDED is sent.
}
DragEvent.ACTION_DRAG_ENTERED -> {
// Applies a GRAY or any color tint to the View. Return true; the return value is ignored.
v!!.background.setColorFilter(Color.GRAY, PorterDuff.Mode.SRC_IN)
// Invalidate the view to force a redraw in the new tint
v!!.invalidate()
return true
}
DragEvent.ACTION_DRAG_LOCATION -> // Ignore the event
return true
DragEvent.ACTION_DRAG_EXITED -> {
// Re-sets the color tint to blue. Returns true; the return value is ignored.
// view.getBackground().setColorFilter(Color.BLUE, PorterDuff.Mode.SRC_IN);
//It will clear a color filter .
v!!.background.clearColorFilter()
// Invalidate the view to force a redraw in the new tint
v!!.invalidate()
return true
}
DragEvent.ACTION_DROP -> {
// Gets the item containing the dragged data
val item = event!!.clipData.getItemAt(0)
// Gets the text data from the item.
val dragData = item.text.toString()
// Displays a message containing the dragged data.
Toast.makeText(this, "", Toast.LENGTH_SHORT).show()
// Turns off any color tints
v!!.background.clearColorFilter()
// Invalidates the view to force a redraw
v!!.invalidate()
val vw = event!!.localState as View
val owner = vw.parent as ViewGroup
owner.removeView(vw) //remove the dragged view
//caste the view into LinearLayout as our drag acceptable layout is LinearLayout
val container = v as LinearLayout
container.addView(vw) //Add the dragged view
vw.visibility = View.VISIBLE //finally set Visibility to VISIBLE
// Returns true. DragEvent.getResult() will return true.
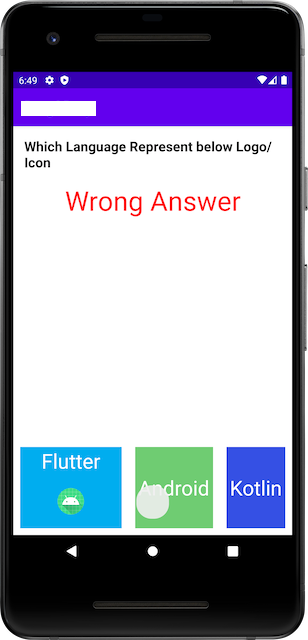
if(v.id==R.id.option1||v.id==R.id.option3) {
binder.txtAnswer.text = "Wrong Answer"
binder.txtAnswer.setTextColor(Color.RED)
}
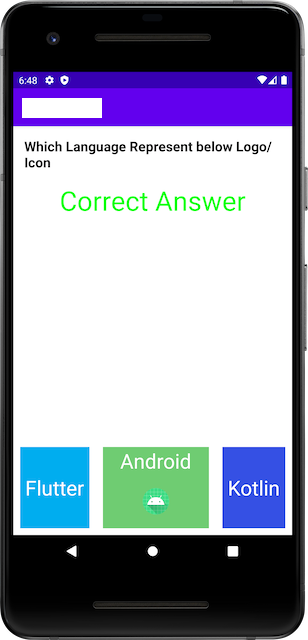
else if(v.id==R.id.option2) {
binder.txtAnswer.text = "Correct Answer"
binder.txtAnswer.setTextColor(Color.GREEN)
}
return true
}
DragEvent.ACTION_DRAG_ENDED -> {
// Turns off any color tinting
v!!.background.clearColorFilter()
// Invalidates the view to force a redraw
v!!.invalidate()
// Does a getResult(), and displays what happened.
if (event!!.result) Toast.makeText(
this,
"",
Toast.LENGTH_SHORT
).show() else Toast.makeText(this, "", Toast.LENGTH_SHORT)
.show()
// returns true; the value is ignored.
return true
}
else -> Log.e("DragDrop Example", "Unknown action type received by OnDragListener.")
}
return false
}
}
|
Step 5: Now run on the application on real device/emulator and you can do the drog and drop events
 |
 |