Java is a programming language that's used to install and run programs.
To check the version of Java in our Computer we have below ways.
- Java Verification page
- Using Command Prompt (Windows)
- Using the Java Control Panel
- Check Java with the Windows Start menu
- For Mac
Java Verification page
The simplest way is to use the Java Verification page.
- Access the Java Verification Page.
- Click on the Verify Java version.
- Click the Agree and Continue button.
- Select Run to continue.
- The page will display the Java version currently installed along with the latest version available.
- Download the recommended update.
- Restart the browser once the installation process is completed.
- Reopen your browser and enable Java.
- To successfully use this method, you need to make sure that:
- Your browser supports NPAPI plug-ins.
- Your browser version is compatible with Java
Using Command Prompt (Windows)
- Open the Command Prompt.
- Insert the following code: java -version.
- The output will highlight the Java version installed on your Windows device
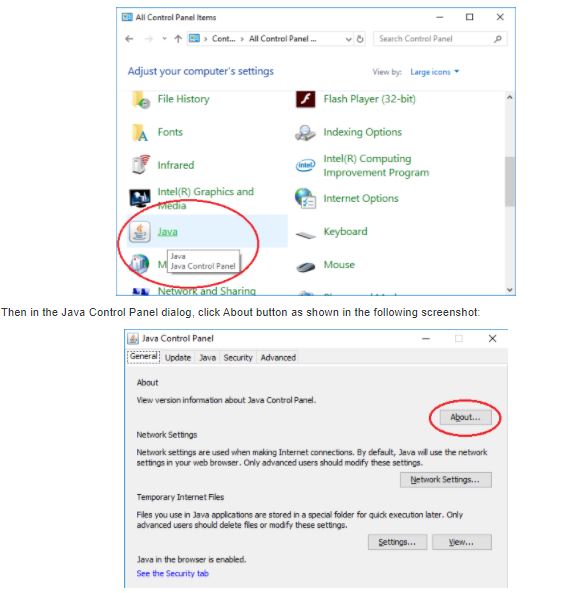
Using the Java Control Panel (for Windows)
- Navigate to the Java folder.
- Choose Configure Java to open the Java Control Panel window.
- In the General tab, click the About button.
- The About Java window will appear and display your Java version
Check Java with the Windows Start menu
- Open the Windows Start menu.
- Select Programs.
- Find the Java program.
- Click About Java to learn which Java version you are using
For Mac
- Select the Apple icon on the upper left side of the screen.
- Navigate to System Preferences.
- Click on the Java icon to launch the Java Control Panel.
- In the General tab in the Java Control Panel, you should find About. Click on it to see the version you are using
What is the Difference between Path and ClassPath in java?
Convert given time in String format to seconds
Can we declare the main () method as final in Java?
How to Create Objects in Java?
Can we define a static constructor in Java?
Memory Allocation in Java
How to create a table in Java with JDBC Connection?
What is a Class/Static Variables?
What is Method Overloading in Java ?
What is the difference between JDK and JRE?
Can we declare a static variable within a method in java?
What are the important features of Java 8?
Can we declare the main method as private in Java?
Can we overload the main method in Java?
What is Instance variable?
How to check Java version?