Flutter Social Auth Buttons (Google, Facebook, Twitter)
Integrate social auth buttons in Flutter for seamless login with Google, Facebook, and more. Learn to implement them step by step. Visit rrtutors.com.
Last updated Mar 01, 2020
In this post, we are going to learn the Flutter Authenticating button widget library containing popular social networks such as Google, Facebook, Twitter, and Microsoft
Let's Start
Step 1: Create Flutter application
Step 2: Add dependencies
Add flutter_auth_buttons: ^0.6.0 plugin in pubspec.yaml file
|
dev_dependencies: |
Step 3: Create dart file and add below code
import 'package:flutter/material.dart';
import 'package:flutter_auth_buttons/flutter_auth_buttons.dart';
class SocialButtons extends StatelessWidget {
@override
Widget build(BuildContext context) {
return MaterialApp(
title: 'Button Demo',
home: Scaffold(
appBar: AppBar(
backgroundColor: Colors.pinkAccent,
title: Text("Social Auth Buttons"),
),
backgroundColor: Color.fromARGB(0xFF, 0xF0, 0xF0, 0xF0),
body: Center(
child: SingleChildScrollView(
child: Column(
children: [
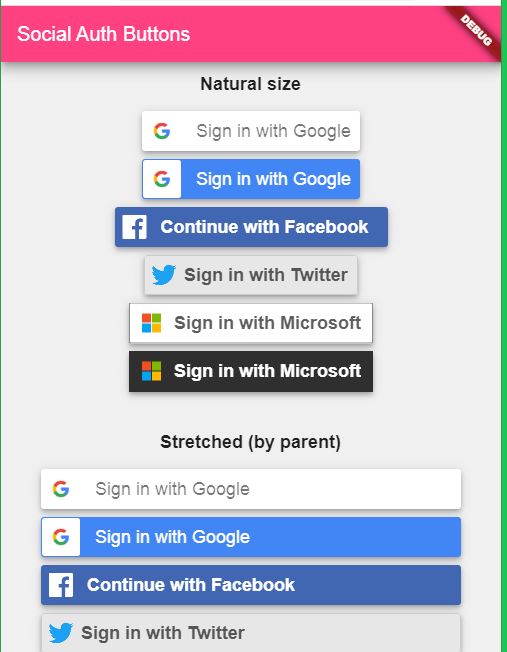
Heading("Natural size"),
Column(
children: [
GoogleSignInButton(onPressed: () {}),
GoogleSignInButton(onPressed: () {}, darkMode: true),
FacebookSignInButton(onPressed: () {}),
TwitterSignInButton(onPressed: () {}),
MicrosoftSignInButton(onPressed: () {}),
MicrosoftSignInButton(onPressed: () {}, darkMode: true),
],
),
SizedBox(height: 25.0),
Heading("Stretched (by parent)"),
Padding(
padding: const EdgeInsets.symmetric(horizontal: 40.0),
child: Column(
crossAxisAlignment: CrossAxisAlignment.stretch,
children: [
GoogleSignInButton(onPressed: () {}),
GoogleSignInButton(onPressed: () {}, darkMode: true),
FacebookSignInButton(onPressed: () {}),
TwitterSignInButton(onPressed: () {}),
MicrosoftSignInButton(onPressed: () {}),
MicrosoftSignInButton(onPressed: () {}, darkMode: true),
],
),
),
],
),
),
),
),
);
}
}
class Heading extends StatelessWidget {
final String text;
Heading(this.text);
@override
Widget build(BuildContext context) {
return Padding(
padding: const EdgeInsets.only(top: 12.0, bottom: 12.0),
child: Text(
text,
style: TextStyle(
fontSize: 18.0,
fontWeight: FontWeight.bold,
),
),
);
}
}
|
Step 4: Update main dart file
void main() => runApp(MyApp());

class MyApp extends StatelessWidget{
  @override
  Widget build(BuildContext context) {
    // TODO: implement build
    return MaterialApp(
      theme: ThemeData(
        primaryColor: Colors.pink
      ),
      home: SocialButtons(),
    );
  }

}
|
Step 5: Run application
We can add different styles for each button
|
this.darkMode = false, |