Flutter Range slider - How to Create Range seekbar in Flutter Application
In this flutter example we will learn how to create range seekbar in flutter application. we know that Slider is a widget where we can set a value by dragging a desired position
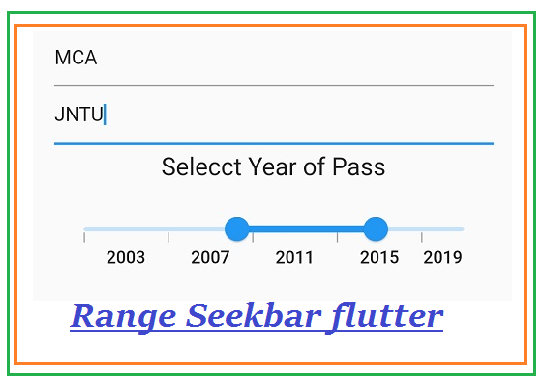
In this flutter example we will learn how to create range seekbar in flutter application. we know that Slider is a widget where we can set a value by dragging a desired position. where as aa range slider is similar to slider where we can set max and min value by dragging the widget. We will use this rang sliders for selecting the dates between like when we will fill the online form for accademic where we will option to select the completion of accademic year, to select this year we will use range slider.
In this flutter example to create range slider we will use syncfusion_flutter_sliders widget.
Let's get started
Step 1: create a flutter application
Step 2: Add required dependencies to pubspec.yaml file
dev_dependencies:
  flutter_test:
    sdk: flutter
  syncfusion_flutter_sliders: ^19.1.67-beta
|
Step 3: Now we need to create a form which contains a year selection, for this we will use SfRangeSelector widget
Constructor
SfRangeSelector(
    {Key? key,
    this.min = 0.0,
    this.max = 1.0,
    this.initialValues,
    this.onChanged,
    this.controller,
    this.enabled = true,
    this.interval,
    this.stepSize,
    this.stepDuration,
    this.deferredUpdateDelay = 500,
    this.minorTicksPerInterval = 0,
    this.showTicks = false,
    this.showLabels = false,
    this.showDivisors = false,
    this.enableTooltip = false,
    this.enableIntervalSelection = false,
    this.enableDeferredUpdate = false,
    this.dragMode = SliderDragMode.onThumb,
    this.inactiveColor,
    this.activeColor,
    this.labelPlacement = LabelPlacement.onTicks,
    this.numberFormat,
    this.dateFormat,
    this.dateIntervalType,
    this.labelFormatterCallback,
    this.tooltipTextFormatterCallback,
    this.semanticFormatterCallback,
    this.trackShape = const SfTrackShape(),
    this.divisorShape = const SfDivisorShape(),
    this.overlayShape = const SfOverlayShape(),
    this.thumbShape = const SfThumbShape(),
    this.tickShape = const SfTickShape(),
    this.minorTickShape = const SfMinorTickShape(),
    this.tooltipShape = const SfRectangularTooltipShape(),
    this.startThumbIcon,
    this.endThumbIcon,
    required this.child})
|
This widget has properties to like min, max to set the minimum and maximum values for the range values. It also has protperty like set initial values to the range. initialValues
To track the selected range values we will use the onChanged() method
onChanged: (r){

}
|
Our complete code will be looks like below
import 'package:flutter/services.dart';
import 'package:syncfusion_flutter_sliders/sliders.dart';

import 'package:intl/intl.dart';
import 'package:flutter/material.dart';
import 'package:flutter/rendering.dart';

void main() {
  return runApp(RangeSelectorApp());
}

/// This widget will be the root of application.
class RangeSelectorApp extends StatelessWidget {
  @override
  Widget build(BuildContext context) {
    return const MaterialApp(
      title: 'Range Selector Demo',
      home: MyHomePage(),
    );
  }
}

/// This widget is the home page of the application.
class MyHomePage extends StatefulWidget {
  /// Initialize the instance of the [MyHomePage] class.
  const MyHomePage({Key? key}) : super(key: key);

  @override
  _MyHomePageState createState() => _MyHomePageState();
}

class _MyHomePageState extends State<MyHomePage> {
  _MyHomePageState();


  final DateTime _dateMin = DateTime(2003);
  final DateTime _dateMax = DateTime(2021);
  final SfRangeValues _dateValues =
  SfRangeValues(DateTime(2008), DateTime(2011));
  TextEditingController _editControllerOne=new TextEditingController();
  TextEditingController _editControllerTwo=new TextEditingController();

  @override
  Widget build(BuildContext context) {
    return Scaffold(
      appBar: AppBar(
        title: const Text('Syncfusion Flutter Range Selector'),
      ),
      body: Container(
          margin: const EdgeInsets.all(10),
          padding: const EdgeInsets.all(8),
          child: Column(
            children: [
              TextField(
                controller: _editControllerOne,
          keyboardType: TextInputType.text
                ,decoration: InputDecoration(
                hintText: ("Enter Higher Qwalification")
              ),),
              TextField(
                controller: _editControllerTwo,
                keyboardType: TextInputType.text,
                decoration: InputDecoration(

                  hintText: ("Enter University Name")
              ),),
              Container(padding: EdgeInsets.all(8),child: Text("Selecct Year of Pass",style: TextStyle(fontSize: 20),textDirection: ,)),
              Stack(
                children: <Widget>[
                  Padding(
                    padding: const EdgeInsets.only(top: 10),
                    child: Center(
                      // ignore: missing_required_param
                      child: SfRangeSelector(
                        onChanged: (r){

                        },
                        min: _dateMin,
                        max: _dateMax,
                        initialValues: _dateValues,
                        labelPlacement: LabelPlacement.betweenTicks,
                        interval: 1,
                        dateIntervalType: DateIntervalType.years,
                        dateFormat: DateFormat.y(),
                        showTicks: true,
                        showLabels: true,
                        child: Container(
                          child: Container(),

                        ),
                      ),
                    ),
                  ),
                ],
              ),
            ],
          )),
    );
  }
}

/// Storing the spline series data points.
class Data {
  /// Initialize the instance of the [Data] class.
  Data({required this.x, required this.y});

  /// Spline series x points.
  final DateTime x;

  /// Spline series y points.
  final double y;
}
|
Step 4: Run application
 |