Flutter IDE configuration and use
Flutter officially recommends using one of Android Studio and VS Code for a better development experience. Flutter officially provides these two editor plug-ins. Through the IDE and the plug-in, you can obtain functions such as code completion, syntax highlighting, widget editing assistance, running and debugging support, which can help us greatly improve development efficiency. Let's introduce the configuration and use of Android Studio and VS Code respectively (readers of Android Studio and VS Code can get the latest installation on their official website, because the installation is relatively simple, so I won't go into details).
1. Android Studio configuration and use
Since Android Studio is developed based on IntelliJ IDEA, readers can also use IntelliJ IDEA.
1) Install the Flutter and Dart plugins
Two plugins need to be installed:
FlutterPlugin: Supports Flutter development workflow (running, debugging, hot reloading, etc.).DartPlugin: Provides code analysis (validation when typing code, code completion, etc.).
installation steps:
- Start Android Studio.
- Open the Plugins preferences (macOS: Preferences>Plugins , Windows: File>Settings>Plugins ).
- Select Browse repositories... , select the flutter plugin and click
install. - The plugin takes effect after restarting Android Studio.
Next, let's create a Flutter project with Android Studio, run it, and experience "hot reloading".
2) Create a Flutter application
- Choose File > New Flutter Project .
- Select Flutter application as the project type, and click Next.
- Enter a project name (such as
myapp) and click Next. - Click Finish .
- Wait for Android Studio to install the SDK and create the project.
The above command creates a Flutter project named myapp, which contains a component using Material (opens new window)A simple demo application for .
In the project directory, where your application's code resides lib/main.dart.
3) Run the application
-
Navigate to the Android Studio toolbar, as shown in Figure 1-2:

-
In the target selector , select an Android device to run the application on. If it is not listed available, select Tools>Android>AVD Manager and create one there.
-
Click the Run icon in the toolbar .
-
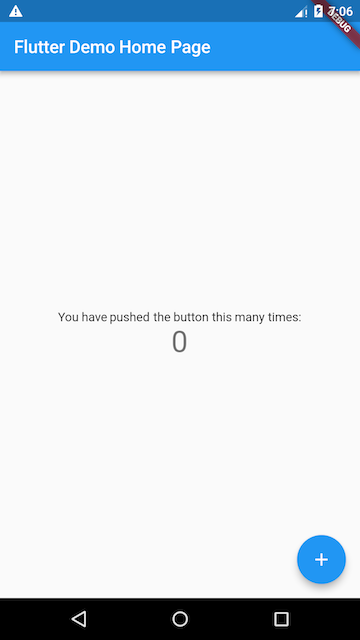
If all goes well, you should see the application launched on your device or emulator, as shown in Figure 1-3:
4) Experience hot reloading
Flutter can achieve fast development cycles through hot reload, which means that modified code can be loaded in real time without restarting the application without losing state. Simply make changes to the code, then tell the IDE or command-line tool that you need to reload (click the reload button), and you'll see the changes on your device or emulator.
-
open
lib/main.dartfile -
'You have pushed the button this many times:'Change the string to'You have clicked the button this many times:' -
Do not press the "Stop" button; let your app continue to run.
-
To review changes, call Save (
cmd-s/ctrl-s), or hit the Hot Reload button (the one with the lightning ⚡️ icon).You will immediately see the updated string in the running application.
2. Configuration and use of VS Code
VS Code is a lightweight editor that supports Flutter running and debugging.
1) Install the flutter plugin
- Start VS Code.
- Call View>Command Palette... .
- Type 'install', then select the Extensions: Install Extension action.
- Enter in the search box
flutter, select 'Flutter' in the search result list, and click Install . - Select 'OK' to restart VS Code.
- Verify configuration
- Invoke View>Command Palette...
- Type 'doctor', then select the 'Flutter: Run Flutter Doctor' action.
- Check the output in the OUTPUT window for problems
2) Create a Flutter application
- Start VS Code
- Invoke View>Command Palette...
- Type 'flutter', then select the 'Flutter: New Project' action
- Enter a Project name (such as
myapp), and press Enter - Specify where to drop the item and press the blue OK button
- Wait for the project creation to continue and display the main.dart file
3) Experience hot reloading
- Open the
lib/main.dartfile. 'You have pushed the button this many times:'Change the string to'You have clicked the button this many times:'.- Do not press the "Stop" button; let your app continue to run.
- To see your changes, call Save (
cmd-s/ctrl-s), or click the Hot Reload button (the green circular arrow button).
You will immediately see the updated string in the running application.
1.3.3 Connect the device to run the Flutter application
Windows only supports building and running Flutter applications for Android devices, while macOS supports both iOS and Android devices. The following describes how to connect Android and iOS devices to run flutter applications.
1. Connect to the Android emulator
To prepare to run and test your Flutter app on the Android emulator, follow these steps:
-
Start Android Studio>Tools>Android>AVD Manager and select Create Virtual Device .
-
Choose a device and choose Next .
-
Select one or more system images for the Android version to emulate, then select Next . An x86 or x86_64 image is recommended.
-
Under "Emulated Performance", select Hardware - GLES 2.0 to enable hardware acceleration (opens new window).
-
Verify that the AVD configuration is correct, then choose Finish .
For details on the steps above, see Managing AVDs (opens new window).
-
In "Android Virtual Device Manager", click Run on the toolbar . The emulator starts and displays the splash screen for the selected OS version or device.
-
Run
flutter runStarts your device. The name of the connected device isAndroid SDK built for <platform>, where platform is the chip family, such as x86.
2. Connect Android real device
To prepare to run and test a Flutter app on an Android device, an Android device with Android 4.1 (API level 16) or higher is required.
- Enable developer options and USB debugging on your Android device . Detailed instructions are available in the Android documentation (opens new window)found in .
- Plug your phone into your computer using USB. If the device displays a debugging authorization prompt, please authorize your computer to access the device.
- Run the
flutter devicescommand to verify that Flutter recognizes your connected Android device. - Run starts your application
flutter run.
By default, the Android SDK version used by Flutter is based on your adbtools version. If you want Flutter to use a different version of the Android SDK, you must set this ANDROID_HOMEenvironment variable to the corresponding SDK installation directory.
3. Connect to the iOS Simulator
To prepare your Flutter app to run and test on the iOS Simulator, follow these steps:
-
On your MAC, find the emulator via Spotlight or the following command:
open -a Simulator -
Make sure the simulator is using a 64-bit device (iPhone 5s or later) by checking the settings in the simulator's Hardware > Device menu.
-
Depending on the size of your computer screen, the simulated HD screen iOS device may overflow the screen. The device scale can be set under the emulator's Window > Scale menu.
-
run to
flutter runstart the flutter application.
4. Connect to iOS device
To install a Flutter app to a real iOS device, you need some extra tools, an Apple account, and some setup in Xcode.
-
install homebrew (opens new window) (Skip this step if brew is already installed).
-
Open a terminal and run these commands:
brew updatebrew install --HEAD libimobiledevicebrew install ideviceinstaller ios-deploy cocoapodspod setupIf any of these commands fail with an error, run brew doctor and follow the instructions to fix the problem.
-
Follow the Xcode signing process to configure your project:
-
In your Flutter project directory by
open ios/Runner.xcworkspaceopening the default Xcode workspace. -
In Xcode, select Projects in the left navigation pane
Runner. -
In the
Runnertarget settings page, make sure your development team is selected under General > Signing > Team . When you choose a team, Xcode creates and downloads a development certificate, registers your device with your account, and creates and downloads a provisioning profile (if needed). -
To start your first iOS development project, you may need to log in to Xcode with your Apple ID, as shown in Figure 1-4:
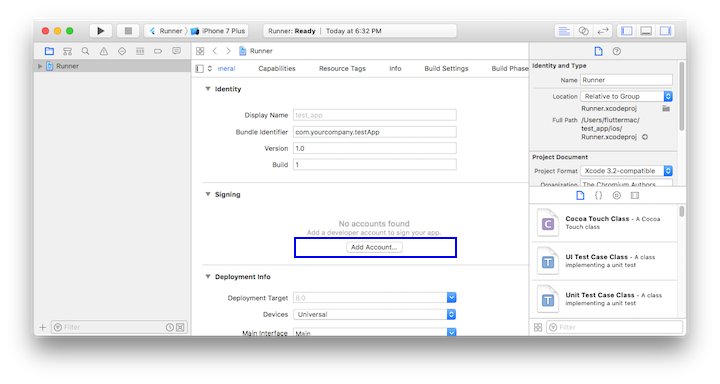
Any Apple ID supports development and testing, but if you want to distribute apps to the App Store, you must sign up for the Apple Developer Program. Readers can learn more about it.
-
When you attach a real device for iOS development for the first time, you need to trust both your Mac and the development certificate on the device. When connecting the iOS device to the Mac for the first time, please select in the dialog box
Trust, as shown in Figure 1-5: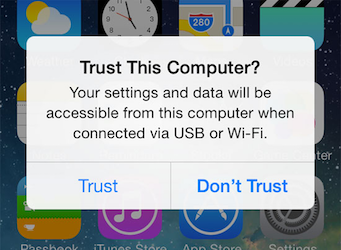
Then, go to the settings menu on your iOS device , select General > Device Management and trust your certificate.
-
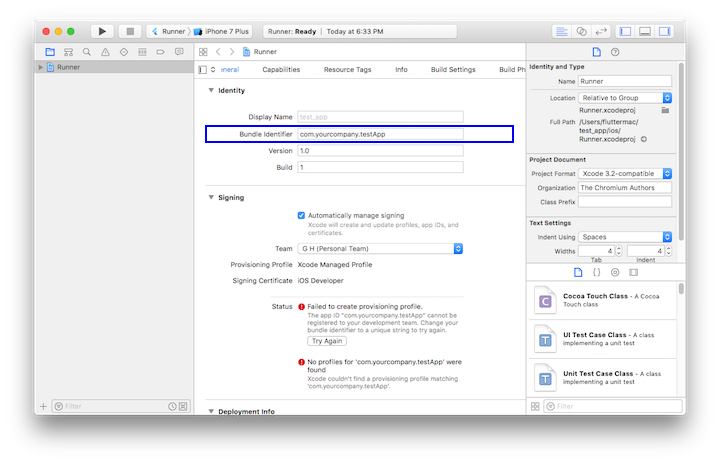
If automatic signing in Xcode fails, verify that the project's General > Identity > Bundle Identifier value is unique, as shown in Figure 1-6:
-
-
run to
flutter runstart the flutter application
-