How do u create Android Dropdown menu with jetpack compose
Jetpack Compose DropDownMenu, Create DropDownMenu with menu items, select choice from multiple options.
In this Jetpack compose tutorial we will cover how can we create a Dropdown menu with jetpack compose. Dropdown is a component which will show multiple options to choose one while selecting. Generally we will use this dropdown menu when we want to choose single value from the multiple items. let's say we have Form where use needs set his Gender (Male,Female,Transgender) from the options, in this scenario we can use dropdown menu to show three options.
A DropdownMenu behaves similarly to a Popup, and will use the position of the parent layout to position itself on screen
The Dropdown Menu construct with below properties
@Composable fun DropdownMenu( expanded: Boolean, onDismissRequest: () -> Unit, modifier: Modifier = Modifier, offset: DpOffset = DpOffset(0.dp, 0.dp), properties: PopupProperties = PopupProperties(focusable = true), content: @Composable ColumnScope.() -> Unit ) |
expanded - This property will used to expand or collapse the menu items
onDismissRequest - This will trigger when user wants to dismiss the menu, like when user tap on outside menu, menu will close and this event will trigger
offset - DpOffset to be added to the position of the menu
To display the Menu Items we will use the DropDownMenuItem component,
DropdownMenuItem(
    onClick: () -> Unit,
    modifier: Modifier = Modifier,
    enabled: Boolean = true,
    contentPadding: PaddingValues = MenuDefaults.DropdownMenuItemContentPadding,
    interactionSource: MutableInteractionSource = remember { MutableInteractionSource() },
    content: @Composable RowScope.() -> Unit
)
|
To handle selected menu item we can find by onClick property
onClick - Called when the menu item was clicked
Let's create a simple DropDownMenu with Jetpack compose
Step 1: Create android application in android studio
Step 2: Follow step for setup Jetpack Compose with Android Studio
Step 3: We will show the Menu items on button click event. So let's add Button and DropDownMenu to the screens.
To align vertically the Button and DropDownMenu we will put these two components inside Compose Column component. Read previous example about how to create Column Layout with Compose.
Column( modifier=Modifier .align(alignment = Alignment.Center) .padding(all=0.dp), ) { Button( modifier=Modifier.width(200.dp), border = BorderStroke(width = 1.dp,color = Color.Red), colors=ButtonDefaults.buttonColors(backgroundColor = Color.White), onClick = { },content = { Text(items[selectedIndex.value]) }) DropdownMenu( expanded = expanded.value, onDismissRequest = { expanded.value = false }, modifier = Modifier.background( Color.White, ) .border(BorderStroke(width = 1.dp,color = Color.Red)) .shadow(elevation = 2.dp) .width(200.dp), ) { } } } |
we added a border to the button by border property.
|
border = BorderStroke(width = 1.dp,color = Color.Red), |
Now Create menu items and add to the DropDownMenu
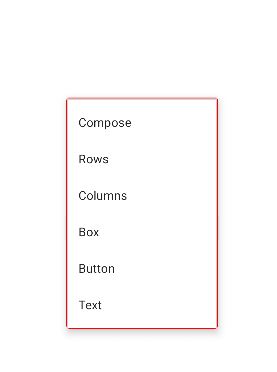
val items = listOf("Compose", "Rows", "Columns", "Box", "Button", "Text")
DropdownMenu(

    expanded = expanded.value,
    onDismissRequest = { expanded.value = false },
    modifier = Modifier.background( Color.White, )
        .border(BorderStroke(width = 1.dp,color = Color.Red))
        .shadow(elevation = 2.dp)
        .width(200.dp),
) {
    items.forEachIndexed { index, s ->
        DropdownMenuItem(onClick = {
            selectedIndex.value = index
            expanded.value = false
        }) {

            Text(text = s )

        }
    }
}
|
Now run the application you can see the Dropdown menu on the screen with given select options
 |
Complete Compose DropDownMenu example code
package com.example.jetpack.widget import android.content.Context import android.util.Log import android.widget.Toast import androidx.compose.foundation.BorderStroke import androidx.compose.foundation.background import androidx.compose.foundation.border import androidx.compose.foundation.clickable import androidx.compose.foundation.layout.* import androidx.compose.material.* import androidx.compose.material.SnackbarDefaults.backgroundColor import androidx.compose.runtime.Composable import androidx.compose.runtime.mutableStateOf import androidx.compose.runtime.remember import androidx.compose.ui.Alignment import androidx.compose.ui.Modifier import androidx.compose.ui.draw.shadow import androidx.compose.ui.focus.FocusRequester.Companion.createRefs import androidx.compose.ui.geometry.Size import androidx.compose.ui.graphics.Color import androidx.compose.ui.graphics.Color.Companion.Red import androidx.compose.ui.graphics.RectangleShape import androidx.compose.ui.graphics.Shape import androidx.compose.ui.semantics.Role.Companion.Button import androidx.compose.ui.unit.dp @Composable fun ComposeMenu(context: Context){ var expanded = remember { mutableStateOf(false) } val items = listOf("Compose", "Rows", "Columns", "Box", "Button", "Text") val disabledValue = "B" var selectedIndex = remember { mutableStateOf(0) } Box(modifier = Modifier .fillMaxSize() ) { Column( modifier=Modifier .align(alignment = Alignment.Center) .padding(all=0.dp), ) { Button( modifier=Modifier.width(200.dp), border = BorderStroke(width = 1.dp,color = Color.Red), colors=ButtonDefaults.buttonColors(backgroundColor = Color.White), onClick = { expanded.value = true },content = { Text(items[selectedIndex.value]) }) DropdownMenu( expanded = expanded.value, onDismissRequest = { expanded.value = false }, modifier = Modifier.background( Color.White, ) .border(BorderStroke(width = 1.dp,color = Color.Red)) .shadow(elevation = 2.dp) .width(200.dp), ) { items.forEachIndexed { index, s -> DropdownMenuItem(onClick = { selectedIndex.value = index expanded.value = false }) { Text(text = s ) } } } } } } |
Conclusion: This compose tutorial covered how to show DropDownMenu with multiple options and align items vertically with Column component.