Create First SwiftUI project in Xcode13
Discover how SwiftUI, the latest framework for developing apps for Apple platforms, simplifies and speeds up development in this Xcode tutorial at rrtutors.com
SwiftUI is the latest trending way to create apps for all Apple platforms. By using SwiftUI we can create apps with more beautiful and More fast development compare with previous development. In this Ios example tutorial we will cover how to create First SwiftUI project in Xcode latest versions. Here we are using the Xcode version 13.
Let's get started
Step 1: Download and Install Xcode from Appstore To create apps with SwiftUI we need minimal Xcode version 11 and Catalina macos
Some of Xcode shortcut keys for developers
- Cmd + Click: Contextual menu for code or UI
- Option + Click: Quick info for code
- Cmd + 0: Show/hide Navigator
- Cmd + Shift + L: Insert new element
- Cmd + R: Run the app
- Cmd + . : Stop the app
Step 2: After installation open your Xcode from launcher
Now you will see a window which will be looks like below
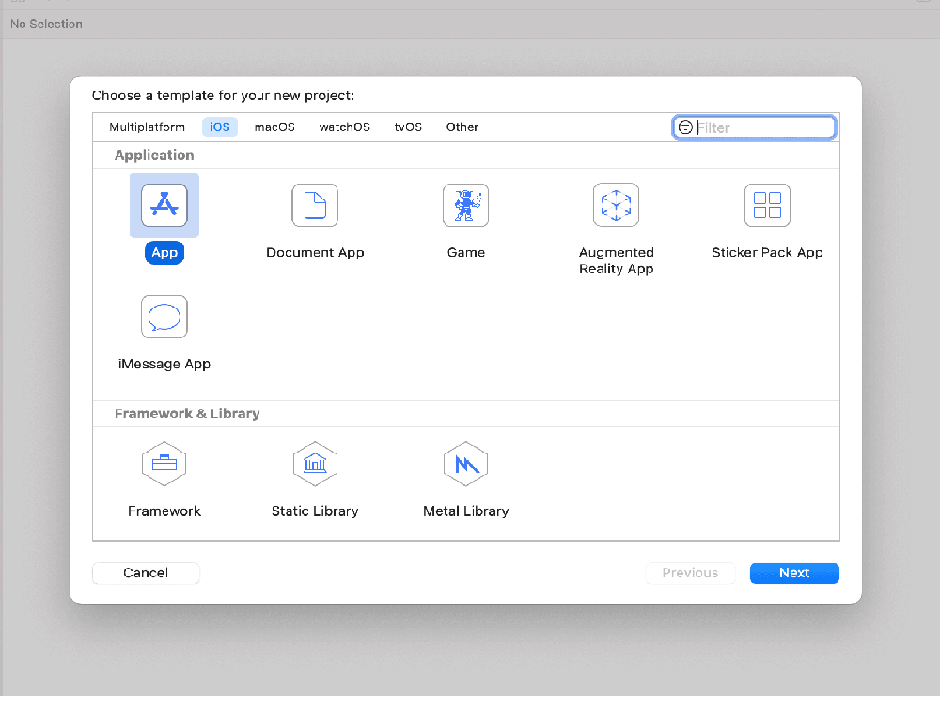 |
There you will find various platform options like ios, macos, watchos,tvos, choose iOS —> App, Click on Next
Step 3: Configure App name and other
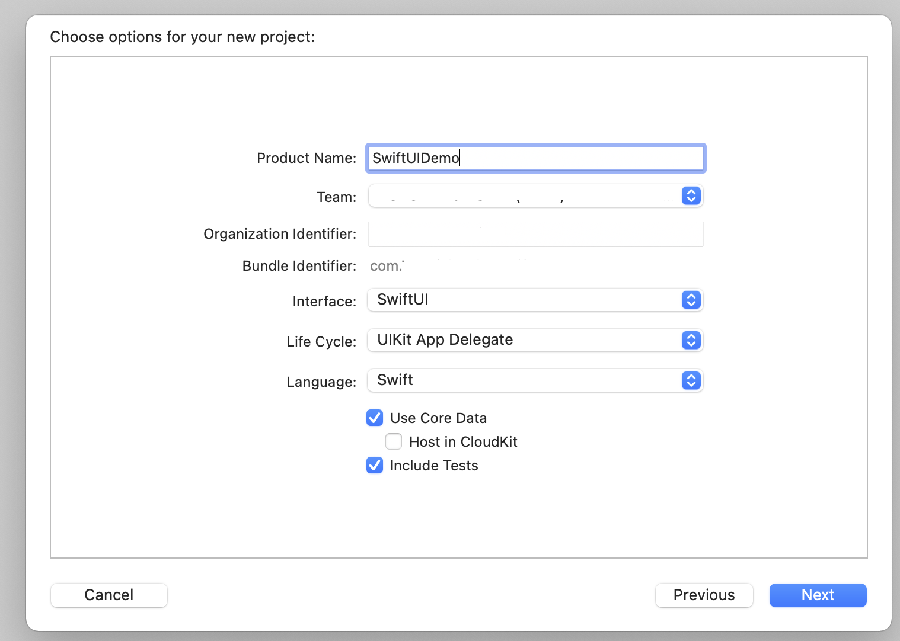
Follow below steps to configure app
- Here you can give a Product Name(App Name),
- Select Team,
- Bundle Identifier should be (com.OrganizationName.ProductName),
- select Interface as SwiftUI,
- select Life Cycle as UIKit App Delegate,
- Language as Swift,
- Check Use core data & Include Tests
- Click on Next
 |
If you want to create git repository to your project select Check box Create Git repository on my Mac —> Click on Create. Git is a distributed version-control system for tracking changes in source code during software development, read more about Git Tutorial
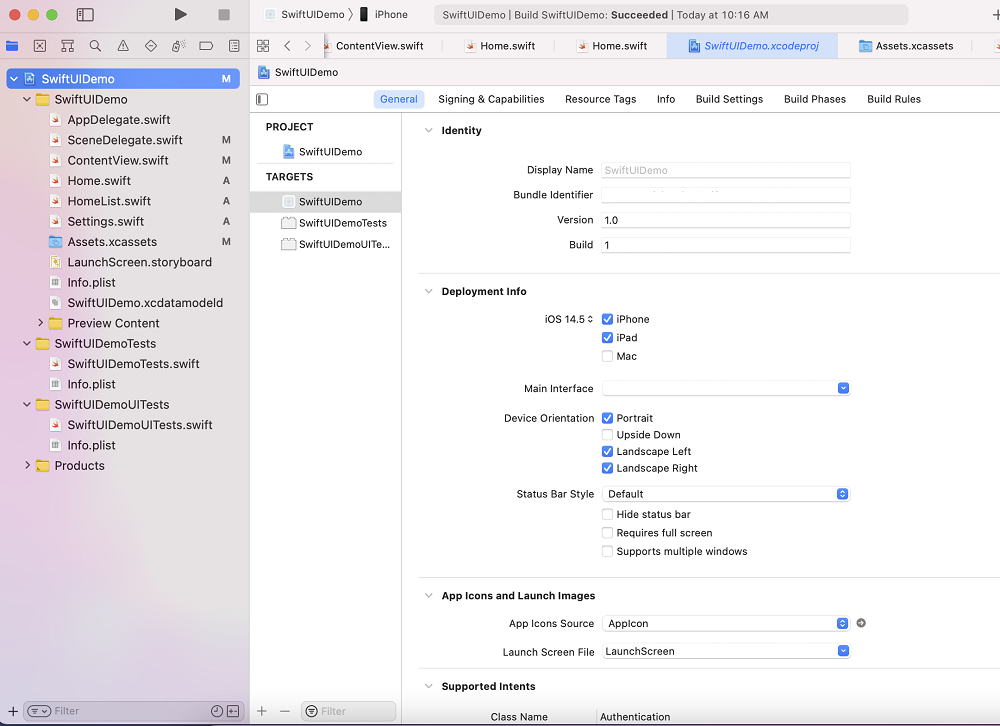
Step 4: After finishing you will see below window which will create your first SwiftUI project. You can find folder structure and other configuration information like bundle identifier...
 |
Step 5: Now open ContentView.swift file which contains your view code, which is the start point for your UI. In the default application you can find simple label which will be created by using Text component in SwiftUI.
You can review your preview on the right side of the panel like below screen
 |
Step 6: Now open your simulator and run your first SwiftUI project
Here all the SwiftUI componets and Topics
We will cover all these component examples in coming tutorials.
Views
- View
- Text
- TextField
- SecureField
- TextEditor
- SafeArea Layout
- Sidebar
- ImageView (Image and AsyncImage)
- Button (EditButton, PasteButton)
- Controls (Links, Menu)
- Toolbar
- Selectors (Toggle, Slider, Stepper, Picker, DatePicker, ColorPicker)
- Progress Disaply (Label, ProgressView, Gauge)
View Layouts
- Stacks (Hstack, VStack, ZStack)
- Lazy Stacks (LazyHstack, LazyVStack)
- Grids (LazyHGrid, LazyVGrid, GridItem )
- Containers (Form, Group, GroupBox, ControlGroup)
- Scroll Views (ScrollView, ScrollViewReader, ScrollViewProxy)
- Lists (List, Section, ForEach, DynamicViewContent)
- Table
Hierarchical Views
- NavigationView
- NavigationLink
- OutlineGroup
- DisclosureGroup
- Tabview
- HSplitView
- VSplitView
- Tabview pagination
Scheduled Views
- TimelineView
Spacers and Dividers
- Spacer
- Divider
Gestures
- TapGesture
- LongPressGesture
- DragGesture
- MagnificationGesture
- SequenceGesture
- Gesture
- AnyGesture
Other Component Properties
- Custom Fonts
- Width and Height Attribute
- Custom Fonts
- Color and Shadows
- Background blur
- Status Bar and Hide Status Bar
- Light and Dark Themes
- Keyboard Events
- Date Formates
Animations
Swift Package Manager
Related Topics
Create First Ios project in Xocde 12
Disable screen recording programatically
How do i merge two dictionaries with Swift5
How do i create Textfield and Secure Texfield in SwiftUI
How do i create Text Component in SwiftUI
Conclusion: In this example we covered what is SwiftUI and how to create First SwiftUI project in Xcode