Understand Android data binding with a focus on the differences between one-way and two-way data binding. RRTutors helps you use both methods effectively.
Last updated Dec 30, 2021 In this android example tutorial we will see the difference between One Way Data Binding and Two Way Data Binding with Example in Android Studio using Kotlin language.
One Way Data Binding:
One-way data-binding indicates that data travels in only one direction, so that when the data in a component changes, it also updates the view with new data.
Two Way Data Binding:
Two-way data binding indicates that data travels in both direction basically its bi-directional. The sharing of data between a component class and its layout is referred to as two-way data binding.
If you alter data in one location, it will automatically reflate at the other. If you alter the value of an input box, for example, it will also modify the value of an attached property in a component class.
Basic Differences between One Way and Two Way Data Binding:
|
One Way Data Binding
|
Two Way Data Binding |
|
Its Uni-directional(data travels in only one direction)
|
Its bi-directional (data travels from both direction)
|
|
Syntax : "@{}"
|
Syntax: "@ = {}"
|
|
Use Case: When you want to update read-only ui field.
|
Use Case: Use can be in editable form/field.
|
Example Implementation of One Way and Two Way Data Binding in one project:
Step 1: Create a new Project in android studio.
|
Go to File > New > New Project > Empty Activity > Next > Enter Name > Select Language Kotlin > Finish
|
Step 2: Now, open the app level build.gradle file .
Add this code part inside the Android block to enable databinding.
|
buildFeatures{
dataBinding true
}
|
Also, add the kotlin-kapt plugin to the plugins block.
Add the viewModel and LiveData Lifecycle dependency in app level build.gradle file and insert inside dependencies
|
// ViewModel
implementation "androidx.lifecycle:lifecycle-viewmodel-ktx:2.4.0"
// LiveData
implementation "androidx.lifecycle:lifecycle-livedata-ktx:2.4.0"
|
Step 3: Create two new Empty Activity, first One : OneWayActivity and second One: TwoWayActivity.
|
app > java > com.example.projectName > right-click > new > Activity > Empty Activity > Enter Name (OneWayActivity) > Finish.
|
Same follows for TwoWayActivity.
Step 4: Now open the activity_one_way.xml file and add the following xml code
|
<?xml version="1.0" encoding="utf-8"?>
<layout xmlns:android="http://schemas.android.com/apk/res/android"
xmlns:tools="http://schemas.android.com/tools">
<data>
<variable
name="viewModel"
type="com.nishajain.onevstwowaybinding.MainViewModel" />
</data>
<LinearLayout
android:layout_width="match_parent"
android:layout_height="match_parent"
android:orientation="vertical"
android:gravity="center"
android:padding="20dp"
android:background="#F1EAEA"
tools:context=".OneWayActivity">
<TextView
android:id="@+id/text_view"
android:layout_width="match_parent"
android:layout_height="wrap_content"
android:hint="Your name"
android:background="#F6D6D6"
android:padding="10dp"
android:text="@{viewModel.oneWayData}"
android:textSize="21sp"
/>
</LinearLayout>
</layout>
|
Connect the XML layout views with ViewModel class by using
|
<data>
<variable
name="viewModel"
type="com.nishajain.onevstwowaybinding.MainViewModel" />
</data>
|
In the TextView, bind the value of “text” property with the “userName” (MutableLiveData) property of the ViewModel.
|
android:text="@{viewModel.oneWayData}"
|
Step 5: Create a new kotlin class file and enter name (MainViewModel) and add the following code:
|
import androidx.lifecycle.MutableLiveData
import androidx.lifecycle.ViewModel
class MainViewModel : ViewModel() {
val oneWayData = MutableLiveData("I am Android Developer")
val twoWayData = MutableLiveData()
}
|
Step 6: Open activity_two_way.xml file and add the following xml code:
|
<?xml version="1.0" encoding="utf-8"?>
<layout xmlns:android="http://schemas.android.com/apk/res/android"
xmlns:tools="http://schemas.android.com/tools">
<data>
<variable
name="viewModel"
type="com.nishajain.onevstwowaybinding.MainViewModel" />
</data>
<LinearLayout
android:layout_width="match_parent"
android:layout_height="match_parent"
android:orientation="vertical"
android:gravity="center"
android:padding="20dp"
android:background="#F1EAEA"
tools:context=".OneWayActivity">
<TextView
android:id="@+id/text_view"
android:layout_width="match_parent"
android:layout_height="wrap_content"
android:hint="Your input"
android:background="#F6D6D6"
android:padding="10dp"
android:text="@={viewModel.twoWayData}"
android:textSize="21sp"
/>
<EditText
android:id="@+id/edit_text"
android:layout_width="match_parent"
android:layout_height="wrap_content"
android:layout_marginTop="20dp"
android:hint="Enter Input"
android:inputType="textPersonName"
android:text="@={viewModel.twoWayData}"
android:textSize="21sp" />
</LinearLayout>
</layout>
|
Step 7: Go to OneWayActivity.kt file and add the following code
In OneWayActivity(or whatever activity) we do 4 common things, when working with Data Binding, ViewModel and LiveData.
- Create an instance(object) of Data Binding class of the layout.(ActivityOneWayBinding)
- Create an instance(object) of ViewModel class.(MainViewModel)
- Pass(send) the ViewModel instance to the Data Binding instance.
- Set the life cycle owner of the Data Binding instance.
|
class OneWayActivity : AppCompatActivity() {
private lateinit var binding: ActivityOneWayBinding
private lateinit var viewModel: MainViewModel
override fun onCreate(savedInstanceState: Bundle?) {
super.onCreate(savedInstanceState)
setContentView(R.layout.activity_one_way)
binding = DataBindingUtil.setContentView(this, R.layout.activity_one_way)
viewModel = ViewModelProvider(this).get(MainViewModel::class.java)
binding.viewModel = viewModel
binding.lifecycleOwner = this
}
}
|
Step 8: Open TwoWayActivity.kt file and add the following code same as OneWayActivity with a small changes in naming conventions
|
class TwoWayActivity : AppCompatActivity() {
private lateinit var binding: ActivityTwoWayBinding
private lateinit var viewModel: MainViewModel
override fun onCreate(savedInstanceState: Bundle?) {
super.onCreate(savedInstanceState)
setContentView(R.layout.activity_two_way)
binding = DataBindingUtil.setContentView(this, R.layout.activity_two_way)
viewModel = ViewModelProvider(this).get(MainViewModel::class.java)
binding.viewModel = viewModel
binding.lifecycleOwner = this
}
}
|
Step 9: Most important point, Go to AndroidManifest.xml file and add the intent filter into OneWayActivity, after adding the file be like:
When we run the code for OneWayBinding:
|
<?xml version="1.0" encoding="utf-8"?>
<manifest xmlns:android="http://schemas.android.com/apk/res/android"
package="com.nishajain.onevstwowaybinding">
<application
android:allowBackup="true"
android:icon="@mipmap/ic_launcher"
android:label="@string/app_name"
android:roundIcon="@mipmap/ic_launcher_round"
android:supportsRtl="true"
android:theme="@style/Theme.OneVsTwoWayBinding">
<activity
android:name=".TwoWayActivity"
android:exported="true">
</activity>
<activity
android:name=".OneWayActivity"
android:exported="true">
<intent-filter>
<action android:name="android.intent.action.MAIN" />
<category android:name="android.intent.category.LAUNCHER" />
</intent-filter>
</activity>
</application>
</manifest>
|
For Run the TwoWayBinding Code you have to cut the intent filter code and paste inside TwoWayActivity and the final file code
|
<?xml version="1.0" encoding="utf-8"?>
<manifest xmlns:android="http://schemas.android.com/apk/res/android"
package="com.nishajain.onevstwowaybinding">
<application
android:allowBackup="true"
android:icon="@mipmap/ic_launcher"
android:label="@string/app_name"
android:roundIcon="@mipmap/ic_launcher_round"
android:supportsRtl="true"
android:theme="@style/Theme.OneVsTwoWayBinding">
<activity
android:name=".TwoWayActivity"
android:exported="true">
<intent-filter>
<action android:name="android.intent.action.MAIN" />
<category android:name="android.intent.category.LAUNCHER" />
</intent-filter>
</activity>
<activity
android:name=".OneWayActivity"
android:exported="true">
</activity>
</application>
</manifest>
|
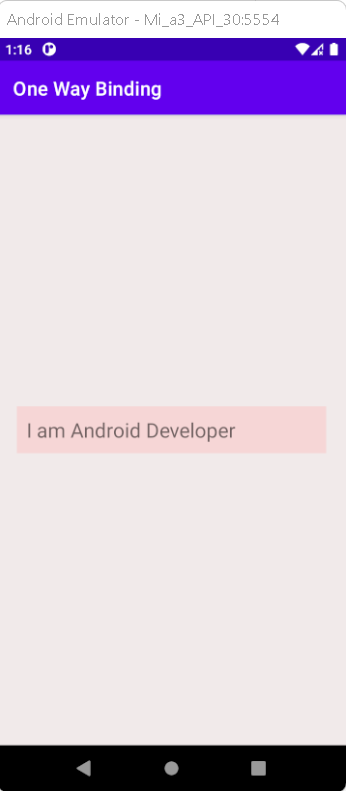
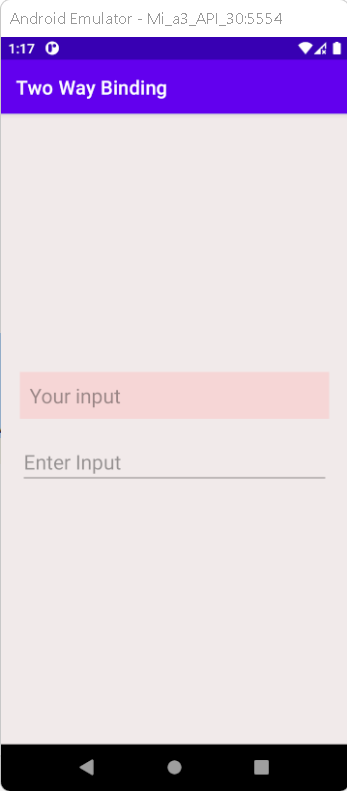
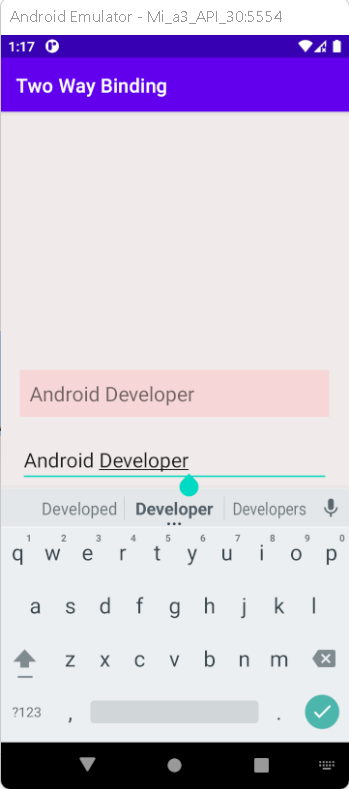
Step 9: Now run the app in your emulator or real device you will get the given output:
One Way Binding Output:
Two Way Binding Output:
You will see a blank EditText at first. Type someting on it. Then, you will see the same text on TextView simultaneously. That is the magic of Two way data binding.
Complete Source Code of One Way and Two Way DataBinding Example:
activity_one_way.xml file
|
<?xml version="1.0" encoding="utf-8"?>
<layout xmlns:android="http://schemas.android.com/apk/res/android"
xmlns:tools="http://schemas.android.com/tools">
<data>
<variable
name="viewModel"
type="com.nishajain.onevstwowaybinding.MainViewModel" />
</data>
<LinearLayout
android:layout_width="match_parent"
android:layout_height="match_parent"
android:orientation="vertical"
android:gravity="center"
android:padding="20dp"
android:background="#F1EAEA"
tools:context=".OneWayActivity">
<TextView
android:id="@+id/text_view"
android:layout_width="match_parent"
android:layout_height="wrap_content"
android:hint="Your name"
android:background="#F6D6D6"
android:padding="10dp"
android:text="@{viewModel.oneWayData}"
android:textSize="21sp"
/>
</LinearLayout>
</layout>
|
OneWayActivity.kt file
|
import androidx.appcompat.app.AppCompatActivity
import android.os.Bundle
import androidx.databinding.DataBindingUtil
import androidx.lifecycle.ViewModelProvider
import com.nishajain.onevstwowaybinding.databinding.ActivityOneWayBinding
class OneWayActivity : AppCompatActivity() {
private lateinit var binding: ActivityOneWayBinding
private lateinit var viewModel: MainViewModel
override fun onCreate(savedInstanceState: Bundle?) {
super.onCreate(savedInstanceState)
setContentView(R.layout.activity_one_way)
binding = DataBindingUtil.setContentView(this, R.layout.activity_one_way)
viewModel = ViewModelProvider(this).get(MainViewModel::class.java)
binding.viewModel = viewModel
binding.lifecycleOwner = this
}
}
|
activity_two_way.xml file
|
<?xml version="1.0" encoding="utf-8"?>
<layout xmlns:android="http://schemas.android.com/apk/res/android"
xmlns:tools="http://schemas.android.com/tools">
<data>
<variable
name="viewModel"
type="com.nishajain.onevstwowaybinding.MainViewModel" />
</data>
<LinearLayout
android:layout_width="match_parent"
android:layout_height="match_parent"
android:orientation="vertical"
android:gravity="center"
android:padding="20dp"
android:background="#F1EAEA"
tools:context=".OneWayActivity">
<TextView
android:id="@+id/text_view"
android:layout_width="match_parent"
android:layout_height="wrap_content"
android:hint="Your input"
android:background="#F6D6D6"
android:padding="10dp"
android:text="@={viewModel.twoWayData}"
android:textSize="21sp"
/>
<EditText
android:id="@+id/edit_text"
android:layout_width="match_parent"
android:layout_height="wrap_content"
android:layout_marginTop="20dp"
android:hint="Enter Input"
android:inputType="textPersonName"
android:text="@={viewModel.twoWayData}"
android:textSize="21sp" />
</LinearLayout>
</layout>
|
TwoWayActivity.kt file
|
import androidx.appcompat.app.AppCompatActivity
import android.os.Bundle
import androidx.databinding.DataBindingUtil
import androidx.lifecycle.ViewModelProvider
import com.nishajain.onevstwowaybinding.databinding.ActivityTwoWayBinding
class TwoWayActivity : AppCompatActivity() {
private lateinit var binding: ActivityTwoWayBinding
private lateinit var viewModel: MainViewModel
override fun onCreate(savedInstanceState: Bundle?) {
super.onCreate(savedInstanceState)
setContentView(R.layout.activity_two_way)
binding = DataBindingUtil.setContentView(this, R.layout.activity_two_way)
viewModel = ViewModelProvider(this).get(MainViewModel::class.java)
binding.viewModel = viewModel
binding.lifecycleOwner = this
}
}
|
MainViewModel.kt file
|
import androidx.lifecycle.MutableLiveData
import androidx.lifecycle.ViewModel
class MainViewModel : ViewModel() {
val oneWayData = MutableLiveData("I am Android Developer")
val twoWayData = MutableLiveData()
}
|
AndroidManifest.xml file when run code for OneWayActivity
|
<?xml version="1.0" encoding="utf-8"?>
<manifest xmlns:android="http://schemas.android.com/apk/res/android"
package="com.nishajain.onevstwowaybinding">
<application
android:allowBackup="true"
android:icon="@mipmap/ic_launcher"
android:label="@string/app_name"
android:roundIcon="@mipmap/ic_launcher_round"
android:supportsRtl="true"
android:theme="@style/Theme.OneVsTwoWayBinding">
<activity
android:name=".TwoWayActivity"
android:exported="true">
</activity>
<activity
android:name=".OneWayActivity"
android:exported="true">
<intent-filter>
<action android:name="android.intent.action.MAIN" />
<category android:name="android.intent.category.LAUNCHER" />
</intent-filter>
</activity>
</application>
</manifest>
|
AndroidManifest.xml file when run code for TwoWayActivity
|
<?xml version="1.0" encoding="utf-8"?>
<manifest xmlns:android="http://schemas.android.com/apk/res/android"
package="com.nishajain.onevstwowaybinding">
<application
android:allowBackup="true"
android:icon="@mipmap/ic_launcher"
android:label="@string/app_name"
android:roundIcon="@mipmap/ic_launcher_round"
android:supportsRtl="true"
android:theme="@style/Theme.OneVsTwoWayBinding">
<activity
android:name=".TwoWayActivity"
android:exported="true">
<intent-filter>
<action android:name="android.intent.action.MAIN" />
<category android:name="android.intent.category.LAUNCHER" />
</intent-filter>
</activity>
<activity
android:name=".OneWayActivity"
android:exported="true">
</activity>
</application>
</manifest>
|
build.gradle(app) file
|
plugins {
id 'com.android.application'
id 'kotlin-android'
id 'kotlin-kapt'
}
android {
compileSdk 31
defaultConfig {
applicationId "com.nishajain.onevstwowaybinding"
minSdk 21
targetSdk 31
versionCode 1
versionName "1.0"
testInstrumentationRunner "androidx.test.runner.AndroidJUnitRunner"
}
buildFeatures{
dataBinding true
}
buildTypes {
release {
minifyEnabled false
proguardFiles getDefaultProguardFile('proguard-android-optimize.txt'), 'proguard-rules.pro'
}
}
compileOptions {
sourceCompatibility JavaVersion.VERSION_1_8
targetCompatibility JavaVersion.VERSION_1_8
}
kotlinOptions {
jvmTarget = '1.8'
}
}
dependencies {
implementation 'androidx.core:core-ktx:1.7.0'
implementation 'androidx.appcompat:appcompat:1.4.0'
implementation 'com.google.android.material:material:1.4.0'
implementation 'androidx.constraintlayout:constraintlayout:2.1.2'
testImplementation 'junit:junit:4.13.2'
androidTestImplementation 'androidx.test.ext:junit:1.1.3'
androidTestImplementation 'androidx.test.espresso:espresso-core:3.4.0'
// ViewModel
implementation "androidx.lifecycle:lifecycle-viewmodel-ktx:2.4.0"
// LiveData
implementation "androidx.lifecycle:lifecycle-livedata-ktx:2.4.0"
}
|
Conclusion: In this example we have covered the difference of one way and two way dataBinding with Example in Android Studio using Kotlin Language.


