Android Alaram Manager - How to create Background task with alarm manager using Kotlin.

Last updated Dec 23, 2021

In this android example tutorial, we will learn how to create background task with alarm manager in android studio using kotlin language.

AlarmManager: AlarmManager acts as a link between the application and the Android system alarm service. It can send a broadcast to your app (which the user can entirely discontinue) at a certain time, and your app can then conduct any task as a result. The system can postpone any alarm in order to improve device performance.

Task scheduling is occasionally necessary. For example, your apps may be required to perform a specific task on a daily basis at a time specified by the user. Then we may use Android's AlarmManager to do it. So let's get started.

Implementation: 

Step 1. Create a new Project in android studio.

Go to File > New > New Project > Google Maps Activity > Next > Enter Name > Select Language Kotlin > Finish.

After creating the new project, Android Studio starts Gradle and builds your project, which may take a few seconds.

Step2. The following UI will be created within activity_main.xml file. We only have a TimePicker and a Button in this case.


<LinearLayout xmlns:android="http://schemas.android.com/apk/res/android"
    xmlns:tools="http://schemas.android.com/tools"
    android:layout_width="match_parent"
    android:layout_height="match_parent"
    android:gravity="center"
    android:padding="10dp"
    android:orientation="vertical"
    tools:context=".MainActivity">


    <TimePicker
        android:id="@+id/timePicker"
        android:layout_width="wrap_content"
        android:layout_height="wrap_content" />

    <Button
        android:id="@+id/buttonAlarm"
        android:layout_width="match_parent"
        android:layout_height="wrap_content"
        android:text="Set Alarm" />

</LinearLayout>


TimePicker: The Android TimePicker is a user interface control that allows you to select the time in 24-hour format or AM/PM mode. It is utilised in our application to verify that users select the correct time for the day.

Android AlarmManager Example with Kotlin code

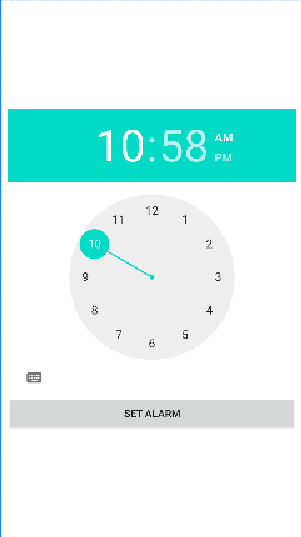
Above xml code will give you output like this.

Step 3. Create a new kotlin file in project name AlarmReceiver.

app > java > com.example.alarmmanager > right-click > new > Kotlin Class/File > Enter Name (AlarmReceiver) > Enter.


Step 4. Open AlarmReceiver.kt file and add the following code

class AlarmReciever : BroadcastReceiver() {
    override fun onReceive(p0: Context?, p1: Intent?) {
        //you can check the log that it is fired
        //Here we are actually not doing anything
        //but you can do any task here that you want to be done at a specific time everyday
        Log.d("MyAlarm", "Alarm is just fired");
    }

}

Broadcast Receivers merely reply to broadcast messages sent by other apps or the system. These signals are sometimes referred to as happenings or intentions. A broadcast receiver is implemented as a subclass of BroadcastReceiver class and overriding the onReceive() method where each message is received as a Intent object parameter.
 

Step 5. Registering BroadcastReceiver
 This BroadcastReceiver must also be registered in the Manifest file. So, in the AndroidManifest.xml file, immediately before the tag.

        <receiver
            android:name=".AlarmReciever"
            android:enabled="true"
            android:exported="true" />


Step 6. Go to MainActivity.kt file and add the following code

Instantiate the views by its unique id of TimePicker and Button.

val timePicker = findViewById(R.id.timePicker)
val setAlarm = findViewById(R.id.buttonAlarm)


Attach onClick event on button 

setAlarm.setOnClickListener(object : View.OnClickListener {
            override fun onClick(view: View?) {
                //We need a calendar object to get the specified time in millis
                //as the alarm manager method takes time in millis to setup the alarm
                val calendar: Calendar = Calendar.getInstance()
                if (Build.VERSION.SDK_INT >= 23) {
                    calendar.set(
                        calendar.get(Calendar.YEAR),
                        calendar.get(Calendar.MONTH),
                        calendar.get(Calendar.DAY_OF_MONTH),
                        timePicker.hour,
                        timePicker.minute,
                        0
                    )
                } else {
                    calendar.set(
                //Calculating the current year i.e. 2022
                        calendar.get(Calendar.YEAR),
                        // Calculating the current month i.e. Jan (01)
                        calendar.get(Calendar.MONTH),
                        // Day of month i.e. Thursday
                        calendar.get(Calendar.DAY_OF_MONTH),
                        // Current hour i.e. 10
                        timePicker.currentHour,
                        // Current minute i.e. 10:20
                        timePicker.currentMinute,
                        0
                    )
                }
            
                setAlarm(calendar.getTimeInMillis())
            }
        })


Build.VERSION>SDK_INT >= 23 (Check if we're running on Android 6.0 or higher)
 

Create a function setAlarm for setting up the alarm

private fun setAlarm(time: Long) {
        //getting the alarm manager
        val am = getSystemService(ALARM_SERVICE) as AlarmManager

        //creating a new intent specifying the broadcast receiver
        val i = Intent(this, AlarmReciever::class.java)

        //creating a pending intent using the intent
        val pi = PendingIntent.getBroadcast(this, 0, i, 0)

        //setting the repeating alarm that will be fired every day
        am.setRepeating(AlarmManager.RTC, time, AlarmManager.INTERVAL_DAY, pi)
        Toast.makeText(this, "Alarm is set", Toast.LENGTH_SHORT).show()
    }


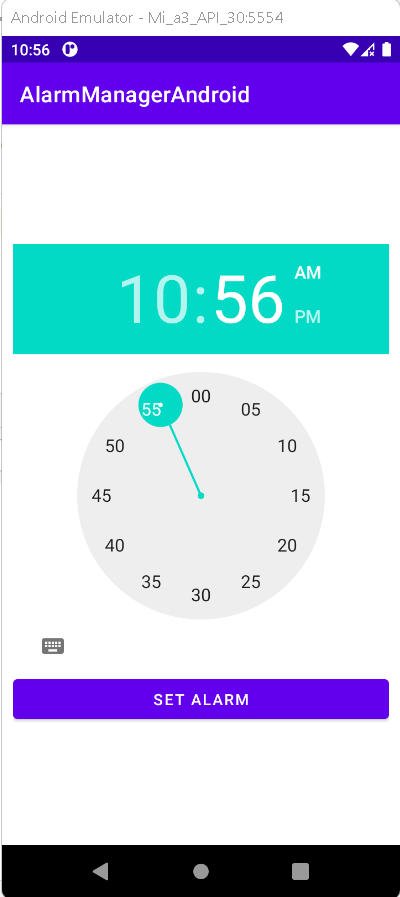
Step 7. Now run the app in your emulator or real device, you will get the following output:


OUTPUT:
 

Android Run background task with AlarmManager Example with Kotlin code


Alarm Manager Output


Even if you close your application after setting the alarm. The method will be called at the time indicated. And as a scheduled task, you can perform whatever you want. Right now, it will do nothing and will output a message to the log, as shown below.

Alarm Manager Output


Complete Source Code of Alarm Manager Example:
 

activity_main.xml file

<?xml version="1.0" encoding="utf-8"?>
<LinearLayout xmlns:android="http://schemas.android.com/apk/res/android"
    xmlns:tools="http://schemas.android.com/tools"
    android:layout_width="match_parent"
    android:layout_height="match_parent"
    android:gravity="center"
    android:padding="10dp"
    android:orientation="vertical"
    tools:context=".MainActivity">


    <TimePicker
        android:id="@+id/timePicker"
        android:layout_width="wrap_content"
        android:layout_height="wrap_content" />

    <Button
        android:id="@+id/buttonAlarm"
        android:layout_width="match_parent"
        android:layout_height="wrap_content"
        android:text="Set Alarm" />

</LinearLayout>


MainActivity.kt file

import android.app.AlarmManager
import android.app.PendingIntent
import android.content.Intent
import androidx.appcompat.app.AppCompatActivity
import android.os.Bundle
import android.widget.Toast
import android.os.Build
import android.view.View
import android.widget.Button

import android.widget.TimePicker
import java.util.*


class MainActivity : AppCompatActivity() {
    override fun onCreate(savedInstanceState: Bundle?) {
        super.onCreate(savedInstanceState)
        setContentView(R.layout.activity_main)

        //Instantiate the views TimePicker and Button
        val timePicker = findViewById(R.id.timePicker)
        val setAlarm = findViewById(R.id.buttonAlarm)


        //attaching clicklistener on setAlarm button
        setAlarm.setOnClickListener(object : View.OnClickListener {
            override fun onClick(view: View?) {
                //We need a calendar object to get the specified time in millis
                //as the alarm manager method takes time in millis to setup the alarm
                val calendar: Calendar = Calendar.getInstance()
                if (Build.VERSION.SDK_INT >= 23) {
                    calendar.set(
                        calendar.get(Calendar.YEAR),
                        calendar.get(Calendar.MONTH),
                        calendar.get(Calendar.DAY_OF_MONTH),
                        timePicker.hour,
                        timePicker.minute,
                        0
                    )
                } else {
                    calendar.set(
                        calendar.get(Calendar.YEAR),
                        calendar.get(Calendar.MONTH),
                        calendar.get(Calendar.DAY_OF_MONTH),
                        timePicker.currentHour,
                        timePicker.currentMinute,
                        0
                    )
                }
                setAlarm(calendar.getTimeInMillis())
            }
        })
    }

    private fun setAlarm(time: Long) {
        //getting the alarm manager
        val am = getSystemService(ALARM_SERVICE) as AlarmManager

        //creating a new intent specifying the broadcast receiver
        val i = Intent(this, AlarmReciever::class.java)

        //creating a pending intent using the intent
        val pi = PendingIntent.getBroadcast(this, 0, i, 0)

        //setting the repeating alarm that will be fired every day
        am.setRepeating(AlarmManager.RTC, time, AlarmManager.INTERVAL_DAY, pi)
        Toast.makeText(this, "Alarm is set", Toast.LENGTH_SHORT).show()
    }
}


AlarmReceiver.kt file

import android.content.BroadcastReceiver
import android.content.Context
import android.content.Intent
import android.util.Log

class AlarmReciever : BroadcastReceiver() {
    override fun onReceive(p0: Context?, p1: Intent?) {
        //you can check the log that it is fired
        //Here we are actually not doing anything
        //but you can do any task here that you want to be done at a specific time everyday
        Log.d("MyAlarm", "Alarm is just fired");
    }

}


AndroidManifest.xml file

<?xml version="1.0" encoding="utf-8"?>
<manifest xmlns:android="http://schemas.android.com/apk/res/android"
    package="com.example.alarmmanagerandroid">
    <uses-permission android:name="android.permission.SET_ALARM"></uses-permission>
    <application
        android:allowBackup="true"
        android:icon="@mipmap/ic_launcher"
        android:label="@string/app_name"
        android:roundIcon="@mipmap/ic_launcher_round"
        android:supportsRtl="true"
        android:theme="@style/Theme.AlarmManagerAndroid">
        <activity
            android:name=".MainActivity"
            android:exported="true">
            <intent-filter>
                <action android:name="android.intent.action.MAIN" />

                <category android:name="android.intent.category.LAUNCHER" />
            </intent-filter>
        </activity>
        <receiver
            android:name=".AlarmReciever"
            android:enabled="true"
            android:exported="true" />
    </application>

</manifest>


Conclusion: In this article we have covered how to create Background task with alarm manager in Android apps using Kotlin language.

-->
Article Contributed By :
https://www.rrtutors.com/site_assets/profile/assets/img/avataaars.svg

1246 Views