In this android example tutorial, we will see how to implement and use Staggered Gridview on RecyclerView in Android using Kotlin.
Recyclerview: RecyclerView is a more advanced and adaptable version of the listview and gridview. It's a container for presenting
large amounts of data sets in a way that allows them to be browsed quickly while limiting the number of views. It has the ability to reuse its views.
What is StaggeredGridLayout?
StaggeredGridView:StaggeredGridLayout is a LayoutManager in the android studio similar to GridView, but in StaggeredGridLayout each grid has its own height and width.
Implementation of StaggeredGridView on Recyclerview:
Step 1. Create a new Project in android studio.
|
Go to File > New > New Project > Empty Activity > Next > Enter Name > Select Language Kotlin > Finish.
|
Step 2. Add the RecyclerView dependency to build.gradle(app).
|
implementation 'androidx.recyclerview:recyclerview:1.2.1'
|
Step 3. Go to activity_main.xml file and add the following xml code:
|
<LinearLayout xmlns:android="http://schemas.android.com/apk/res/android"
xmlns:tools="http://schemas.android.com/tools"
android:layout_width="match_parent"
android:layout_height="match_parent"
android:orientation="vertical"
tools:context=".MainActivity">
<androidx.recyclerview.widget.RecyclerView
android:id="@+id/recyclerView"
android:layout_width="wrap_content"
android:layout_height="wrap_content" />
</LinearLayout>
|
Step 4. Create a new layout resource file and add the following code
|
app > res > layout > new > layout resource file > enter name (layout_items) > ok
|
Code:
|
<?xml version="1.0" encoding="utf-8"?>
<LinearLayout xmlns:android="http://schemas.android.com/apk/res/android"
android:layout_width="match_parent"
android:layout_height="wrap_content"
xmlns:app="http://schemas.android.com/apk/res-auto"
android:orientation="vertical"
android:padding="10dp">
<androidx.cardview.widget.CardView
android:layout_width="wrap_content"
android:layout_height="wrap_content"
app:cardCornerRadius="19dp">
<ImageView
android:id="@+id/imageView"
android:layout_width="wrap_content"
android:layout_height="wrap_content"
android:scaleType="centerCrop" />
</androidx.cardview.widget.CardView>
</LinearLayout>
|
Step 5. Create a new Kotlin class for model
|
app > java > package name > right-click > New > Kotlin class/file (RecyclerModel > enter name > OK
|
This file will hold the information of every item which you want to show in your RecyclerView.
Code:
|
class RecyclerModel(val image : Int) {
}
|
Step 6. Create a adapter class
|
app > java > package name > right-click > New > Kotlin class/file (RecyclerAdapter) > enter name > ok
|
This class contains some important functions to work with the RecyclerView these are as follows:
- onCreateViewHolder(): This function sets the views to display the items.
- onBindViewHolder(): This function is used to bind the list items to our widgets such as TextView, ImageView, etc.
- getItemCount(): It returns the count of items present in the list.
Code:
|
class RecyclerAdapter(private val dataList: List) : RecyclerView.Adapter() {
override fun onCreateViewHolder(parent: ViewGroup, viewType: Int): RecyclerAdapter.ViewHolder {
val view = LayoutInflater.from(parent.context)
.inflate(R.layout.layout_items, parent, false)
return ViewHolder(view)
}
override fun onBindViewHolder(holder: RecyclerAdapter.ViewHolder, position: Int) {
val recyclerModel = dataList[position]
// Image set to the imageview widget
holder.imageView.setImageResource(recyclerModel.image)
}
override fun getItemCount(): Int {
return dataList.size
}
class ViewHolder(ItemView: View) : RecyclerView.ViewHolder(ItemView) {
val imageView: ImageView = itemView.findViewById(R.id.imageView)
}
}
|
Step 7. Go to MainActivity.kt file and add the following code
Initialize the recyclerView widget below setContentView(R.layout.activity_main).
|
val recyclerview = findViewById(R.id.recyclerView)
|
Create a ArrayList of type recyclerModel and insert the data:
|
// ArrayList of class RecyclerModel
val data = ArrayList()
// Inserting data in arrayList
data.add(RecyclerModel(R.drawable.image1))
data.add(RecyclerModel(R.drawable.image2))
data.add(RecyclerModel(R.drawable.image3))
data.add(RecyclerModel(R.drawable.image4))
data.add(RecyclerModel(R.drawable.image5))
data.add(RecyclerModel(R.drawable.image6))
data.add(RecyclerModel(R.drawable.image7))
data.add(RecyclerModel(R.drawable.image8))
|
|
// Used for set staggered grid Layout view and 2 is the span count and orientation is vertical
recyclerview.layoutManager = StaggeredGridLayoutManager(2, StaggeredGridLayoutManager.VERTICAL)
// This will pass the ArrayList to our Adapter
val adapter = RecyclerAdapter(data)
// Setting the Adapter with the recyclerview
recyclerview.adapter = adapter
|
Code:
|
class MainActivity : AppCompatActivity() {
override fun onCreate(savedInstanceState: Bundle?) {
super.onCreate(savedInstanceState)
setContentView(R.layout.activity_main)
val recyclerview = findViewById(R.id.recyclerView)
val data = ArrayList()
data.add(RecyclerModel(R.drawable.image1))
data.add(RecyclerModel(R.drawable.image2))
data.add(RecyclerModel(R.drawable.image8))
data.add(RecyclerModel(R.drawable.image4))
data.add(RecyclerModel(R.drawable.image5))
data.add(RecyclerModel(R.drawable.image6))
data.add(RecyclerModel(R.drawable.image7))
data.add(RecyclerModel(R.drawable.image3))
val adapter = RecyclerAdapter(data)
recyclerview.layoutManager = StaggeredGridLayoutManager(2, StaggeredGridLayoutManager.VERTICAL)
recyclerview.adapter = adapter
}
}
|
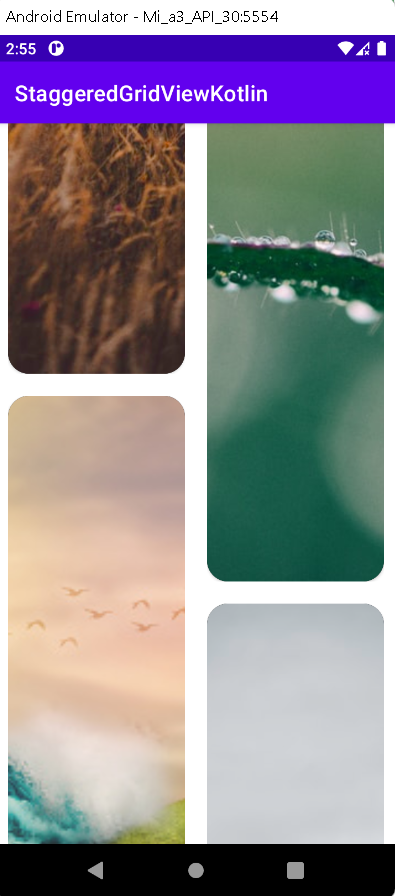
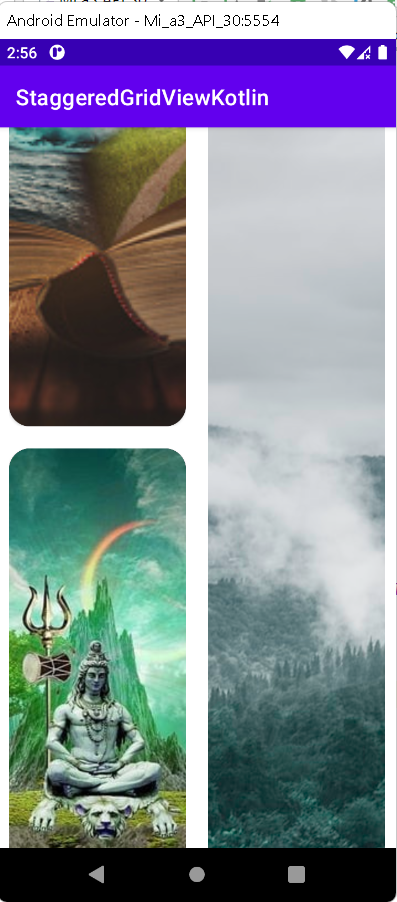
Step 8. Now run the app in your emulator, and get the following output.
Output:
Complete source code of StaggeredGridView with Example:
activity_main.xml file
|
<?xml version="1.0" encoding="utf-8"?>
<LinearLayout xmlns:android="http://schemas.android.com/apk/res/android"
xmlns:tools="http://schemas.android.com/tools"
android:layout_width="match_parent"
android:layout_height="match_parent"
android:orientation="vertical"
tools:context=".MainActivity">
<androidx.recyclerview.widget.RecyclerView
android:id="@+id/recyclerView"
android:layout_width="wrap_content"
android:layout_height="wrap_content" />
</LinearLayout>
|
MainActivity.kt file
|
import androidx.appcompat.app.AppCompatActivity
import android.os.Bundle
import androidx.recyclerview.widget.RecyclerView
import androidx.recyclerview.widget.StaggeredGridLayoutManager
class MainActivity : AppCompatActivity() {
override fun onCreate(savedInstanceState: Bundle?) {
super.onCreate(savedInstanceState)
setContentView(R.layout.activity_main)
val recyclerview = findViewById(R.id.recyclerView)
val data = ArrayList()
// Inserting data in arrayList
data.add(RecyclerModel(R.drawable.image1))
data.add(RecyclerModel(R.drawable.image2))
data.add(RecyclerModel(R.drawable.image8))
data.add(RecyclerModel(R.drawable.image4))
data.add(RecyclerModel(R.drawable.image5))
data.add(RecyclerModel(R.drawable.image6))
data.add(RecyclerModel(R.drawable.image7))
data.add(RecyclerModel(R.drawable.image3))
val adapter = RecyclerAdapter(data)
recyclerview.layoutManager = StaggeredGridLayoutManager(2, StaggeredGridLayoutManager.VERTICAL)
recyclerview.adapter = adapter
}
}
|
layout_items.xml file
|
<?xml version="1.0" encoding="utf-8"?>
<LinearLayout xmlns:android="http://schemas.android.com/apk/res/android"
android:layout_width="match_parent"
android:layout_height="wrap_content"
xmlns:app="http://schemas.android.com/apk/res-auto"
android:orientation="vertical"
android:padding="10dp">
<androidx.cardview.widget.CardView
android:layout_width="wrap_content"
android:layout_height="wrap_content"
app:cardCornerRadius="19dp">
<ImageView
android:id="@+id/imageView"
android:layout_width="wrap_content"
android:layout_height="wrap_content"
android:scaleType="centerCrop" />
</androidx.cardview.widget.CardView>
</LinearLayout>
|
RecyclerModel.kt file
|
class RecyclerModel(val image : Int) {
}
|
RecyclerAdapter.kt file
|
import android.view.LayoutInflater
import android.view.View
import android.view.ViewGroup
import android.widget.ImageView
import androidx.recyclerview.widget.RecyclerView
class RecyclerAdapter(private val dataList: List) : RecyclerView.Adapter() {
override fun onCreateViewHolder(parent: ViewGroup, viewType: Int): RecyclerAdapter.ViewHolder {
val view = LayoutInflater.from(parent.context)
.inflate(R.layout.layout_items, parent, false)
return ViewHolder(view)
}
override fun onBindViewHolder(holder: RecyclerAdapter.ViewHolder, position: Int) {
val recyclerModel = dataList[position]
// Image set to the imageview widget
holder.imageView.setImageResource(recyclerModel.image)
}
override fun getItemCount(): Int {
return dataList.size
}
class ViewHolder(ItemView: View) : RecyclerView.ViewHolder(ItemView) {
val imageView: ImageView = itemView.findViewById(R.id.imageView)
}
}
|
build.gradle(app) file
|
plugins {
id 'com.android.application'
id 'kotlin-android'
}
android {
compileSdk 31
defaultConfig {
applicationId "com.nishajain.staggeredgridviewkotlin"
minSdk 21
targetSdk 31
versionCode 1
versionName "1.0"
testInstrumentationRunner "androidx.test.runner.AndroidJUnitRunner"
}
buildTypes {
release {
minifyEnabled false
proguardFiles getDefaultProguardFile('proguard-android-optimize.txt'), 'proguard-rules.pro'
}
}
compileOptions {
sourceCompatibility JavaVersion.VERSION_1_8
targetCompatibility JavaVersion.VERSION_1_8
}
kotlinOptions {
jvmTarget = '1.8'
}
}
dependencies {
implementation 'androidx.core:core-ktx:1.7.0'
implementation 'androidx.appcompat:appcompat:1.4.0'
implementation 'com.google.android.material:material:1.4.0'
implementation 'androidx.constraintlayout:constraintlayout:2.1.2'
testImplementation 'junit:junit:4.13.2'
androidTestImplementation 'androidx.test.ext:junit:1.1.3'
androidTestImplementation 'androidx.test.espresso:espresso-core:3.4.0'
implementation 'androidx.recyclerview:recyclerview:1.2.1'
}
|
Conclusion: In this article we have covered how to implement StaggeredGridView on recyclerview in Android Using Kotlin.