Handle Image Button Click Events in Kotlin - RRutors
Understand the functionality of ImageButton in Android, a button with an image background. Use it along with other button types in Android at rrtutors.com.
In this Android example tutorial, we'll look at how to create an ImageButton, and handle the onClick and long click events, and explore its various properties in Android Studio using the Kotlin programming language.
What is ImageButton?
ImageButton is a view that shows a button with an image in the background and behaves exactly like a button when clicked. ImageButtons, ToggleButtons, and other button types are available in Android.
Implementation:
To begin, Create a new project in android studio with the name ImageButton_Kotlin. Then press the Finish button.
Open the activity main.xml file and add the LinearLayout with orientation (Vertical or horizontal).
| <LinearLayout xmlns:android="http://schemas.android.com/apk/res/android" xmlns:tools="http://schemas.android.com/tools" android:orientation="horizontal" android:layout_width="match_parent" android:layout_height="match_parent" android:gravity="center" android:background="#22FFAA00" tools:context=".MainActivity"></LinearLayout> |
In activity_main.xml, insert an ImageButton view inside a LinearLayout.
| <ImageButton android:layout_width="60dp" android:layout_height="60dp" android:id="@+id/fbBtn" ></ImageButton> |
Add an image to the ImageButton using the src property and set the scaleType property to centerCrop.
Open browser and download an image, then copy it from the folder and paste it inside
| app > res > drawable |
and then use like this "@drawable/image_name".
Note: Use the background property for the image to make it look more appropriate.
| android:background="@drawable/facebook" |
** Differences between using the src and background properties in below image.
 |
FaceBook ImageButton uses src property and Twitter uses background property.
ImageButton has the following attributes:
id, padding, background, layout_margin, layout_marginLeft, layout_marginRight, layout_marginEnd, layout margin, paddingLeft and so on....
| android:layout_marginRight="20dp" android:layout_marginLeft="20dp" android:padding="10dp" android:paddingLeft="10dp" android:layout_margin="10dp" |
Now, let's put our ImageButton to use inside Activity. Any view, from layout to activity, can be used by using its unique id: "id" property with findViewById() method.
| val fbBtn = findViewById(R.id.fbBtn) |
R.id.fbBtn is the id of the button defined in the activity main.xml file.
By implementing onClickListener, we can now add an event listener to the ImageButton instance.
|
fbBtn.setOnClickListener { |
Using setOnLongClickListener, we will add long press functionality to ImageButton.
|
fbBtn.setOnLongClickListener{ |
If we set the value to true, long press is enabled; if false, long press is disabled.
- OnClick of ImageButton in the above code will display a Toast of " Welcome to FaceBook ".
Note: Toast is a small message that appears on the screen for some time.
- Now run the application, you will see the output shown below.
OUTPUT:
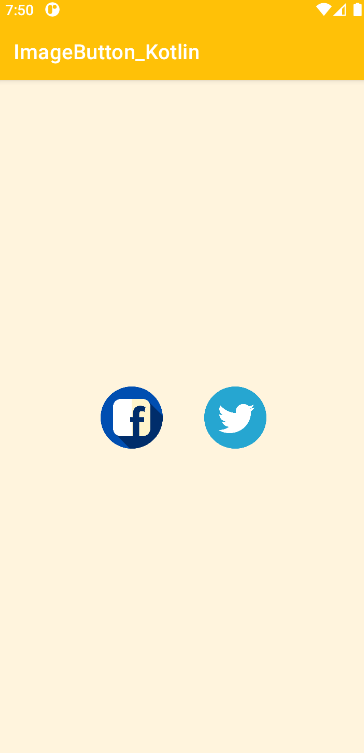 |
Fig: Two ImageButton View (Facebook and Twitter).
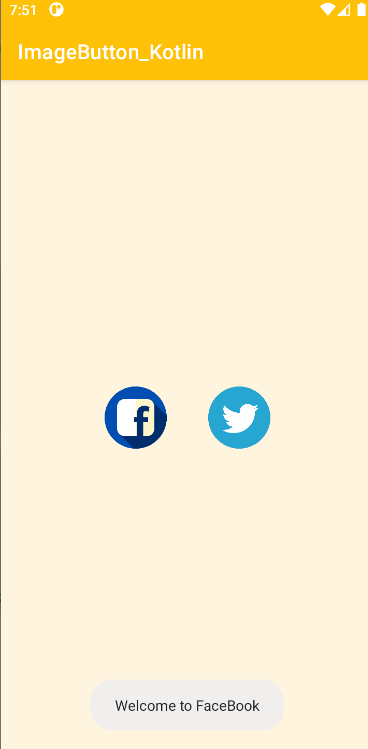 |
Fig: OnClickEvent on Facebook Button.
 |
Fig: OnLongClickEvent on Facebook Button.
Complete source code for Android ImageButton example:
activity_main.xml file
|
<?xml version="1.0" encoding="utf-8"?> <ImageButton </LinearLayout> |
MainActivity.kt file
|
import androidx.appcompat.app.AppCompatActivity class MainActivity : AppCompatActivity() { fbBtn.setOnClickListener { fbBtn.setOnLongClickListener{ twitterBtn.setOnClickListener { |
Conclusion:
We've gone over how to add an ImageButton to Android and handle the onClick and LongClick events with Kotlin code.