Python Menu Button - How to add Tkinter MenuButton
Create a menu button using Tkinter and Python with this guide. Learn how to add drop-down alternatives for user selection in your application at rrtutors.com.
In this tutorial, we'll look at how to make a menu button using Tkinter and Python. A menu button in Python is a section of the drop-down menu that is always shown on the screen and gives several alternatives for the user to choose once the application user clicks on the button.
The Tkinter menu button syntax
The following syntax is used to build the Tkinter menu button:
w = Menubutton (root, Option...)
Where root represents the parent window and options indicate the settings used in this widget. Multiple choices separated by commas may be used in a single widget.
Options for Tkinter Menubutton
-
Activebackground: When a user hovers over a menu button, this option sets the background of the menu button.
-
Activeforeground: This option determines the foreground color when the user hovers over the menu button.
-
Anchor: The location of the text shown in the menu button is specified by this parameter.
-
Bg: defines the color of the menubutton's background.
-
Cursor: specifies the action to be executed by the menu button when the mouse cursor is over.
-
Font: defines the font used to show text on the screen.
-
Height: specifies the size of the menu button.
-
Hightlightbackground: highlights the background color when the cursor is active and when not.
-
Image: Used to display the images when the menubutton is clicked.
-
Justify: Ensure that text appears inside the menu button.
-
Menu: displays a variety of options for the user to choose from.
-
Padx: specifies the amount of space to the left and right of the menu button.
-
Pady: defines how much space should be left at the top and bottom of the menu button.
-
Relief: This allows the menu button to have a 3-D effect.
-
State: gives menu button alternatives such as active or dormant.
-
Takefocus: This allows you to focus on a button using the keyboard.
-
Text: contains the text that the menu button will show.
-
TextVariable: This allows us to associate a string variable with a menu button.
-
Underline: Underlines the text you've chosen.
-
Width: determines the width of the menu button dependent on the number of characters.
-
Wraplength- wraps the number of characters specified.
Examples of Tkinter menuButtton
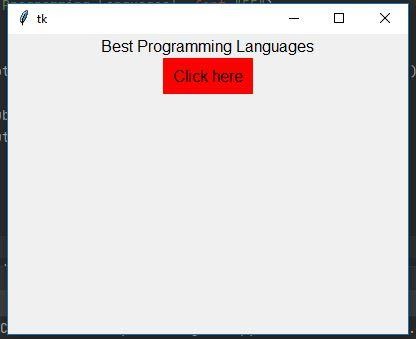
In this example, if you click on the “click here” button, the list of three programming languages will pop up on your screen
|
from tkinter import * root = Tk() root.geometry("400x300") w = Label(root, text='Best Programming Languages', font="55") w.pack() menubutton = Menubutton(root, text="Click here", bg="red", bd="4px", font="20") menubutton.menu = Menu(menubutton) menubutton["menu"] = menubutton.menu var1 = IntVar() var2 = IntVar() var3 = IntVar() menubutton.menu.add_checkbutton(label="PHP", variable=var1) menubutton.menu.add_checkbutton(label="Java", variable=var2) menubutton.menu.add_checkbutton(label="Python", variable=var3) menubutton.pack() root.mainloop()
|
 |