Python How do create Menu withTkinter
Using Tkinter menus, you can quickly design multiple sorts of menus in your Python program, such as pop-up, pull-up, or top-level, giving users exclusive access to all application features. In this tutorial, we will look at how to create Tkinter menus
If you're creating a Python application with several functions, you'll need to organize them in a user-friendly way to make user navigation easy. This can be accomplished with the aid of menus.
Using Tkinter menus, you can quickly design multiple sorts of menus in your Python program, such as pop-up, pull-up, or top-level, giving users exclusive access to all application features. In this tutorial, we will look at how to create Tkinter menus.
Creating a Tkinter menu
Like other Tkinter widgets, you will need to understand the Tkinter menu syntax to build them easily. Their syntax includes
w = Menu(top, options) (top, options)
Tkinter Menu Options
The following is a list of the most often used Tkinter menu options that you can use in your project.
-
Bg- defines the widget's background color.
-
Bd- defines the width of the widget's border.
-
Pointer- defines how the cursor appears when it hovers over the widget.
-
Aciveforeground- defines the font color of the widget when it is focused.
-
Activeborderwidth- defines the size of the widget's border while the mouse hovers over it.
-
Activebackground- defines the widget's background while it is in focus.
-
Disabledforeground-specifies the widget's font when it is deactivated.
-
Font- indicates the font that will be used in the widget.
-
Fg- defines the color of the widget's foreground.
-
Postcommand- set to a particular function when the mouse hovers over the widget
-
Relief- defines the type of border for the widget. RAISED is the default value.
-
Picture- shows the widget's selected image.
-
Selectorcolor- defines the color of the radio button or checkbox that has been chosen.
-
Tearoff- specifies the menu's beginning point. The default option is 1.
-
Title- provides the window's title.
Menu Methods in Tkinter
You will need to add methods/functions to your menu to do numerous operations. Here are some common methods you can use.
-
Add command(options)- this method adds a specific menu item to your menu
-
Add radiobutton(options)- you can use this method to add a radio button as a menu item
-
Add checkbutton (options)- adds a check button menu item
-
Add cascade(options)- used to create a hierarchical menu
-
Add(type, options)- adds a specific type of menu item
Examples of the Tkinter Menu Button
Let's glance at a Tkinter menu button example.
|
from tkinter import * def donothing(): filewin = Toplevel(root) button = Button(filewin, text="Do nothing button") button.pack() root = Tk() menubar = Menu(root) filemenu = Menu(menubar, tearoff=0) filemenu.add_command(label="New Project", command=donothing) filemenu.add_command(label="Open File", command=donothing) filemenu.add_command(label="Save", command=donothing) filemenu.add_command(label="Settings", command=donothing) filemenu.add_command(label="Close Project", command=donothing) filemenu.add_separator() filemenu.add_command(label="Exit", command=root.quit) menubar.add_cascade(label="File", menu=filemenu) editmenu = Menu(menubar, tearoff=0) editmenu.add_command(label="Undo", command=donothing) editmenu.add_separator() editmenu.add_command(label="Cut", command=donothing) editmenu.add_command(label="Copy", command=donothing) editmenu.add_command(label="Paste", command=donothing) editmenu.add_command(label="Delete", command=donothing) editmenu.add_command(label="Select All", command=donothing) menubar.add_cascade(label="Edit", menu=editmenu) helpmenu = Menu(menubar, tearoff=0) helpmenu.add_command(label="Help Index", command=donothing) helpmenu.add_command(label="About...", command=donothing) menubar.add_cascade(label="Help", menu=helpmenu) root.config(menu=menubar) root.mainloop()
|
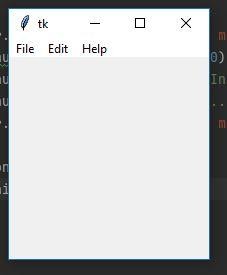
When you run the above code, the following menu will appear on your screen
 |