How do i create overflow menu (Popup Menu) in Jetpack compose
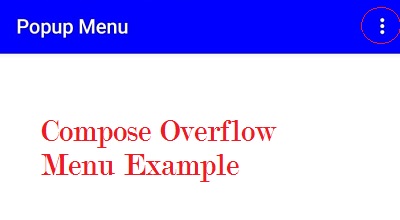
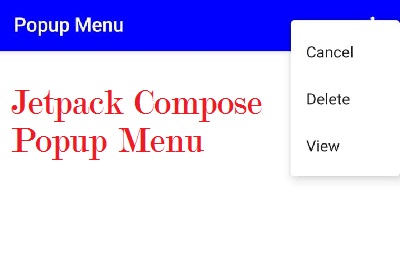
Jetpack Compose Create Overflow menu (Popup menu) inside appbar action items.
In this Jetpack compose tutorial we will learn how to create overflow menu (Popup Menu) with Jetpack compose in Android application.
Let's get started
Step 1: Create android application in android studio
Step 2: Follow step for setup Jetpack Compose with Android Studio
Let's create app bar with simple title "Overflow Menu"
val scaffoldState = rememberScaffoldState()
Scaffold(
    scaffoldState = scaffoldState,
    content = {
    },
    topBar = {
        TopAppBar(title = { Text("Overflow Menu") },
            backgroundColor = Color.Blue,
            contentColor = Color.White,
            )
    },
)
|
To show popup menu we need to create Appbar and appbar action items with a button, on click on this button we will show popup menu window. To create Appbar we will use TopAppBar compose function
TopAppBar(title = { Text("Overflow Menu") },
    backgroundColor = Color.Blue,
    contentColor = Color.White,
    actions = {
        IconButton(
            onClick = {
            }

        ) {
            Icon(
                imageVector = Icons.Default.MoreVert,
                contentDescription = "image",
                tint = Color.White,
            )
        }
    }
)
|
Now we need to create list of items which will display inside overflow menu. These are menu items.
On clicking action button we are going to show this list in overflow menu
val menuItems = listOf("Cancel", "Delete", "View")
|
To store the selected popup menu item we have to create Compose Remember function
create a remember composable which will store true or false value depending on which overflow menu will be shown. Default value will be false.
val expanded = remember { mutableStateOf(false) }
|
Let's add UI for our Overflow menu
val context = LocalContext.current

DropdownMenu(
    expanded = expanded.value,
    offset = DpOffset((-40).dp, (-40).dp),
    onDismissRequest = { expanded.value = false }) {
    menuItems.forEach {
        DropdownMenuItem(onClick = {
            Toast.makeText(
                context,
                "You clicked $it menu",
                Toast.LENGTH_LONG
            ).show()
            expanded.value = false
        }) {
            Text(text = it)
        }
    }
|
Full code
package com.example.jetpack

import android.os.Bundle
import android.view.WindowManager
import android.widget.Toast
import androidx.activity.ComponentActivity
import androidx.activity.compose.setContent
import androidx.compose.material.*
import androidx.compose.material.icons.Icons
import androidx.compose.material.icons.filled.MoreVert
import androidx.compose.runtime.*
import androidx.compose.ui.graphics.Color
import androidx.compose.ui.platform.LocalContext
import androidx.compose.ui.tooling.preview.Preview
import androidx.compose.ui.unit.DpOffset
import androidx.compose.ui.unit.dp

class MainActivity : ComponentActivity() {

    override fun onCreate(savedInstanceState: Bundle?) {
        super.onCreate(savedInstanceState)
        window.setSoftInputMode(WindowManager.LayoutParams.SOFT_INPUT_ADJUST_RESIZE)
        setContent {
            OverFlowMenuDemo()
        }
    }
}

@Composable
fun OverFlowMenuDemo() {
    val context = LocalContext.current
    val expanded = remember { mutableStateOf(false) }
    val menuItems = listOf("Cancel", "Delete", "View")
    val scaffoldState = rememberScaffoldState()
    Scaffold(
        scaffoldState = scaffoldState,
        content = {

        },
        topBar = {
            TopAppBar(title = { Text("Overflow Menu") },
                backgroundColor = Color.Blue,
                contentColor = Color.White,
                actions = {
                    IconButton(
                        onClick = {
                            expanded.value = true
                        }

                    ) {
                        Icon(
                            imageVector = Icons.Default.MoreVert,
                            contentDescription = "image",
                            tint = Color.White,
                        )
                    }
                    DropdownMenu(
                        expanded = expanded.value,
                        offset = DpOffset((-40).dp, (-40).dp),
                        onDismissRequest = { expanded.value = false }) {
                        menuItems.forEach {
                            DropdownMenuItem(onClick = {
                                Toast.makeText(
                                    context,
                                    "You clicked $it menu",
                                    Toast.LENGTH_LONG
                                ).show()
                                expanded.value = false
                            }) {
                                Text(text = it)
                            }
                        }
                    }
                })
        },
    )
}

@Preview(showBackground = true)
@Composable
fun DefaultPreview() {
    OverFlowMenuDemo()
}
|
Images
 |
 |