One to One chat application using Kotlin - Android
Learn how to build a real-time chat application in Android, with features like one-to-one chat and user visibility. Start building today with RRTutors.
In this post we are going to learn develop a chat application in Android. For this chat application we are going to use
ChometChat Pro sdk. If you don’t know then I would recommend you to follow below link to get basic overview about Tutorials Blog.
CometChat is a flexible developer tool that bridges the gap between what users expect (a complete chat experience) and the technical requirements we face as Android developers. In this tutorial, we will build a chat application creatively named Chaty where users can communicate directly using the open-source CometChat Kotlin SDK:
To help you know what to expect, in this tutorial we will:
- Log in through CometChat user IDs
- View the list of all other users
- View user presence such as if the user is online or offline at this moment
- Send and receive chat messages to other users
- View logged in user profile details
- Log out from the application
CometChat is a hosted developer tool meaning the Kotlin SDK creates a secure connection to the CometChat platform. To follow along, you will need to create your CometChat application with a unique identifier. We will later specify this identifier in our Kotlin code when connecting to CometChat.
I won’t elaborate creating a free CometChat account in too much detail as I expect you will find it very easy.
Simply head to the dashboard where you’ll be prompted to login or create an account then create an app with any name like “ChattyTutorialApp”
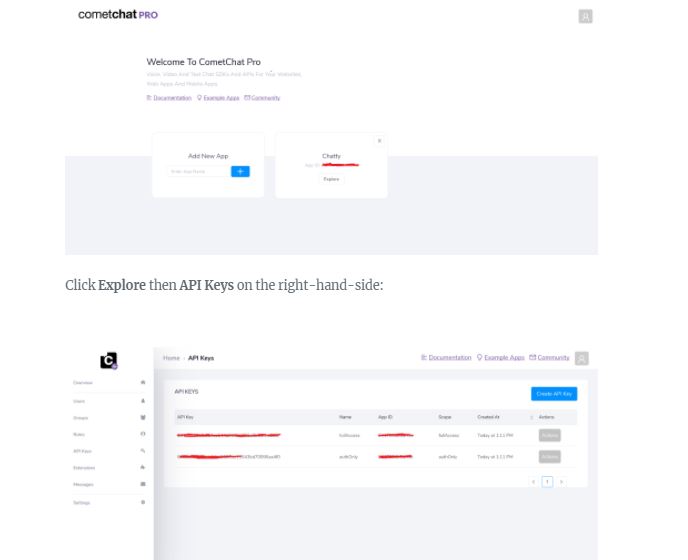
Note both the fullAccess key and App ID as we will need them in a moment.
To follow along, it would be handy if you have some experience with Android and Kotlin. Rather than touch on fundamental concepts like layouts, the RecyclerView and so, I have created a starting point for us and uploaded it to a branch called start-here
Adding CometChat dependency in Android app
To integrate CometChat SDK in your Android app, you need to add CometChat dependencies in Android project’s Gradle files. So, start by adding the maven lines from the below snippet in the project level’s root build.gradle file:
allprojects {
    repositories {
        google()
        jcenter()
        maven {
            url "https://dl.bintray.com/cometchat/pro"
        }
    }
}
|
Now, add the CometChat SDK in the app level’s build.gradle file by adding the folllowing line:
implementation 'com.cometchat:pro-android-chat-sdk:2.0.7'
|
Initializing CometChat in the app
Initialize CometChat in application class. Create a class which extends Application() and add below code.
class App :Application() {
    val appID:String=AppConfig.AppDetails.API_ID // Replace with your App ID
    val region:String="us" // Replace with your App Region ("eu" or "us")

    val TAG:String="App "
    val appSettings = AppSettings.AppSettingsBuilder().subscribePresenceForAllUsers().setRegion(region).build()


    override fun onCreate() {
        super.onCreate()
        CometChat.init(this,appID,appSettings, object : CometChat.CallbackListener() {
            override fun onSuccess(p0: String?) {
                Log.d(TAG, "Initialization completed successfully")
            }

            override fun onError(p0: CometChatException?) {
                Log.d(TAG, "Initialization failed with exception: " + p0?.message)
            }

        })
    }


}
|
Signup with CometChat
CometChat provides a createUser() method for signup in any user. Let’s use that here like the code below
val authKey = AppConfig.AppDetails.API_KEY // Replace with your App Auth Key
val user = User()
user.uid = uId// Replace with the UID for the user to be created
user.name = uName
CometChat.createUser(user, authKey, object : CometChat.CallbackListener() {
    override fun onSuccess(user: User) {
        Log.d("createUser", user.toString());
        startActivity(Intent(this@RegistrationActivity, MainActivity::class.java))
        finish()
    }

    override fun onError(e: CometChatException) {
        Log.e("createUser", e.message!!)
        input_uid!!.isEndIconVisible = true
       loginProgress.visibility = View.GONE
        Toast.makeText(this@RegistrationActivity, e.message, Toast.LENGTH_SHORT).show()
    }
})
txt_signup.setOnClickListener {
    onBackPressed()
}
|
Log in through CometChat user IDs
CometChat provides a login() method for logging in any user. Let’s use that here like the code below.
CometChat.login(uid, AppConfig.AppDetails.API_KEY, object : CometChat.CallbackListener() {
    override fun onSuccess(user: User) {
        startActivity(Intent(this@LoginActivity, MainActivity::class.java))
        finish()
    }

    override fun onError(e: CometChatException) {
        inputLayout!!.isEndIconVisible = true
        findViewById(R.id.loginProgress).visibility = View.GONE
        Toast.makeText(this@LoginActivity, e.message, Toast.LENGTH_SHORT).show()
    }
})
|
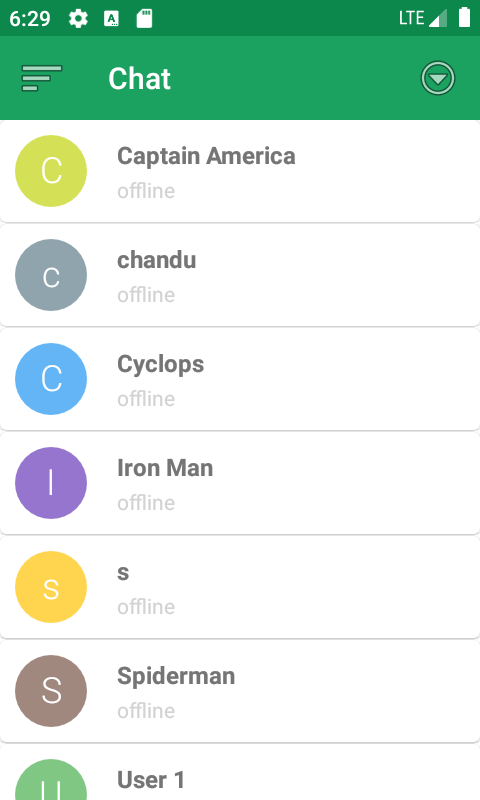
View the list of all other users
Once the user is logged in, the app will show the Contacts screen with all other users registered in CometChat dashboard. At this moment, we’re using test superhero users of CometChat, so you will see the list of those superheroes. If your app needs features like friends or followers, this is the place where you can integrate it.
CometChat SDK provides a UserRequest class, through which you can configure what kind of users you need and then you can load those users with fetchNext() method
    var usersRequest = UsersRequest.UsersRequestBuilder().setLimit(10).build()
    usersRequest.fetchNext(object:CometChat.CallbackListener>(){
        override fun onSuccess(p0: List?) {
            if(p0!=null)
            {
                var loggedInUser = CometChat.getLoggedInUser()
                for (user in p0)
                {
                    // Don't add yourself (logged in user) in the list
                    if (loggedInUser.uid != user.uid)
                    {
                        contactsList.add(convertToUserModel(user))

                    }
                }

                // Update the Recycler Adapter
                recyclerAdapter.notifyDataSetChanged()

            }
            else
            {
                Toast.makeText(this@MainActivity, "Couldn't load the users!", Toast.LENGTH_SHORT).show()
            }

            // Hide Progress
            progressLoading.visibility = View.GONE
            recyclerContacts.visibility = View.VISIBLE
        }

        override fun onError(exception: CometChatException?) {
            progressLoading.visibility = View.GONE
            recyclerContacts.visibility = View.VISIBLE

            Toast.makeText(this@MainActivity, exception?.localizedMessage ?: "Unknown error occurred!", Toast.LENGTH_SHORT).show()
        }

    })
|
View user presence such as if the user is online or offline
User presence is usually a very attractive feature of any chat application. Without this, any chat app and mail app doesn’t have much difference. CometChat provides this feature in a very easy and simple way using addUserListener() method like the code below
CometChat.addUserListener(getUniqueListenerId(user.uid), object : CometChat.UserListener() {
    override fun onUserOffline(offlineUser: User?) {
        super.onUserOffline(offlineUser)
        user?.let {
            searchUserWithId(contactsList, it.uid)?.let {
                contactsList[it].status = "offline"
                recyclerAdapter?.notifyItemChanged(it)

            }
        }

    }

    override fun onUserOnline(user: User?) {
        super.onUserOnline(user)
        user?.let {
            searchUserWithId(contactsList, it.uid)?.let {
                contactsList[it].status = "online"
                recyclerAdapter?.notifyItemChanged(it)

            }
        }
    }
})
|
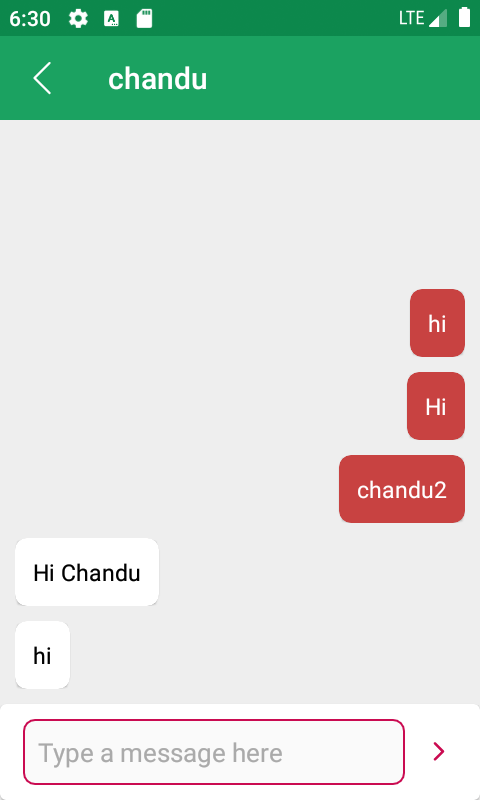
Send and receive chat messages to other users
Before sending messages, you need to fetch the already existing messages for that particular conversation. You can do this through MessageRequest class like the code below.
    val receiverID: String = it.uid
    val messageText = message
    val receiverType = CometChatConstants.RECEIVER_TYPE_USER

    val textMessage = TextMessage(receiverID, messageText,receiverType)

    CometChat.sendMessage(textMessage, object : CometChat.CallbackListener() {
        override fun onSuccess(p0: TextMessage?) {

        }

        override fun onError(p0: CometChatException?) {

        }
    })

    var messageModel = MessageModel(message, true)
    messagesList.add(messageModel)
    messagesAdapter?.notifyItemInserted(messagesList.size-1)
    recyclerMessages.scrollToPosition(messagesList.size-1)
|
Now, to receive the messages from another user in real-time, you need to add a listener through addMessageListener()
CometChat.addMessageListener(getUniqueListenerId(user!!.uid), object : CometChat.MessageListener() {
    override fun onTextMessageReceived(message: TextMessage?) {
        message?.let {
            messagesList.add(MessageModel(message = it.text, isMine = false))
            messagesAdapter?.notifyItemInserted(messagesList.size)
            recyclerMessages.scrollToPosition(messagesList.size-1)
        }
    }
})
|
Finally, we’ve reached the last section of logging out the user. Like all other methods of CometChat SDK, we have logout() method to clear the current existing session for the CometChat
CometChat.logout(object : CometChat.CallbackListener() {
    override fun onSuccess(p0: String?) {
        Toast.makeText(getApplicationContext(), "Logout ", Toast.LENGTH_SHORT).show();
        startActivity(Intent(this@MainActivity, LoginActivity::class.java))
        finish()
           }

    override fun onError(p0: CometChatException?) {
        Toast.makeText(getApplicationContext(), "Please try again", Toast.LENGTH_SHORT).show();  }
})
|
Tags: Android Chat App, RealTime Chat, One-to-One Chat