Navigation Component Android | BottomNavigationView Examples
Navigation Component Android, Integrate BottomNavigationView with Navigation component. Navigation controller
The Navigation Component simplifies implementing navigation from different button events to more complex events. Bottom Navigation View is a material component that makes it easy to explore and switch between the top-level destinations in single click or tap In this post we will cover how to integrate BottomNavigationView with Navigation Component with Android Studio Tutorial
The Navigation component contain main three properties.
- Navigation graph
- NavHost
- NavController
With navigation component we can reduce boilerplate code for fragment transactions and avoid any manual fragment transaction Handling
BottomNavigationView
The BottomNavigationView is an alternative place to put actions and navigation buttons from the top toolbar.
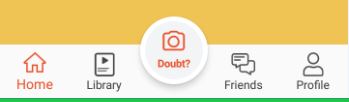
BottomNavigatioView design like below
Now in this post we are going to integrate BottomNavigation with Jetpack Navigation UI component .
Lets Started
Step 1: Create Android application in Android studio
Step 2: Add dependencies
dependencies {
  def nav_version = "2.3.0"

  // Java language implementation
  implementation "androidx.navigation:navigation-fragment:$nav_version"
  implementation "androidx.navigation:navigation-ui:$nav_version"
  implementation 'com.google.android.material:material:1.0.0-beta01'
}
|
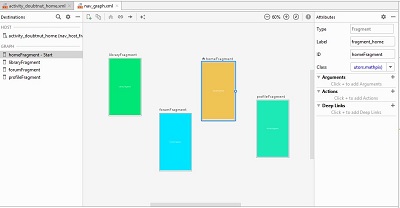
Step 3: Navigation Graph
A navigation graph is a resource file that contains all of your destinations and actions. The graph represents all of our app's navigation paths
To add Navigation graph by below steps
- In the Project window, right-click on the
resdirectory and select New > Android Resource File. The New Resource File dialog appears. - Type a name in the File name field, such as "nav_graph".
- Select Navigation from the Resource type drop-down list, and then click OK.
When we add our first navigation graph, Android Studio creates a navigation resource directory within the res directory. This directory contains our navigation graph resource file
the created nav_grph.xml file contains below code
|
The Navigation editor looks like below
Add a NavHostFragment via XML:
Now add NavHostFragment like below in xml file
<fragment
    android:id="@+id/nav_host_fragment"
    android:name="androidx.navigation.fragment.NavHostFragment"
    android:layout_width="0dp"
    android:layout_height="0dp"
    app:defaultNavHost="true"
    app:layout_behavior="@string/appbar_scrolling_view_behavior"
    app:layout_constraintBottom_toTopOf="@+id/bottomNavigationView"
    app:layout_constraintEnd_toEndOf="parent"
    app:layout_constraintStart_toStartOf="parent"
    app:layout_constraintTop_toBottomOf="@+id/appBarLayout"
    app:navGraph="@navigation/nav_graph" />
|
This will contains below properties
android:nameattribute contains the class name of yourNavHostimplementation.app:navGraphattribute associates theNavHostFragmentwith a navigation graph. The navigation graph specifies all of the destinations in thisNavHostFragmentto which users can navigate.app:defaultNavHost="true"attribute ensures that yourNavHostFragmentintercepts the system Back button.
Add destinations to the navigation graph
We are ready with our NavHostFragment, now we need to add our destination fragment from this NavHostFragment.
To create destination go to Navigation Editor and do the following things
- In the Navigation Editor, click the New Destination icon +, and then click Create new destination.
- In the New Android Component dialog that appears, create your fragment. For more information on fragments, see the fragment documentation.
Add how many fragment you want
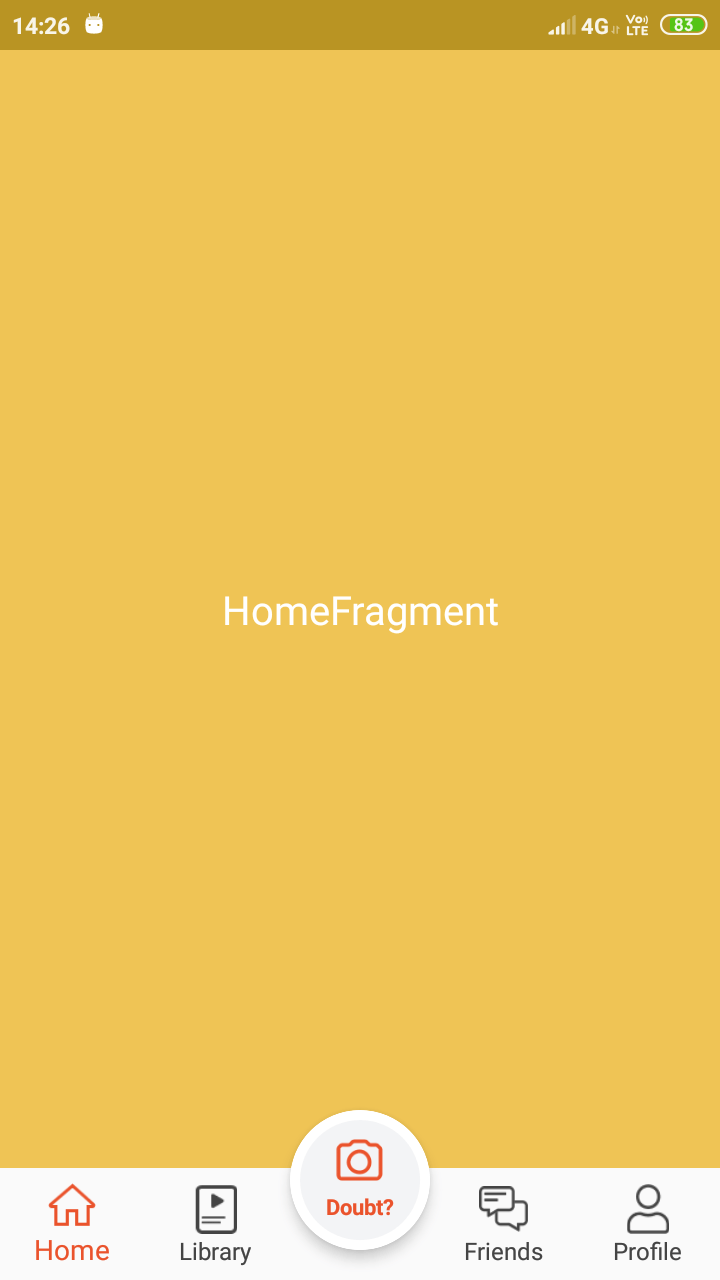
In our current application have create 4 fragment and file looks like below
<?xml version="1.0" encoding="utf-8"?>
<navigation xmlns:android="https://schemas.android.com/apk/res/android"
    xmlns:app="https://schemas.android.com/apk/res-auto"
    xmlns:tools="https://schemas.android.com/tools"
    android:id="@+id/nav_graph"
    app:startDestination="@id/homeFragment">

    <fragment
        android:id="@+id/homeFragment"
        android:name="com.rrtutors.mathpix.HomeFragment"
        android:label="fragment_home"
        tools:layout="@layout/fragment_home" />
    <fragment
        android:id="@+id/libraryFragment"
        android:name="com.rrtutors.mathpix.LibraryFragment"
        android:label="fragment_library"
        tools:layout="@layout/fragment_library" />
    <fragment
        android:id="@+id/forumFragment"
        android:name="com.rrtutors.mathpix.ForumFragment"
        android:label="fragment_forum"
        tools:layout="@layout/fragment_forum" />
    <fragment
        android:id="@+id/profileFragment"
        android:name="com.rrtutors.mathpix.ProfilrFragment"
        android:label="fragment_profilr"
        tools:layout="@layout/fragment_profilr" />
</navigation>
|
Now its time to add BottomNavigationView to our xml file
<com.google.android.material.bottomnavigation.BottomNavigationView
    android:id="@+id/bottomNavigationView"
    android:layout_width="0dp"
    android:layout_height="56dp"
    android:layout_gravity="bottom"
    app:elevation="4dp"
    app:itemIconSize="25dp"
    app:itemIconTint="@drawable/nav_item_color_state"
    app:itemTextColor="@drawable/nav_item_color_state"
    app:labelVisibilityMode="auto"
    app:layout_constraintBottom_toBottomOf="parent"

    app:layout_constraintEnd_toEndOf="parent"
    app:layout_constraintStart_toStartOf="parent"
    app:menu="@menu/menu_bottom_nav_home" />
|
Handle Tab Navigation with BottomNavigationView
With below code we ill handle the navigate different Fragments with BottomNavigationView
NavHostFragment navHostFragment =       (NavHostFragment)getSupportFragmentManager()
        .findFragmentById(R.id.nav_host_fragment);
NavigationUI.setupWithNavController(bottomNavigationView,
        navHostFragment.getNavController());
|
Complete code
MainActivity.java
package com.rrtutors.mathpix;

import android.os.Bundle;
import android.view.MenuItem;
import android.widget.ImageView;

import com.google.android.material.appbar.AppBarLayout;
import com.google.android.material.bottomnavigation.BottomNavigationView;
import com.google.android.material.bottomnavigation.LabelVisibilityMode;

import androidx.annotation.NonNull;
import androidx.appcompat.app.AppCompatActivity;
import androidx.appcompat.widget.Toolbar;
import androidx.cardview.widget.CardView;
import androidx.constraintlayout.widget.ConstraintLayout;
import androidx.fragment.app.Fragment;
import androidx.navigation.fragment.NavHostFragment;
import androidx.navigation.ui.NavigationUI;
import butterknife.BindView;
import butterknife.ButterKnife;

public class MainActivity extends AppCompatActivity {

    @BindView(R.id.ivNavDrawer)
    ImageView ivNavDrawer;
    @BindView(R.id.toolbar)
    Toolbar toolbar;
    @BindView(R.id.appBarLayout)
    AppBarLayout appBarLayout;
    @BindView(R.id.askQuestionButton)
    CardView askQuestionButton;
    @BindView(R.id.bottomNavigationView)
    BottomNavigationView bottomNavigationView;
    @BindView(R.id.activity_main_layout)
    ConstraintLayout activityMainLayout;

    @Override
    protected void onCreate(Bundle savedInstanceState) {
        super.onCreate(savedInstanceState);
        setContentView(R.layout.activity_doubtnut_home);
        ButterKnife.bind(this);
        bottomNavigationView.setLabelVisibilityMode(LabelVisibilityMode.LABEL_VISIBILITY_LABELED);
        setUpNavigation();

    }
    public void setUpNavigation(){

        NavHostFragment navHostFragment =       (NavHostFragment)getSupportFragmentManager()
                .findFragmentById(R.id.nav_host_fragment);
        NavigationUI.setupWithNavController(bottomNavigationView,
                navHostFragment.getNavController());
    }
}
|
xml file
<?xml version="1.0" encoding="utf-8"?>
<!--<androidx.drawerlayout.widget.DrawerLayout
    xmlns:android="https://schemas.android.com/apk/res/android"
    xmlns:aapt="https://schemas.android.com/aapt"
    xmlns:app="https://schemas.android.com/apk/res-auto"
    android:id="@+id/drawer"
    android:layout_width="match_parent"
    android:layout_height="match_parent"
    android:background="@color/white">-->

<androidx.constraintlayout.widget.ConstraintLayout xmlns:android="https://schemas.android.com/apk/res/android"
    xmlns:aapt="https://schemas.android.com/aapt"
    xmlns:app="https://schemas.android.com/apk/res-auto"
    xmlns:tools="https://schemas.android.com/tools"
    android:id="@+id/activity_main_layout"
    android:layout_width="match_parent"
    android:layout_height="match_parent">

    <com.google.android.material.appbar.AppBarLayout
        android:id="@+id/appBarLayout"
        android:layout_width="match_parent"
        android:layout_height="wrap_content"
        android:background="@color/white"
        android:theme="@style/ThemeOverlay.AppCompat.Dark.ActionBar"
        app:elevation="0dp"
        app:layout_constraintEnd_toEndOf="parent"
        app:layout_constraintStart_toStartOf="parent"
        app:layout_constraintTop_toTopOf="parent">

        <androidx.appcompat.widget.Toolbar
            android:id="@+id/toolbar"
            android:layout_width="match_parent"
            android:layout_height="wrap_content"
            android:background="@color/white"
            android:visibility="gone"
            app:contentInsetStart="0dp"
            app:popupTheme="@style/ThemeOverlay.AppCompat.Light">

            <ImageView
                android:layout_width="wrap_content"
                android:layout_height="wrap_content"
                android:layout_gravity="center"
                android:contentDescription="@string/toolbar_home_logo_content_des"
                app:srcCompat="@drawable/ic_logo" />

            <ImageView
                android:id="@+id/ivNavDrawer"
                android:layout_width="@dimen/nav_ham_icon_width"
                android:layout_height="@dimen/nav_ham_icon_height"
                android:layout_gravity="start"
                android:layout_marginStart="@dimen/nav_ham_icon_height"
                android:contentDescription="@string/toolbar_home_logo_content_des"
                app:srcCompat="@drawable/ic_hamburger" />
        </androidx.appcompat.widget.Toolbar>
    </com.google.android.material.appbar.AppBarLayout>

    <fragment
        android:id="@+id/nav_host_fragment"
        android:name="androidx.navigation.fragment.NavHostFragment"
        android:layout_width="0dp"
        android:layout_height="0dp"
        app:defaultNavHost="true"
        app:layout_behavior="@string/appbar_scrolling_view_behavior"
        app:layout_constraintBottom_toTopOf="@+id/bottomNavigationView"
        app:layout_constraintEnd_toEndOf="parent"
        app:layout_constraintStart_toStartOf="parent"
        app:layout_constraintTop_toBottomOf="@+id/appBarLayout"
        app:navGraph="@navigation/nav_graph" />

    <androidx.cardview.widget.CardView
        android:id="@+id/askQuestionButton"
        android:layout_width="70dp"
        android:layout_height="70dp"
        android:layout_marginBottom="15dp"
        android:clickable="true"
        android:focusable="true"
        android:foreground="?android:attr/selectableItemBackground"
        app:cardCornerRadius="35dp"
        app:cardElevation="5dp"
        app:layout_constraintBottom_toBottomOf="parent"
        app:layout_constraintEnd_toEndOf="parent"
        app:layout_constraintStart_toStartOf="parent">

        <LinearLayout
            android:layout_width="match_parent"
            android:layout_height="match_parent"
            android:background="@drawable/bottomnavigation_doubt_buttonbg"
            android:gravity="center"
            android:orientation="vertical">

            <ImageView
                android:layout_width="24dp"
                android:layout_height="21dp"
                app:srcCompat="@drawable/ic_camera_red" />

            <TextView
                android:layout_width="wrap_content"
                android:layout_height="wrap_content"
                android:layout_marginTop="5dp"
                android:text="@string/caption_bottomnavigation_doubt"
                android:textColor="@color/redTomato"
                android:textSize="11sp"
                android:textStyle="bold" />
        </LinearLayout>
    </androidx.cardview.widget.CardView>

    <com.google.android.material.bottomnavigation.BottomNavigationView
        android:id="@+id/bottomNavigationView"
        android:layout_width="0dp"
        android:layout_height="56dp"
        android:layout_gravity="bottom"
        app:elevation="4dp"
        app:itemIconSize="25dp"
        app:itemIconTint="@drawable/nav_item_color_state"
        app:itemTextColor="@drawable/nav_item_color_state"
        app:labelVisibilityMode="auto"
        app:layout_constraintBottom_toBottomOf="parent"

        app:layout_constraintEnd_toEndOf="parent"
        app:layout_constraintStart_toStartOf="parent"
        app:menu="@menu/menu_bottom_nav_home" />
</androidx.constraintlayout.widget.ConstraintLayout>
|
res/navigation/nav_graph.xml
<?xml version="1.0" encoding="utf-8"?>
<navigation xmlns:android="https://schemas.android.com/apk/res/android"
    xmlns:app="https://schemas.android.com/apk/res-auto"
    xmlns:tools="https://schemas.android.com/tools"
    android:id="@+id/nav_graph"
    app:startDestination="@id/homeFragment">

    <fragment
        android:id="@+id/homeFragment"
        android:name="com.rrtutors.mathpix.HomeFragment"
        android:label="fragment_home"
        tools:layout="@layout/fragment_home" />
    <fragment
        android:id="@+id/libraryFragment"
        android:name="com.rrtutors.mathpix.LibraryFragment"
        android:label="fragment_library"
        tools:layout="@layout/fragment_library" />
    <fragment
        android:id="@+id/forumFragment"
        android:name="com.rrtutors.mathpix.ForumFragment"
        android:label="fragment_forum"
        tools:layout="@layout/fragment_forum" />
    <fragment
        android:id="@+id/profileFragment"
        android:name="com.rrtutors.mathpix.ProfilrFragment"
        android:label="fragment_profilr"
        tools:layout="@layout/fragment_profilr" />
</navigation>
|
menu/menu_bottom_nav_home.xml
<?xml version="1.0" encoding="utf-8"?>
<menu xmlns:android="https://schemas.android.com/apk/res/android" xmlns:app="https://schemas.android.com/apk/res-auto" xmlns:aapt="https://schemas.android.com/aapt">
    <item android:icon="@drawable/ic_bottomnavigation_home" android:enabled="true" android:id="@+id/homeFragment" android:title="@string/string_home_bottom_nav_home" app:showAsAction="ifRoom"/>
    <item android:icon="@drawable/ic_bottomnavigation_library" android:enabled="true" android:id="@+id/libraryFragment" android:title="@string/string_home_bottom_nav_pdfs" app:showAsAction="ifRoom"/>
    <item android:enabled="true" android:title="" app:showAsAction="ifRoom"/>
    <item android:icon="@drawable/ic_bottomnavigation_forum" android:enabled="true" android:id="@+id/forumFragment" android:title="@string/string_home_bottom_nav_forum" app:showAsAction="ifRoom"/>
    <item android:icon="@drawable/ic_bottomnavigation_profile" android:enabled="true" android:id="@+id/profileFragment" android:title="@string/string_home_bottom_nav_profile" app:showAsAction="ifRoom"/>
</menu>
|
Related Topics
How do i use Navigationview in android with Kotlin
Android ViewModel Interview questions
Tags:
Navigation, bar, Bottomnavigationview, view, component, fragment, fragments, NavigationView, android Navigation Component