Flutter Create Animated Bottom Navigation Bar
Learn how to create an animated BottomNavigationBar in Flutter for seamless navigation between different screens in your app. Check it out! | RRTutors
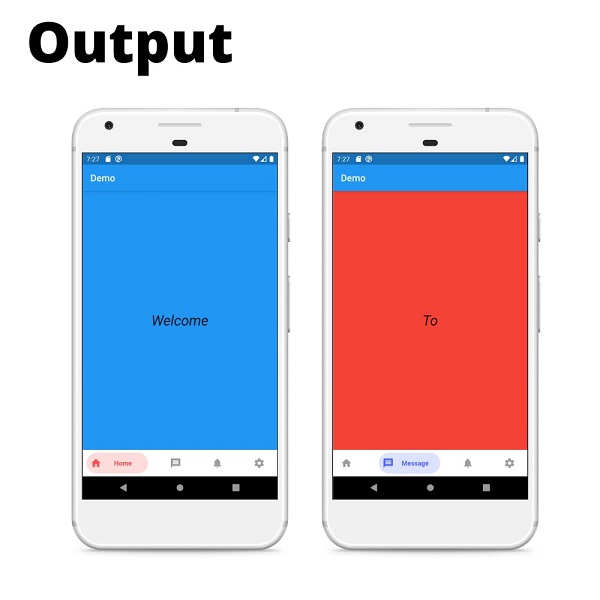
When it comes to Mobile Applications, the Bottom Navigation Bar plays an Important role so, In this tutorial, we will learn how you can get Animated Bottom Navigation Bar in Flutter.
Let's start by creating a new application in Flutter Once you created a new application follow these steps:
Step 1: Add required packages in pubspec.yaml file and run flutter pub add
dependencies:
  ...
  bottom_navy_bar: ^5.6.0
Step 2: Inside your MaterialApp add a Stateful Widget in your home and declare a page controller and an int variable for your current index/state.
Example
int currentIndex = 0;

PageController _pageController;
|
Step 3: Inside your body declare Page View Widget and give page controller to it and add children as pages to your app for example if you want three bottom navigation buttons then add three children inside Page View.
body: SizedBox.expand(
   child: PageView(
   controller: _pageController,
   onPageChanged: (index){
   setState(() {
   currentState = index;
   });
   },
   children: [
   Container(
   color: Colors.blue,
   child: Center(
   child: Text('Welcome',style: textStyle,),
   ),
   ),
   Container(
   color: Colors.red,
   child: Center(
   child: Text('To',style: textStyle,),
   ),
   ),Container(
   color: Colors.green,
   child: Center(
   child: Text('The',style: textStyle,),
   ),
   ),
   Container(
   color: Colors.pink,
   child: Center(
   child: Text('Jungle',style: textStyle,),
   ),
   ),
   ],
   ),
   ),
|
Step 4: Declare BottomNavyBar in Bottom Navigation Bar below your body and you can find various properties.
BottomNavyBar
iconSize- the item icon's sizeitems- navigation items, required more than one item and less than sixselectedIndex- the current item index. Use this to change the selected item. Default to zeroonItemSelected- required to listen when a item is tapped it provide the selected item's indexbackgroundColor- the navigation bar's background colorshowElevation- if false the appBar's elevation will be removedmainAxisAlignment- use this property to change the horizontal alignment of the items. It is mostly used when you have ony two items and you want to center the itemscurve- param to customize the item change's animationcontainerHeight- changes the Navigation Bar's height
BottomNavyBarItem
icon- the icon of this itemtitle- the text that will appear next to the icon when this item is selectedactiveColor- the active item's background and text colorinactiveColor- the inactive item's icon colortextAlign- property to change the alignment of the item title.
Using these properties you can customize your beautiful animated bottom navigation bar.
bottomNavigationBar: BottomNavyBar( curve: Curves.easeIn, showElevation: true, selectedIndex: currentState, onItemSelected:(index){ setState(() { currentState = index; }); _pageController.jumpToPage(index); }, items: [ BottomNavyBarItem(icon: Icon(Icons.home), title: Text('Home'), inactiveColor: Colors.grey, activeColor: Colors.redAccent, textAlign: TextAlign.center ), BottomNavyBarItem( icon: Icon(Icons.message), title: Text('Message'), inactiveColor: Colors.grey, activeColor: Colors.indigoAccent, textAlign: TextAlign.center ), BottomNavyBarItem( icon: Icon(Icons.notifications), title: Text('Notification'), inactiveColor: Colors.grey, activeColor: Colors.green, textAlign: TextAlign.center ), BottomNavyBarItem( icon: Icon(Icons.settings), title: Text('Settings'), inactiveColor: Colors.grey, activeColor: Colors.blue, textAlign: TextAlign.center ), ], ), |
 |
Completed Example code for Flutter Animated Bottom Navigation Bar:
import 'package:bottom_navy_bar/bottom_navy_bar.dart'; import 'package:flutter/material.dart'; void main()=> runApp(MyApp()); class MyApp extends StatelessWidget { @override Widget build(BuildContext context) { return MaterialApp( debugShowCheckedModeBanner: false, home: BottomBarDemo(), ); } } class BottomBarDemo extends StatefulWidget { @override _BottomBarDemoState createState() => _BottomBarDemoState(); } class _BottomBarDemoState extends State<BottomBarDemo> { int currentState = 0; PageController _pageController; TextStyle textStyle = TextStyle(fontSize: 30,fontStyle: FontStyle.italic); @override void initState() { // TODO: implement initState super.initState(); _pageController = PageController(); } @override void dispose() { // TODO: implement dispose super.dispose(); _pageController.dispose(); } @override Widget build(BuildContext context) { return Scaffold( appBar: AppBar(title: Text('Demo'),), body: SizedBox.expand( child: PageView( controller: _pageController, onPageChanged: (index){ setState(() { currentState = index; }); }, children: [ Container( color: Colors.blue, child: Center( child: Text('Welcome',style: textStyle,), ), ), Container( color: Colors.red, child: Center( child: Text('To',style: textStyle,), ), ),Container( color: Colors.green, child: Center( child: Text('The',style: textStyle,), ), ), Container( color: Colors.pink, child: Center( child: Text('Jungle',style: textStyle,), ), ), ], ), ), bottomNavigationBar: BottomNavyBar( curve: Curves.easeIn, showElevation: true, selectedIndex: currentState, onItemSelected:(index){ setState(() { currentState = index; }); _pageController.jumpToPage(index); }, items: [ BottomNavyBarItem(icon: Icon(Icons.home), title: Text('Home'), inactiveColor: Colors.grey, activeColor: Colors.redAccent, textAlign: TextAlign.center ), BottomNavyBarItem( icon: Icon(Icons.message), title: Text('Message'), inactiveColor: Colors.grey, activeColor: Colors.indigoAccent, textAlign: TextAlign.center ), BottomNavyBarItem( icon: Icon(Icons.notifications), title: Text('Notification'), inactiveColor: Colors.grey, activeColor: Colors.green, textAlign: TextAlign.center ), BottomNavyBarItem( icon: Icon(Icons.settings), title: Text('Settings'), inactiveColor: Colors.grey, activeColor: Colors.blue, textAlign: TextAlign.center ), ], ), ); } } |
Conclusion: In this tutorial, we learned how you can create a beautiful animated Bottom Navigation Bar in Flutter.