Display Multiple Markers in Flutter Google Maps with RRutors
Show Multiple Markers on Google Maps with Different styles. Add Infowindow for markers. Show infowindow on tap on marker with null safety feature
In this flutter Google maps tutorials we are going to learn how to show multiple markers on google maps. To show Google Maps we required Google Maps key which we can get from Google Maps console. To know more about how to show Google maps with flutter in the previous example. To load google maps with flutter we are using google_maps_plugin dependency. This Google Maps plugin updated with null safety feature.
GoogleMaps widget contains property markers, with this we are going to show the Markers on Map.
In this example we will cover
- How to create Markers
- How to show Multiple Markers to Google Maps
- Show Marker Infow window and click event for Marker with Infow Window listener
- Show Selected Location info on tap on Marker by BottomSheet
So let's get started
Step 1: Create flutter project
Step 2: Add required dependencies to pubspec.yaml file
dev_dependencies:
  flutter_test:
    sdk: flutter
  google_maps_flutter: ^2.0.6
|
Step 3:
How will create Markers?
Marker marker=Marker(markerId: MarkerId("Current"),
position: LatLng(17.4435, 78.3772)
;
|
To create a marker we need to pass MarkerId & Position to the Marker
So here MarkerId("Current") is the Marker Id for the Marker.
We can differ this in below way
Marker marker1=Marker(
    markerId: markerId1,
    position: LatLng(17.4435, 78.3772),
  icon: BitmapDescriptor.defaultMarkerWithHue(BitmapDescriptor.hueCyan),
    infoWindow: InfoWindow(
      title: "Hytech City",onTap: (){


    },snippet: "Snipet Hitech City"
    ));
|
To add these markers to GoogleMap markers property we need to pass it to Set type.
So let's create a HashMap of Type Markers and add these markers to it.
Map<MarkerId, Marker> markers = <MarkerId, Marker>{};
markers[markerId1]=marker1;
|
Now we are ready with our Marker data, we need to pass this marker data to GoogleMap
markers: Set<Marker>.of(markers.values),
|
Now let's run the app, you will able to see the Marker on the Map.
Step 4:
How to add Multiple markers?
MarkerId markerId1 = MarkerId("1");
MarkerId markerId2 = MarkerId("2");
MarkerId markerId3 = MarkerId("3");
Marker marker2=Marker(markerId: markerId2,position: LatLng(17.4837, 78.3158),
  icon: BitmapDescriptor.defaultMarkerWithHue(BitmapDescriptor.hueGreen),);
Marker marker3=Marker(markerId: markerId3,position: LatLng(17.5169, 78.3428),
    infoWindow: InfoWindow(
    title: "Miyapur",onTap: (){},snippet: "Miyapur"
));

setState(() {
  markers[markerId1]=marker1;
  markers[markerId2]=marker2;
  markers[markerId3]=marker3;
});
|
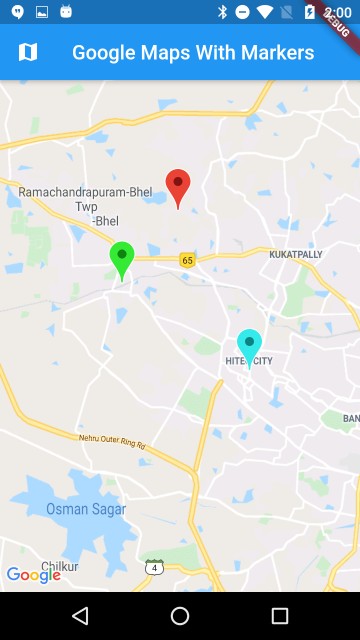
So now we are able to see multiple Markers on Maps.
Step 5:
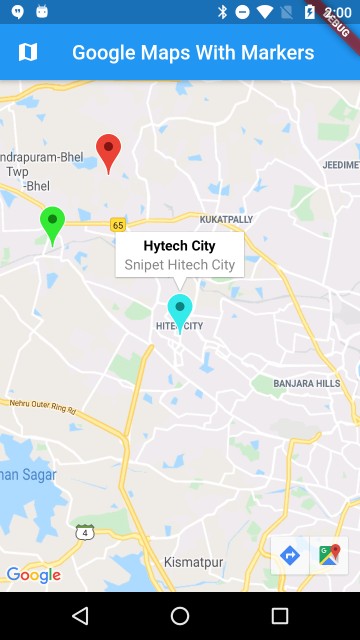
How to add InfoWindow for markers?
Marker() has property with infoWindow, this infoWindow has properties like title,snippet,....
by adding the below code will show the infoWindow for the Marker
infoWindow: InfoWindow(
    title: "Miyapur",onTap: (){},
snippet: "Miyapur"
)
|
Step 6:
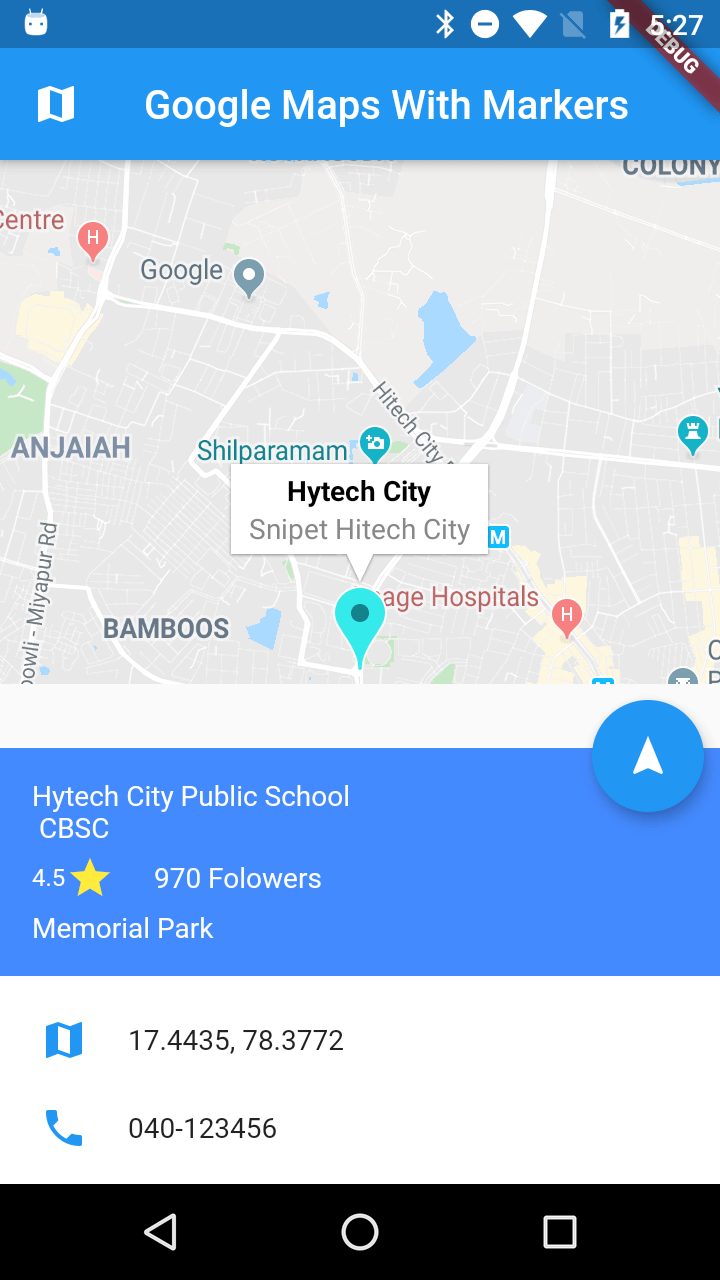
How to add Event For infoWindow?
With the onTap() functionality of InfoWindow, we can handle event for infoWindow
onTap: (){
var  bottomSheetController=scaffoldKey.currentState!.showBottomSheet((context) => Container(
  child: getBottomSheet("17.4435, 78.3772"),
  height: 250,
  color: Colors.transparent,
  ));
}
|
Here we are showing the BottomSheet window on tap on infoWindow of Marker
 |
Complete code for Show Multiple Markers on Google Maps
import 'dart:async';

import 'package:flutter/material.dart';
import 'package:google_maps_flutter/google_maps_flutter.dart';

class MyMaps extends StatefulWidget{
  @override
  State<StatefulWidget> createState() {
    // TODO: implement createState
    return MyMapsState();
  }

}
class MyMapsState extends State<MyMaps>{
  final GlobalKey<ScaffoldState> scaffoldKey = GlobalKey<ScaffoldState>();

  Completer<GoogleMapController> _controller = Completer();
  Map<MarkerId, Marker> markers = <MarkerId, Marker>{};
  static final CameraPosition _kGooglePlex = CameraPosition(
    target: LatLng(17.4435, 78.3772),
    zoom: 14.0,
  );
  List<MarkerId>listMarkerIds=List<MarkerId>.empty(growable: true);
  //final MarkerId markerId = MarkerId("current");
  @override
  void initState() {
    // TODO: implement initState
    super.initState();


  }

  @override
  Widget build(BuildContext context) {

    return Scaffold(
      key: scaffoldKey,
      appBar: AppBar(leading: Icon(Icons.map),backgroundColor: Colors.blue,title: Text("Google Maps With Markers"),),
      body: Container(
        child: GoogleMap(initialCameraPosition: _kGooglePlex,

          onTap: (_){

          },
          mapType: MapType.normal,
          markers: Set<Marker>.of(markers.values),

          onMapCreated: (GoogleMapController controler){
            _controller.complete(controler);

            MarkerId markerId1 = MarkerId("1");
            MarkerId markerId2 = MarkerId("2");
            MarkerId markerId3 = MarkerId("3");

            listMarkerIds.add(markerId1);
            listMarkerIds.add(markerId2);
            listMarkerIds.add(markerId3);


            Marker marker1=Marker(
                markerId: markerId1,
                position: LatLng(17.4435, 78.3772),
              icon: BitmapDescriptor.defaultMarkerWithHue(BitmapDescriptor.hueCyan),infoWindow: InfoWindow(
                  title: "Hytech City",onTap: (){

                var  bottomSheetController=scaffoldKey.currentState!.showBottomSheet((context) => Container(
                  child: getBottomSheet("17.4435, 78.3772"),
                  height: 250,
                  color: Colors.transparent,
                  ));

                },snippet: "Snipet Hitech City"
                ));

            Marker marker2=Marker(markerId: markerId2,position: LatLng(17.4837, 78.3158),
              icon: BitmapDescriptor.defaultMarkerWithHue(BitmapDescriptor.hueGreen),);
            Marker marker3=Marker(markerId: markerId3,position: LatLng(17.5169, 78.3428),
                infoWindow: InfoWindow(
                title: "Miyapur",onTap: (){},snippet: "Miyapur"
            ));

            setState(() {
              markers[markerId1]=marker1;
              markers[markerId2]=marker2;
              markers[markerId3]=marker3;
            });
          },

        ),
      )
    );
  }

  Widget getBottomSheet(String s)
  {
    return Stack(
      children: <Widget>[
        Container(

          margin: EdgeInsets.only(top: 32),
          color: Colors.white,
          child: Column(
            children: <Widget>[
              Container(
                color: Colors.blueAccent,
                child: Padding(
                  padding: const EdgeInsets.all(16.0),
                  child: Column(
                    crossAxisAlignment: CrossAxisAlignment.start,
                    children: <Widget>[
                      Text("Hytech City Public School \n CBSC",style: TextStyle(
                          color: Colors.white,
                          fontSize: 14
                      ),),
                      SizedBox(height: 5,),
                      Row(children: <Widget>[

                        Text("4.5",style: TextStyle(
                            color: Colors.white,
                            fontSize: 12
                        )),
                        Icon(Icons.star,color: Colors.yellow,),
                        SizedBox(width: 20,),
                        Text("970 Folowers",style: TextStyle(
                            color: Colors.white,
                            fontSize: 14
                        ))
                      ],),
                      SizedBox(height: 5,),
                      Text("Memorial Park",style: TextStyle(
                          color: Colors.white,
                          fontSize: 14
                      )),
                    ],
                  ),
                ),
              ),
              SizedBox(height: 20,),
              Row(
                children: <Widget>[SizedBox(width: 20,),Icon(Icons.map,color: Colors.blue,),SizedBox(width: 20,),Text("$s")],
              ),
              SizedBox(height: 20,),
              Row(
                children: <Widget>[SizedBox(width: 20,),Icon(Icons.call,color: Colors.blue,),SizedBox(width: 20,),Text("040-123456")],
              )
            ],
          ),
        ),
        Padding(
          padding: const EdgeInsets.all(8.0),
          child: Align(
            alignment: Alignment.topRight,

            child: FloatingActionButton(
                child: Icon(Icons.navigation),
                onPressed: (){

                }),
          ),
        )
      ],

    );
  }

}
|
main.dart
import 'package:flutter/material.dart';

import 'googlemaps.dart';

void main() => runApp(MyApp());

class MyApp extends StatelessWidget {
  // This widget is the root of your application.
  @override
  Widget build(BuildContext context) {
    return MaterialApp(
      title: 'Google Maps With Markers',

      theme: ThemeData(

        primarySwatch: Colors.blue,
      ),
      home: MyMaps(),
    );
  }
}
|
Drawing Route Lines in Google Maps between Two Location in Flutter
Tags: Google Maps, Multiple Markers on Google Maps Flutter, Draw Route Between Two Location - Flutter