Flutter bottom navigation - Simple BottomNavigationBar Example
Implenting simple bottom navigationbar in fluttter
Today I want to share with you a realization of the Bottom Navigation function. In this post, we will learn Simple BottomNavigationBar with Scaffold Widget.
This post will cover
- How to split parts
- How to build flutter layout
- How to create bottom navigation
Let Say We are going to create the below the page
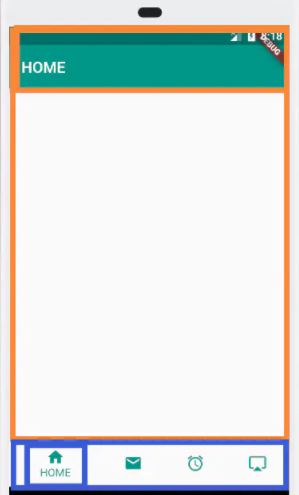
Now construct the Bottom Navigation
import 'package:flutter/material.dart';

class BottomNavigationWidget extends StatefulWidget {
  @override
  State<StatefulWidget> createState() => BottomNavigationWidgetState();
}

class BottomNavigationWidgetState extends State<BottomNavigationWidget> {
  final _bottomNavigationColor = Colors.blue;
  int _currentIndex = 0;

  @override
  Widget build(BuildContext context) {
    return Scaffold(
      bottomNavigationBar: BottomNavigationBar(
        items: [
          BottomNavigationBarItem(
              icon: Icon(
                Icons.home,
                color: _bottomNavigationColor,
              ),
              title: Text(
                'HOME',
                style: TextStyle(color: _bottomNavigationColor),
              )),
          BottomNavigationBarItem(
              icon: Icon(
                Icons.email,
                color: _bottomNavigationColor,
              ),
              title: Text(
                'Email',
                style: TextStyle(color: _bottomNavigationColor),
              )),
          BottomNavigationBarItem(
              icon: Icon(
                Icons.pages,
                color: _bottomNavigationColor,
              ),
              title: Text(
                'PAGES',
                style: TextStyle(color: _bottomNavigationColor),
              )),
          BottomNavigationBarItem(
              icon: Icon(
                Icons.airplay,
                color: _bottomNavigationColor,
              ),
              title: Text(
                'AIRPLAY',
                style: TextStyle(color: _bottomNavigationColor),
              )),
        ],
        currentIndex: _currentIndex,
        onTap: (int index) {
          setState(() {
            _currentIndex = index;
          });
        },
      ),
    );
  }
}
|
Here we used a Scaffold layout, by default this provides a bottomNavigationBar, we give it a BottomNavigationBar here, and put four BottomNavigationBar Items in this BottomNavigationBar. Each item is a navigation button at the bottom.
The items of BottomNavigationBar is an array, so there will be subscripts. BottomNavigationBar provides us with a currentIndex property, the default is 0.
Now Create a SwitchPage
class HomeScreen extends StatefulWidget {
  @override
  State<StatefulWidget> createState() => HomeScreenState();
}

class HomeScreenState extends State<HomeScreen> {
  @override
  Widget build(BuildContext context) {
    return Scaffold(
      appBar: AppBar(
        title: Text('HOME'),
      ),
    );
  }
}
|
Each page is a Scaffold layout with an appBar.
Display the page on the interface
|
List<Widget> pages = List<Widget>(); @override |
Complete BottomNavigationBar Example
import 'package:flutter/material.dart';

class BottomNavigationWidget extends StatefulWidget {
  @override
  State<StatefulWidget> createState() => BottomNavigationWidgetState();
}

class BottomNavigationWidgetState extends State<BottomNavigationWidget> {
  final _bottomNavigationColor = Colors.blue;
  int _currentIndex = 0;
  List<Widget> pages = List<Widget>();
  final _bottomNavigationBarItemColor = Colors.teal;


  @override
  void initState() {
    pages
      ..add(HomeScreen())
      ..add(EmailScreen())
      ..add(AlarmsScreen())
      ..add(ProfileScreen());
  }


  @override
  Widget build(BuildContext context) {
    return Scaffold(
      bottomNavigationBar: BottomNavigationBar(
        items: [
          BottomNavigationBarItem(
              icon: Icon(
                Icons.home,
                color: _bottomNavigationColor,
              ),
              title: Text(
                'HOME',
                style: TextStyle(color: _bottomNavigationColor),
              )),
          BottomNavigationBarItem(
              icon: Icon(
                Icons.email,
                color: _bottomNavigationColor,
              ),
              title: Text(
                'Email',
                style: TextStyle(color: _bottomNavigationColor),
              )),
          BottomNavigationBarItem(
              icon: Icon(
                Icons.pages,
                color: _bottomNavigationColor,
              ),
              title: Text(
                'ALARAM',
                style: TextStyle(color: _bottomNavigationColor),
              )),
          BottomNavigationBarItem(
              icon: Icon(
                Icons.airplay,
                color: _bottomNavigationColor,
              ),
              title: Text(
                'PROFILE',
                style: TextStyle(color: _bottomNavigationColor),
              )),
        ],
        currentIndex: _currentIndex,
        onTap: (int index) {
          setState(() {
            _currentIndex = index;
          });
        },
      ),
      body: pages[_currentIndex],
    );
  }
}


class HomeScreen extends StatefulWidget {
  @override
  State<StatefulWidget> createState() => HomeScreenState();
}

class HomeScreenState extends State<HomeScreen> {
  @override
  Widget build(BuildContext context) {
    return Scaffold(
      appBar: AppBar(
        title: Text('HOME'),
      ),
    );
  }
}

class EmailScreen extends StatefulWidget {
  @override
  State<StatefulWidget> createState() => EmailScreenState();
}

class EmailScreenState extends State<EmailScreen> {
  @override
  Widget build(BuildContext context) {
    return Scaffold(
      appBar: AppBar(
        title: Text('Email'),
      ),
    );
  }
}
class AlarmsScreen extends StatefulWidget {
  @override
  State<StatefulWidget> createState() => AlarmsScreenState();
}

class AlarmsScreenState extends State<AlarmsScreen> {
  @override
  Widget build(BuildContext context) {
    return Scaffold(
      appBar: AppBar(
        title: Text('Alaram'),
      ),
    );
  }
}
class ProfileScreen extends StatefulWidget {
  @override
  State<StatefulWidget> createState() => ProfileScreenState();
}

class ProfileScreenState extends State<ProfileScreen> {
  @override
  Widget build(BuildContext context) {
    return Scaffold(
      appBar: AppBar(
        title: Text('Profile'),
      ),
    );
  }
}
|
How to Implement Pull To refresh in Flutter
Build a Flutter app with Date and Time Picker