Flutter Firebase Phone Authentication and Firebase Database example
Flutter Firebase user authentication with phone number and Firebase database integration. Learn to implement authentication with tutorials on rrtutors.com.
Flutter Firebase Phone authentication is an easy way to authenticate user while using the application. Phone number verification is much easier and most convenient way to authenticate user by sending OTP to given mobile number.
Now a days many mobile applications authenticating the use by Mobile by sending the OTP like swiggy, zomato,ola, uber.
In this flutter firebase tutorial we will cover the flutter firebase phone auth example.Flutter firebase phone auth is an easy way to develop beginners which will provides a limit of OTP sms 50 per day
What we will cover?
- Simple UI for User Registration with Phone Authentication
- Integrate Firebase authentication
- Validate OTP by using PIN CODE Field UI
- Integrate Firebase Database to store the User Information
- Verify User login with Firebase Database
Let's get started
Step 1: Create flutter application in your favorite IDE, this example developed under Android studio.
Step 2: Add required dependencies to pubspec.yaml file
dependencies:
  flutter:
    sdk: flutter
  firebase_core: ^1.8.0
  firebase_auth: ^3.1.4
  pin_code_fields: ^7.3.0
  firebase_database: ^8.0.1
|
Step 3: Create Required UI Part
This firebase example contains 5 screens
- Login Screen
- User Signup with Phone Authentication
- OTP Screen
- User Registration details
- Home Screen
Login Screen
Our Login Screen contains two fields to enter user mobile number and password to verify the user.
 |
This UI code will be like below
import 'package:fllutter_firabase_form/main.dart';
import 'package:flutter/material.dart';

import 'home.dart';
import 'registration.dart';


class LoginScreen extends StatefulWidget {
  @override
  _LoginScreenState createState() => _LoginScreenState();
}

class _LoginScreenState extends State<LoginScreen> {
  TextEditingController _controller = TextEditingController();
  TextEditingController _passwordcontroller = TextEditingController();
  final GlobalKey<ScaffoldState> _scaffoldkey = GlobalKey<ScaffoldState>();
  @override
  Widget build(BuildContext context) {
    return Scaffold(
      key: _scaffoldkey,
      appBar: AppBar(
        title: Text('Login Page'),
      ),
      body: SingleChildScrollView(
        child: Column(
          mainAxisAlignment: MainAxisAlignment.spaceAround,
          children: [
            Column(children: [
              Container(
                margin: EdgeInsets.only(top: 60),
                child: Center(
                  child: Text(
                    'Login Into Application',
                    style: TextStyle(fontWeight: FontWeight.bold, fontSize: 28),
                  ),
                ),
              ),
              Container(
                margin: EdgeInsets.only(top: 40, right: 10, left: 10),
                child: TextField(
                  decoration: InputDecoration(
                    hintText: 'Phone Number',

                  ),
                  maxLength: 10,
                  keyboardType: TextInputType.number,
                  controller: _controller,
                ),
              ),
              Container(
                margin: EdgeInsets.only(top: 40, right: 10, left: 10),
                child: TextField(
                  keyboardType: TextInputType.text,
                  controller: _passwordcontroller,
                  obscureText: true,
                  maxLength: 15,
                  decoration: InputDecoration(
                    hintText: 'Password',

                  ),
                ),
              ),
            ]),
            Container(
              margin: EdgeInsets.all(10),
              width: double.infinity,
              child: MaterialButton(
                color: Colors.blue,
                onPressed: () {


                },
                child: Text(
                  'Login',
                  style: TextStyle(color: Colors.white),
                ),
              ),
            ),
            Container(
              margin: EdgeInsets.all(10),
              width: double.infinity,
              child: TextButton(
                onPressed: () {
                  Navigator.of(context).pushReplacement(MaterialPageRoute(
                      builder: (context) => Registartion()));
                },
                child: Text(
                  'Don\'t have account? Signup',
                  style: TextStyle(color: Colors.black),
                ),
              ),
            )
          ],
        ),
      ),
    );
  }
}
|
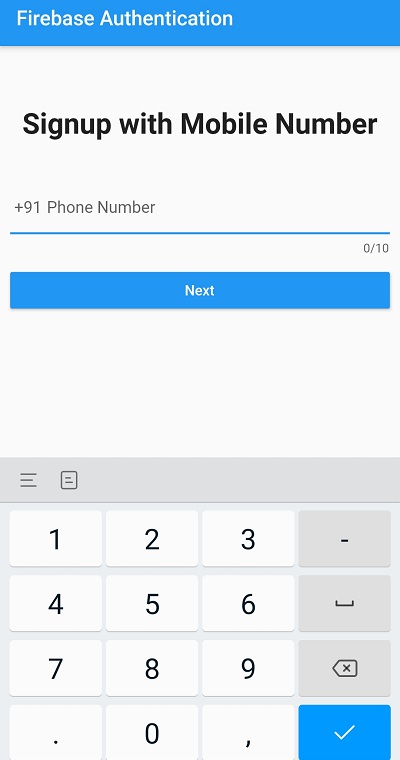
If the user not yet registered then he will navigate to Registration Page where first user enter his mobile number to authenticate valid user.
 |
So our first signup page contains Mobile number field and button with next
import 'package:fllutter_firabase_form/main.dart';
import 'package:flutter/material.dart';

import 'home.dart';
import 'registration.dart';


class LoginScreen extends StatefulWidget {
  @override
  _LoginScreenState createState() => _LoginScreenState();
}

class _LoginScreenState extends State<LoginScreen> {
  TextEditingController _controller = TextEditingController();
  TextEditingController _passwordcontroller = TextEditingController();
  final GlobalKey<ScaffoldState> _scaffoldkey = GlobalKey<ScaffoldState>();
  @override
  Widget build(BuildContext context) {
    return Scaffold(
      key: _scaffoldkey,
      appBar: AppBar(
        title: Text('Login Page'),
      ),
      body: SingleChildScrollView(
        child: Column(
          mainAxisAlignment: MainAxisAlignment.spaceAround,
          children: [
            Column(children: [
              Container(
                margin: EdgeInsets.only(top: 60),
                child: Center(
                  child: Text(
                    'Login Into Application',
                    style: TextStyle(fontWeight: FontWeight.bold, fontSize: 28),
                  ),
                ),
              ),
              Container(
                margin: EdgeInsets.only(top: 40, right: 10, left: 10),
                child: TextField(
                  decoration: InputDecoration(
                    hintText: 'Phone Number',

                  ),
                  maxLength: 10,
                  keyboardType: TextInputType.number,
                  controller: _controller,
                ),
              ),
              Container(
                margin: EdgeInsets.only(top: 40, right: 10, left: 10),
                child: TextField(
                  keyboardType: TextInputType.text,
                  controller: _passwordcontroller,
                  obscureText: true,
                  maxLength: 15,
                  decoration: InputDecoration(
                    hintText: 'Password',

                  ),
                ),
              ),
            ]),
            Container(
              margin: EdgeInsets.all(10),
              width: double.infinity,
              child: MaterialButton(
                color: Colors.blue,
                onPressed: () {


                },
                child: Text(
                  'Login',
                  style: TextStyle(color: Colors.white),
                ),
              ),
            ),
            Container(
              margin: EdgeInsets.all(10),
              width: double.infinity,
              child: TextButton(
                onPressed: () {
                  Navigator.of(context).pushReplacement(MaterialPageRoute(
                      builder: (context) => Registartion()));
                },
                child: Text(
                  'Don\'t have account? Signup',
                  style: TextStyle(color: Colors.black),
                ),
              ),
            )
          ],
        ),
      ),
    );
  }
}
|
Now its time to integrate Firebase to authentication user with phone number. Read how to setup firebase to phone authentication.
To authentication phone number we will use below code
_verifyPhone() async {
  await FirebaseAuth.instance.verifyPhoneNumber(
      phoneNumber: '+91${widget.phone}',
      verificationCompleted: (PhoneAuthCredential credential) async {
        await FirebaseAuth.instance
            .signInWithCredential(credential)
            .then((value) async {
          if (value.user != null) {
            setPassword( value.user!.uid);
          }
        });
      },
      verificationFailed: (FirebaseAuthException e) {
        print(e.message);
      },
      codeSent: (String verficationID, int? resendToken) {
        setState(() {
          _verificationCode = verficationID;
        });
      },
      codeAutoRetrievalTimeout: (String verificationID) {
        setState(() {
          _verificationCode = verificationID;
        });
      },
      timeout: Duration(seconds: 120));
}
|
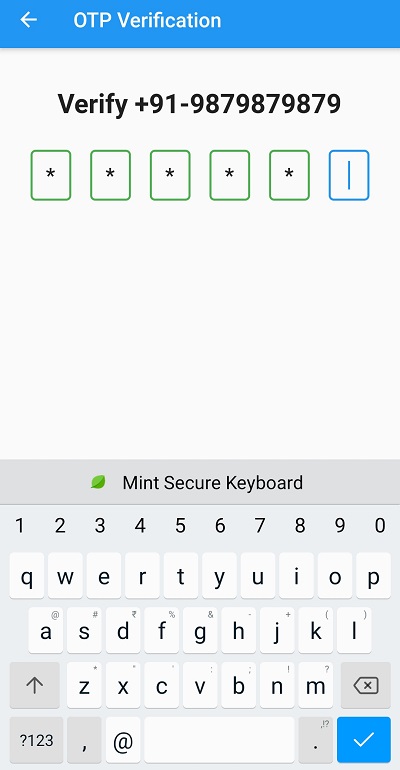
After calling above method entered mobile number will receive a 6 digits number OTP, now we need to show a OTP screen to enter OTP.
 |
Our OTP screen will be looks like below
import 'package:firebase_auth/firebase_auth.dart';
import 'package:fllutter_firabase_form/main.dart';
import 'package:fllutter_firabase_form/password.dart';
import 'package:flutter/material.dart';
import 'package:pin_code_fields/pin_code_fields.dart';

import 'home.dart';


class OTPScreen extends StatefulWidget {
  final String phone;
  OTPScreen(this.phone);
  @override
  _OTPScreenState createState() => _OTPScreenState();
}

class _OTPScreenState extends State<OTPScreen> {
  final GlobalKey<ScaffoldState> _scaffoldkey = GlobalKey<ScaffoldState>();
  late String _verificationCode;
  final TextEditingController _pinPutController = TextEditingController();
  final FocusNode _pinPutFocusNode = FocusNode();
  final BoxDecoration pinPutDecoration = BoxDecoration(
    color: const Color.fromRGBO(43, 46, 66, 1),
    borderRadius: BorderRadius.circular(10.0),
    border: Border.all(
      color: const Color.fromRGBO(126, 203, 224, 1),
    ),
  );
  @override
  Widget build(BuildContext context) {
    return Scaffold(
      key: _scaffoldkey,
      appBar: AppBar(
        title: Text('OTP Verification'),
      ),
      body: SingleChildScrollView(
        child: Column(
          children: [
            Container(
              margin: EdgeInsets.only(top: 40),
              child: Center(
                child: Text(
                  'Verify +91-${widget.phone}',
                  style: TextStyle(fontWeight: FontWeight.bold, fontSize: 26),
                ),
              ),
            ),
            Padding(
              padding: const EdgeInsets.all(30.0),
              child: PinCodeTextField(
                appContext: context,
                    length: 6,
                    obscureText: true,
                    obscuringCharacter: '*',
                    animationType: AnimationType.fade,
                    pinTheme: PinTheme(
                      shape: PinCodeFieldShape.box,
                      borderRadius: BorderRadius.circular(5),
                      fieldHeight: 50,
                      fieldWidth: 40,
                      activeFillColor: Colors.white,
                      ),
                    animationDuration: Duration(milliseconds: 300),

                      onCompleted: (v) async{
                        try {
                          await FirebaseAuth.instance
                              .signInWithCredential(PhoneAuthProvider.credential(
                              verificationId: _verificationCode, smsCode: v))
                              .then((value) async {
                            if (value.user != null) {

                              setPassword( value.user!.uid);

                            }
                          });
                        } catch (e) {
                          FocusScope.of(context).unfocus();
                          _scaffoldkey.currentState!
                              .showSnackBar(SnackBar(content: Text('invalid OTP')));
                        }
                      },
                      onChanged: (value) {
                        print(value);
                        setState(() {

                        });
                      },
                    ),


            )
          ],
        ),
      ),
    );
  }

  _verifyPhone() async {
    await FirebaseAuth.instance.verifyPhoneNumber(
        phoneNumber: '+91${widget.phone}',
        verificationCompleted: (PhoneAuthCredential credential) async {
          await FirebaseAuth.instance
              .signInWithCredential(credential)
              .then((value) async {
            if (value.user != null) {
              setPassword( value.user!.uid);
            }
          });
        },
        verificationFailed: (FirebaseAuthException e) {
          print(e.message);
        },
        codeSent: (String verficationID, int? resendToken) {
          setState(() {
            _verificationCode = verficationID;
          });
        },
        codeAutoRetrievalTimeout: (String verificationID) {
          setState(() {
            _verificationCode = verificationID;
          });
        },
        timeout: Duration(seconds: 120));
  }

  setPassword(uid)
  {

    Navigator.pushAndRemoveUntil(
        context,
        MaterialPageRoute(builder: (context) => PasswordScreen(widget.phone,uid)),
            (route) => false);

    /*Map userDetails={
      "mobile":widget.phone,
      "password":"1234",
    };

    dbRef.child(uid).set(userDetails).then((value) {
      Navigator.pushAndRemoveUntil(
          context,
          MaterialPageRoute(builder: (context) => Home(uid)),
              (route) => false);
    }).onError((error, stackTrace) {
      _scaffoldkey.currentState!
          .showSnackBar(SnackBar(content: Text('${error.toString()}')));
    });*/

  }

  @override
  void initState() {
    // TODO: implement initState
    super.initState();
    _verifyPhone();
  }
}
|
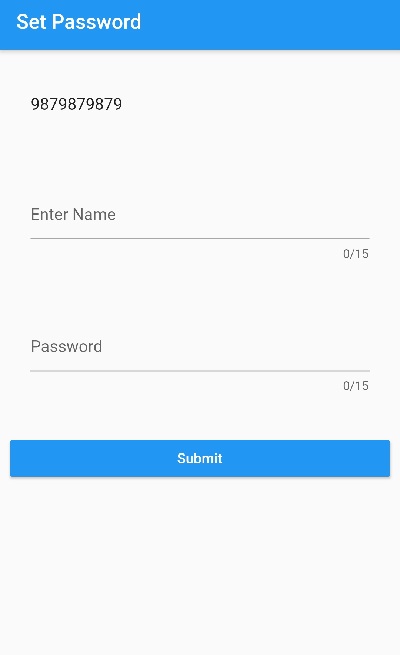
After successful verification of the OTP we will navigate user to Registration with full details page
So now here we after fill the user details we will store these user details with authenticated user id inside our Firebase Database.
 |
So our Complete registration page looks like below
import 'package:firebase_auth/firebase_auth.dart';
import 'package:fllutter_firabase_form/main.dart';
import 'package:flutter/material.dart';
import 'package:pin_code_fields/pin_code_fields.dart';

import 'home.dart';


class PasswordScreen extends StatefulWidget {
  final String phone;
  final String uid;
  PasswordScreen(this.phone,this.uid);
  @override
  _PasswordState createState() => _PasswordState();
}

class _PasswordState extends State<PasswordScreen> {
  final GlobalKey<ScaffoldState> _scaffoldkey = GlobalKey<ScaffoldState>();

  final TextEditingController _nameController = TextEditingController();
  final TextEditingController _passwordController = TextEditingController();
  final TextEditingController _phoneController = TextEditingController();

  @override
  Widget build(BuildContext context) {
    _phoneController.text=(widget.phone);
    return Scaffold(
      key: _scaffoldkey,
      appBar: AppBar(
        title: Text('Set Password'),
      ),
      body: SingleChildScrollView(
        child: Column(
          children: [

            Padding(
              padding: const EdgeInsets.all(30.0),
              child: TextField(
                keyboardType: TextInputType.text,

                controller: _phoneController,
                enabled: false,
                decoration: InputDecoration(
                  hintText: 'mobile',

                ),
              )

            ),

            Padding(
              padding: const EdgeInsets.all(30.0),
              child: TextField(
                keyboardType: TextInputType.text,
                controller: _nameController,

                maxLength: 15,
                decoration: InputDecoration(
                  hintText: 'Enter Name',

                ),
              ),


            ),
            Padding(
              padding: const EdgeInsets.all(30.0),
              child: TextField(
                keyboardType: TextInputType.text,
                controller: _passwordController,
                obscureText: true,
                maxLength: 15,
                decoration: InputDecoration(
                  hintText: 'Password',

                ),
              ),


            ),
            Container(
              margin: EdgeInsets.all(10),
              width: double.infinity,
              child: MaterialButton(
                color: Colors.blue,
                onPressed: () {
                  if(_nameController.text.length<=4){
                    _scaffoldkey.currentState!
                        .showSnackBar(SnackBar(content: Text('Password should be minimum 4 characters')));
                    return;
                  }
                  if(_passwordController.text.length<=4)
                    {
                      _scaffoldkey.currentState!
                          .showSnackBar(SnackBar(content: Text('Password should be minimum 4 characters')));
                    }
                  Map userDetails={
                    "mobile":widget.phone,
                    "password":_passwordController.text,
                    "name":_nameController.text,
                  };

                  dbRef.child(widget.uid).set(userDetails).then((value) {
                    Navigator.pushAndRemoveUntil(
                        context,
                        MaterialPageRoute(builder: (context) => Home(widget.uid,_nameController.text)),
                            (route) => false);
                  }).onError((error, stackTrace) {
                    _scaffoldkey.currentState!
                        .showSnackBar(SnackBar(content: Text('${error.toString()}')));
                  });


                },
                child: Text(
                  'Submit',
                  style: TextStyle(color: Colors.white),
                ),
              ),
            ),
          ],
        ),
      ),
    );
  }


  @override
  void initState() {
    // TODO: implement initState
    super.initState();

  }
}
|
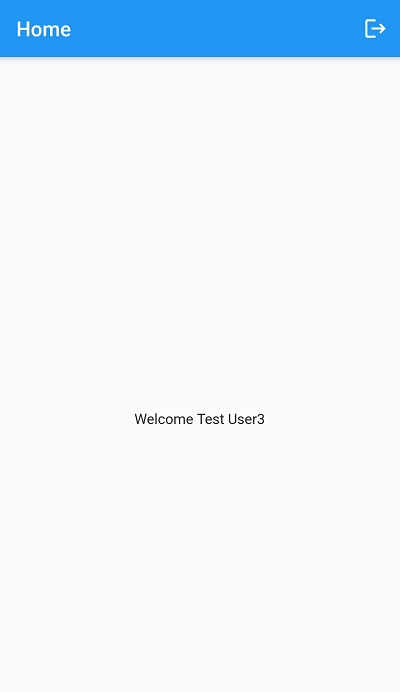
After successful registration or Login user will navigates to home page. This Home screen contains user details and firebase authenticated user Logout option
 |
Home page code will be like below
import 'package:firebase_auth/firebase_auth.dart';
import 'package:fllutter_firabase_form/loginpage.dart';
import 'package:flutter/material.dart';

import 'registration.dart';


class Home extends StatefulWidget {
   String uid;
   String name;
   Home(this.uid,this.name);
  @override
  _HomeState createState() => _HomeState();
}

class _HomeState extends State<Home> {


  @override
  Widget build(BuildContext context) {
    return Scaffold(
      appBar: AppBar(
        title: Text('Home'),
        actions: [
          IconButton(
            icon: Icon(Icons.logout),
            onPressed: () async {
              await FirebaseAuth.instance.signOut();
              Navigator.pushAndRemoveUntil(
                  context,
                  MaterialPageRoute(builder: (context) => LoginScreen()),
                      (route) => false);
            },
          )
        ],
      ),
      body: Center(
        child: Text('Welcome ${widget.name}'),
      ),
    );
  }

  @override
  void initState() {
    // TODO: implement initState
    super.initState();
   // uid = FirebaseAuth.instance.currentUser!.uid;
  }
}
|
main.dart
import 'package:firebase_core/firebase_core.dart';
import 'package:firebase_database/firebase_database.dart';
import 'package:flutter/material.dart';

import 'registration.dart';
import 'loginpage.dart';

void main()  async{
  WidgetsFlutterBinding.ensureInitialized();
  await Firebase.initializeApp();
  runApp(MyApp());
}

DatabaseReference dbRef=FirebaseDatabase.instance.reference().child("users");

class MyApp extends StatelessWidget {
  // This widget is the root of your application.
  @override
  Widget build(BuildContext context) {
    return MaterialApp(
      title: 'Flutter Demo',
      theme: ThemeData(
        primarySwatch: Colors.blue,
      ),
      home: LoginScreen(),
    );
  }
}
|
Conclusion: In this flutter firebase authentication we integrated firebase phone authentication and firebase database integration to verify the user logins and firebase authenticated user Logout.