Flutter 2.0 Autocomplete TextField | RawAutocomplete Example
In this post we are going to create an example on AutoComplete Textfield with RawAutocomplete widget.
Google Announced Flutter stable release Flutter 2. This new release gives the developers to create beautiful, fast and portable apps. This Fluter 2 release works for 5 operating systems for iOS, Android, Windows, mackOS and Linux system
This new release contains few new widgets and updates for old flutter widgets.
In this post we are going to create an example on AutoComplete Textfield with RawAutocomplete widget.
Let's get started
Step 1: Create Flutter application
Step 2: Create a constants class which we will have static data to pass autocomplete textfield
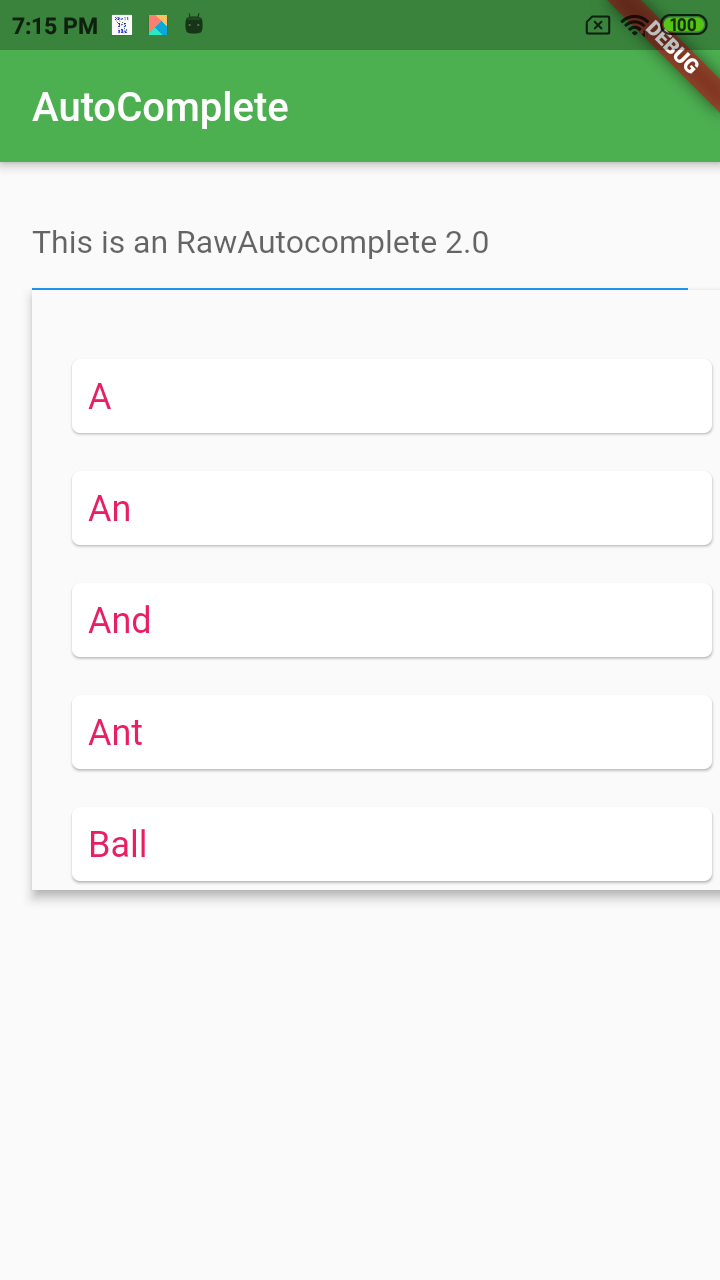
const List<String> kOptions = <String>[
  'A',
  'An',
  'And',
  'Ant',
  'Ball',
  'Basket',
  'Bounce',
  'Bakery',
  'Zoo',
  'Zebra',
  'Joo',
  'June',
  'King',
  'Kite',
  'Kama',
];
|
Step 3: Add RawAutocomplete widget
RawAutocomplete({
  Key? key,
  required this.optionsViewBuilder,
  required this.optionsBuilder,
  this.displayStringForOption = defaultStringForOption,
  this.fieldViewBuilder,
  this.focusNode,
  this.onSelected,
  this.textEditingController,
})
|
This RawAutoComplete widget contains required filed optionsViewBuilder and optionsBuilder
optionsBuilder is A function that returns the current selectable options objects given the
current TextEditingValue
optionsViewBuilder  the options are displayed floating below the field using a
 [CompositedTransformFollower] inside of an [Overlay], not at the same
 place in the widget tree as [RawAutocomplete]
Here we will define the list of options data with optionsViewBuilder property
optionsViewBuilder: (BuildContext context, AutocompleteOnSelected<String> onSelected, Iterable<String> options) {
  final RenderBox renderBox = context.findRenderObject() as RenderBox;
  return Align(
    alignment: Alignment.topLeft,
    child: Material(
      elevation: 4.0,
      child: SizedBox(
        height: 300.0,
        child: ListView(

          children: options.map((String option) => GestureDetector(
            onTap: () {
              onSelected(option);
            },
            child: ListTile(
              title: Card(child: Padding(
                padding: const EdgeInsets.all(8.0),
                child: Text(option,style: TextStyle(fontSize: 18,color: Colors.pink),),
              )),
            ),
          )).toList(),
        ),
      ),
    ),
  );
|
Update main.dart file with below code
import 'package:flutter/material.dart';
import 'package:flutter/widgets.dart';
import 'constant.dart';

void main() {
  runApp(MaterialApp(home: RawAutocompleteBasicFormPage(title:"Raw AutoComplete 2.0")));
}

class RawAutocompleteBasicFormPage extends StatefulWidget {
  RawAutocompleteBasicFormPage({Key key, this.title}) : super(key: key);

  final String title;

  @override
  AutocompleteFormExample createState() => AutocompleteFormExample();
}

class AutocompleteFormExample extends State<RawAutocompleteBasicFormPage> {
  final _formKey = GlobalKey<FormState>();
  final TextEditingController _textEditingController = TextEditingController();
  String _dropdownValue;
  String _autocompleteSelection;

  @override
  Widget build(BuildContext context) {
    return Scaffold(
      appBar: AppBar(
        backgroundColor: Colors.green,
        title: Text(widget.title),
      ),
      body: Padding(
        padding: const EdgeInsets.all(8.0),
        child: Center(
          child: Form(
            key: _formKey,
            child: Column(
              children: <Widget>[

                Padding(
                  padding: const EdgeInsets.all(8.0),
                  child: RawAutocomplete<String>(
                    optionsBuilder: (TextEditingValue textEditingValue) {
                      return kOptions.where((String option) {
                        return option.toLowerCase().contains(textEditingValue.text.toLowerCase());
                      });
                    },
                    onSelected: (String selection) {
                      setState(() {
                        _autocompleteSelection = selection;
                      });
                    },
                    fieldViewBuilder: (BuildContext context, TextEditingController textEditingController, FocusNode focusNode, VoidCallback onFieldSubmitted) {
                      return TextFormField(
                        controller: textEditingController,
                        decoration: InputDecoration(
                          hintText: 'This is an RawAutocomplete 2.0',
                        ),
                        focusNode: focusNode,
                        onFieldSubmitted: (String value) {
                          onFieldSubmitted();
                        },
                        validator: (String value) {
                          if (!kOptions.contains(value)) {
                            return 'Nothing selected.';
                          }
                          return null;
                        },
                      );
                    },
                    optionsViewBuilder: (BuildContext context, AutocompleteOnSelected<String> onSelected, Iterable<String> options) {
                      final RenderBox renderBox = context.findRenderObject() as RenderBox;
                      return Align(
                        alignment: Alignment.topLeft,
                        child: Material(
                          elevation: 4.0,
                          child: SizedBox(
                            height: 300.0,
                            child: ListView(

                              children: options.map((String option) => GestureDetector(
                                onTap: () {
                                  onSelected(option);
                                },
                                child: ListTile(
                                  title: Card(child: Padding(
                                    padding: const EdgeInsets.all(8.0),
                                    child: Text(option,style: TextStyle(fontSize: 18,color: Colors.pink),),
                                  )),
                                ),
                              )).toList(),
                            ),
                          ),
                        ),
                      );
                    },
                  ),
                ),
                ElevatedButton(
                  onPressed: () {
                    FocusScope.of(context).requestFocus(new FocusNode());
                    if (!_formKey.currentState.validate()) {
                      return;
                    }
                    showDialog<void>(
                      context: context,
                      builder: (BuildContext context) {
                        return AlertDialog(
                          title: Text('Successfully submitted'),
                          content: SingleChildScrollView(
                            child: ListBody(
                              children: <Widget>[
                                Text('DropdownButtonFormField: "$_dropdownValue"'),
                                Text('TextFormField: "${_textEditingController.text}"'),
                                Text('RawAutocomplete: "$_autocompleteSelection"'),
                              ],
                            ),
                          ),
                          actions: <Widget>[
                            TextButton(
                              child: Text('Ok'),
                              onPressed: () {
                                Navigator.of(context).pop();
                              },
                            ),
                          ],
                        );
                      },
                    );
                  },
                  child: Text('Submit'),
                ),
              ],
            ),
          ),
        ),
      ),
    );
  }
}
|
Step 4: Run application