Push Notification in Flutter - Local Notification
Local Notification in Flutter| Handle platform-specific notifications and click events using Flutter’s Local Notifications plugin on rrtutors.com.
In this flutter example tutorial we are going to learn how to send Local Notifications in flutter. How to achieve local push notification in flutter, here we are going to use flutter_local_notifications plugin
Lets get started
Step 1: Create Flutter Application
Step 2: Add flutter_local_notifications plugin to pubspec.yaml file
flutter_local_notifications: ^9.1.5
|
Step 3: Create dart file and import
package:flutter_local_notifications/flutter_local_notifications.dart packages
import 'package:flutter_local_notifications/flutter_local_notifications.dart'; |
Step 4: Initialize Notification plugin
create FlutterLocalNotificationsPlugin object in initState method
|
FlutterLocalNotificationsPlugin flutterLocalNotificationsPlugin = new FlutterLocalNotificationsPlugin(); |
then initialize it by flutterLocalNotificationsPlugin.initialize().
This initialization requires InitializationSettings object which will contains the Plat specific settings
for Android
|
new AndroidInitializationSettings('mimap/ic_launcher'); |
for Ios
|
new IOSInitializationSettings( onDidReceiveLocalNotification: (i, string1, string2, string3) { print("received notifications"); }); |
Then we need to pass this settings to InitializationSetting by
|
new InitializationSettings( initializationSettingsAndroid, initializationSettingsIOS); |
Now we need to pass this Initialization object to flutterLocalNotificationsPlugin.initialize().
This has callback method which we can handle the notification events here.
Lets check the below code
var initializationSettingsAndroid =
new AndroidInitializationSettings('ic_launcher');
var initializationSettingsIOS = new IOSInitializationSettings(
    onDidReceiveLocalNotification: (i, string1, string2, string3) {
      print("received notifications");
    });

var initializationSettings = new InitializationSettings(
    initializationSettingsAndroid, initializationSettingsIOS);

flutterLocalNotificationsPlugin.initialize(initializationSettings,
    onSelectNotification: (string) {
      print("selected notification");
    });
|
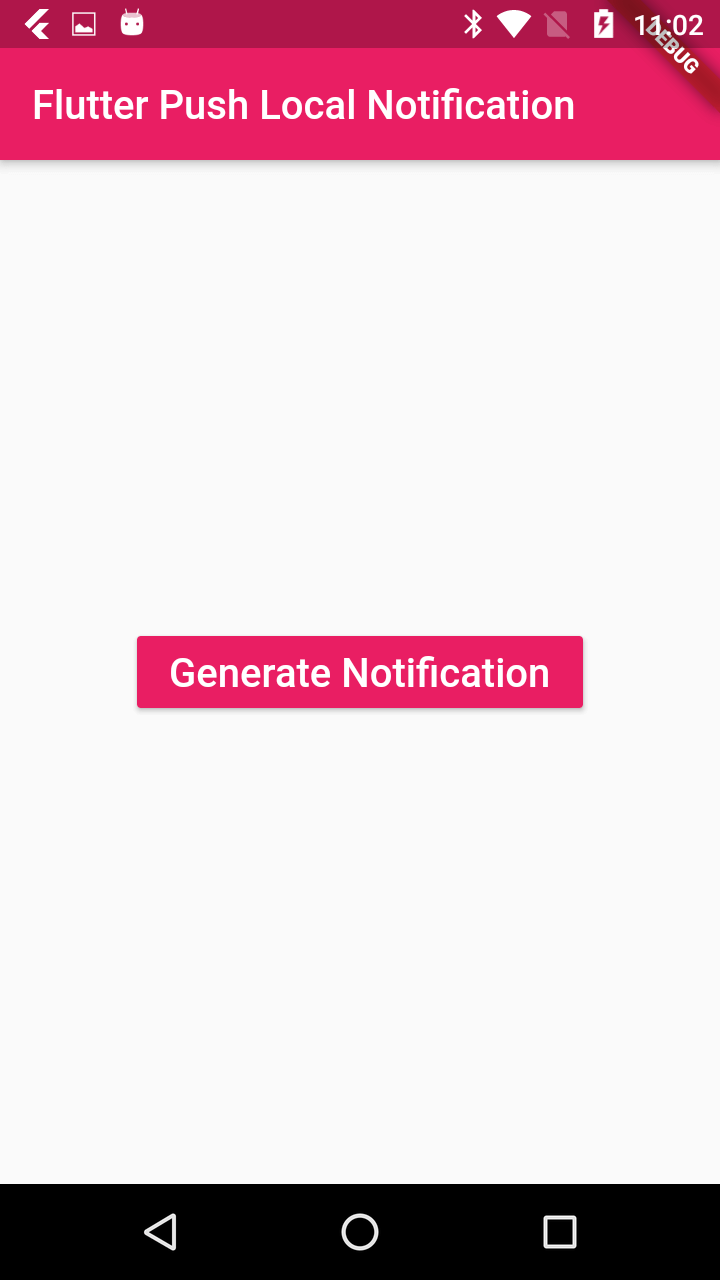
Step 5: Create UI with Button to generate Notification

Scaffold(
  appBar: AppBar(
    // Here we take the value from the MyHomePage object that was created by
    // the App.build method, and use it to set our appbar title.
    title: Text(widget.title),
  ),
  body: Center(
    child: RaisedButton(
      child: Text("Generate Notification",style: TextStyle(color: Colors.white,fontSize: 20),),
      onPressed: _onTap,
      color: Colors.pink,
    ),
  ),
  // This trailing comma makes auto-formatting nicer for build methods.
);
|
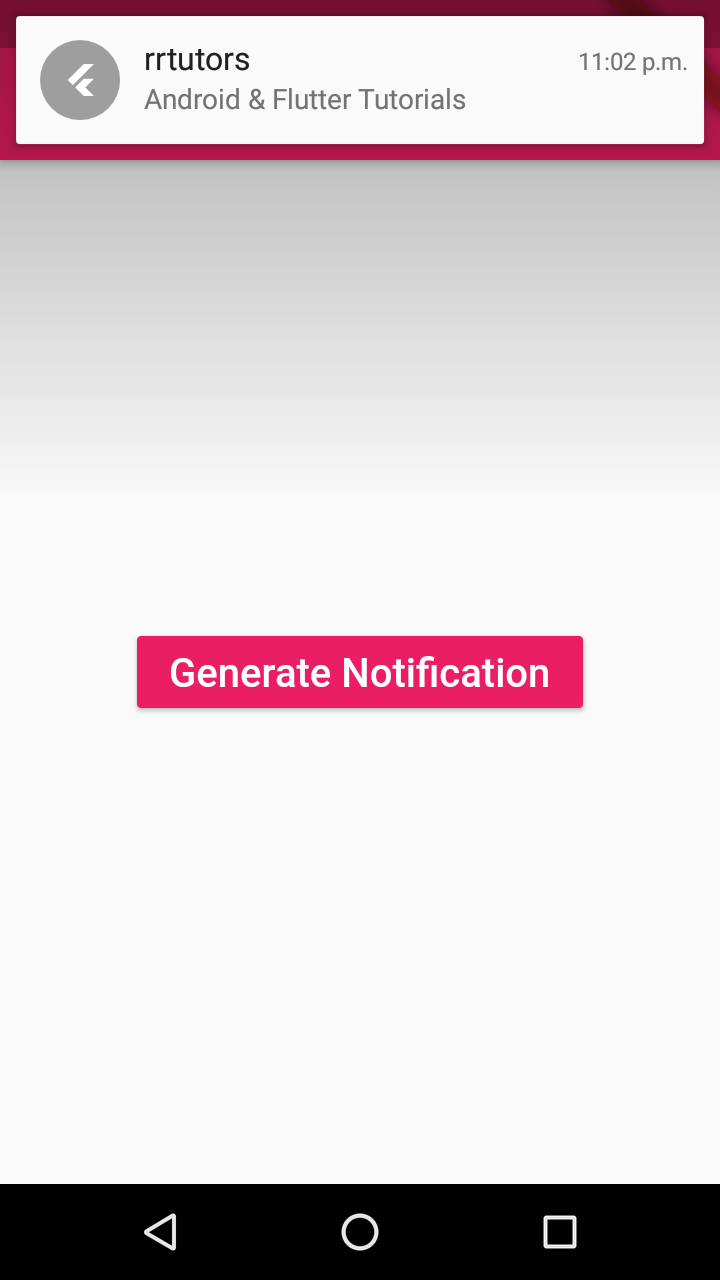
Step 6: Write code to Generate Notification
_onTap() async {
  var androidPlatformChannelSpecifics = AndroidNotificationDetails(
      '1', 'rrtutors', 'flutter snippets',
      importance: Importance.Max, priority: Priority.High);
  var iOSPlatformChannelSpecifics = IOSNotificationDetails();
  var platformChannelSpecifics = NotificationDetails(
      androidPlatformChannelSpecifics, iOSPlatformChannelSpecifics);
  await flutterLocalNotificationsPlugin.show(0, 'rrtutors',
      'Android & Flutter Tutorials', platformChannelSpecifics,
      payload: 'item x');
}
|
Now lets run the code and tap on button, you will be able to see the notification in Notification bar.

Note: Before run make sure you have added notification icon in the android drawable folder with the name what you added in initialization method, here i have used "ic_launcher"
Let's check the complete code
import 'package:flutter/material.dart';

import 'package:flutter_local_notifications/flutter_local_notifications.dart';

void main() => runApp(MyApp());

class MyApp extends StatelessWidget {
  // This widget is the root of your application.
  @override
  Widget build(BuildContext context) {
    return MaterialApp(
      title: 'Flutter Demo',
      theme: ThemeData(

        primarySwatch: Colors.pink,
      ),
      home: MyHomePage(title: 'Flutter Push Local Notification'),
    );
  }
}

class MyHomePage extends StatefulWidget {
  MyHomePage({Key key, this.title}) : super(key: key);


  final String title;

  @override
  _MyHomePageState createState() => _MyHomePageState();
}

class _MyHomePageState extends State {

  GlobalKey _scaffoldKey = GlobalKey();
  FlutterLocalNotificationsPlugin flutterLocalNotificationsPlugin =
  new FlutterLocalNotificationsPlugin();
  @override
  void initState() {

    print("Initialize 1");
    initNotifications();
    super.initState();
  }
  @override
  Widget build(BuildContext context) {


    return Scaffold(
      appBar: AppBar(
        // Here we take the value from the MyHomePage object that was created by
        // the App.build method, and use it to set our appbar title.
        title: Text(widget.title),
      ),
      body: Center(
        child: RaisedButton(
          child: Text("Generate Notification",style: TextStyle(color: Colors.white,fontSize: 20),),
          onPressed: _onTap,
          color: Colors.pink,
        ),
      ),
      // This trailing comma makes auto-formatting nicer for build methods.
    );


  }
  _onTap() async {
    var androidPlatformChannelSpecifics = AndroidNotificationDetails(
        '1', 'rrtutors', 'flutter snippets',
        importance: Importance.Max, priority: Priority.High);
    var iOSPlatformChannelSpecifics = IOSNotificationDetails();
    var platformChannelSpecifics = NotificationDetails(
        androidPlatformChannelSpecifics, iOSPlatformChannelSpecifics);
    await flutterLocalNotificationsPlugin.show(0, 'rrtutors',
        'Android & Flutter Tutorials', platformChannelSpecifics,
        payload: 'item x');
  }
  void initNotifications() async{

    var initializationSettingsAndroid =
    new AndroidInitializationSettings('ic_launcher');
    var initializationSettingsIOS = new IOSInitializationSettings(
        onDidReceiveLocalNotification: (i, string1, string2, string3) {
          print("received notifications");
        });
    var initializationSettings = new InitializationSettings(
        initializationSettingsAndroid, initializationSettingsIOS);
    flutterLocalNotificationsPlugin.initialize(initializationSettings,
        onSelectNotification: (string) {
          print("selected notification");
        });


  }


}
|
Conclusion: In this flutter notification tutorial we covered create local notification when tap on button, In next flutter notification click event example i will show you how to handle the Notification click events to navigate other screens.