Flutter UI Design - Create Movie Ticket UI with Flutter
Flutter UI design - Create Movie Ticket list app ui
Flutter can be used to create great-looking UI So, In this tutorial, we will see how you can create a Movie Ticket UI the easiest way in Flutter.
Let's Start
Step 1: Create a new Flutter Application.
Step 2: Add a line like this to your package's pubspec.yaml.
|
When this package gets installed you will get access to Ticket Widget in Flutter.
Step 3: So with Ticket widget it has properties such as
- innerRadius: Determines the inner radius of the ticket
- outerRadius: Determines the outside radius of the ticket
- boxShadow: used to get the shadow around the ticket
- child: widget can hold any widget as a ticket inside the ticket
Step 4: So, Now you can add Image that you want inside a ticket child which will display movie image for the ticket.
|
Ticket( innerRadius: BorderRadius.only( bottomLeft: Radius.circular(10.0), bottomRight: Radius.circular(10.0), ), outerRadius: BorderRadius.circular(10.0), boxShadow: [ BoxShadow( offset: Offset(0, 4), blurRadius: 2.0, spreadRadius: 2.0, color: Colors.white60), ], child: Image.asset('assets/ff7.jpg'), ), |
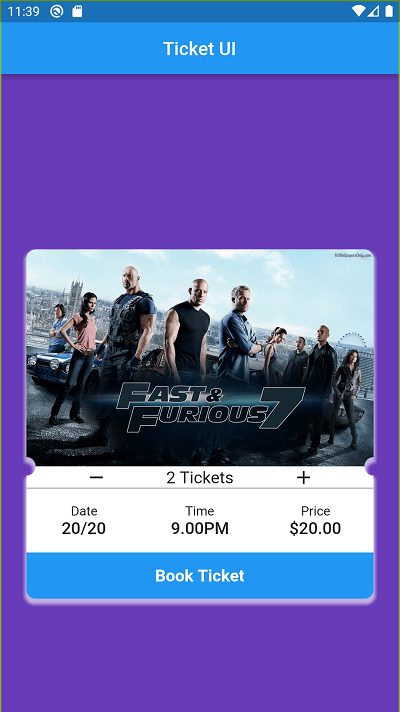
Now for the bottom ticket UI, you can get another Ticket widget and inside child you can add the name, price and time of the ticket using the Row widget. the innerRadius and outerRadius plays very important to achieve the Movie Ticket UI.
Once you add these run the Flutter app without sound-null-safety
|
Complete Source Code to design Movie Ticker UI
|
import 'package:flutter/cupertino.dart'; import 'package:flutter/material.dart'; import 'package:fw_ticket/fw_ticket.dart';
void main() => runApp(MyApp());
class MyApp extends StatelessWidget { @override Widget build(BuildContext context) { return MaterialApp( debugShowCheckedModeBanner: false, home: DemoApp(), ); } }
class DemoApp extends StatelessWidget { @override Widget build(BuildContext context) { return Scaffold( backgroundColor: Colors.deepPurple, appBar: AppBar( title: Text('Ticket UI'), centerTitle: true, ), body: Center( child: Container( width: 375, child: Column( crossAxisAlignment: CrossAxisAlignment.center, mainAxisSize: MainAxisSize.min, children: [ SizedBox( height: 20.0, ), Ticket( innerRadius: BorderRadius.only( bottomLeft: Radius.circular(10.0), bottomRight: Radius.circular(10.0), ), outerRadius: BorderRadius.circular(10.0), boxShadow: [ BoxShadow( offset: Offset(0, 4), blurRadius: 2.0, spreadRadius: 2.0, color: Colors.white60), ], child: Image.asset('assets/ff7.jpg'), ), Ticket( innerRadius: BorderRadius.only( topRight: Radius.circular(10.0), topLeft: Radius.circular(10.0), ), outerRadius: BorderRadius.circular(10.0), boxShadow: [ BoxShadow( offset: Offset(0, 4), blurRadius: 2.0, spreadRadius: 2.0, color: Colors.white60, ), ], child: Container( color: Colors.white, child: Column( mainAxisSize: MainAxisSize.min, mainAxisAlignment: MainAxisAlignment.start, children: [ Row( mainAxisAlignment: MainAxisAlignment.spaceEvenly, children: [ Icon( Icons.remove, color: Colors.black, ), Text( '2 Tickets', style: TextStyle(fontSize: 18.0), ), Icon(Icons.add), ], ), Divider( height: 0.0, color: Colors.grey, thickness: 1.0, ), Row( children: [ Expanded( child: Padding( padding: EdgeInsets.all(16.0), child: Column( children: [ Text('Date'), FittedBox( child: Text( '20/20', style: TextStyle( fontSize: 18.0, fontWeight: FontWeight.w600, ), ), ) ], ), ), ), Expanded( child: Padding( padding: EdgeInsets.all(16.0), child: Column( children: [ Text('Time'), FittedBox( child: Text( '9.00PM', style: TextStyle( fontSize: 18.0, fontWeight: FontWeight.w600, ), ), ) ], ), ), ), Expanded( child: Padding( padding: EdgeInsets.all(16.0), child: Column( children: [ Text('Price'), FittedBox( child: Text( '\$20.00', style: TextStyle( fontSize: 18.0, fontWeight: FontWeight.w600, ), ), ) ], ), ), ), ], ), Container( width: double.infinity, height: 50, color: Colors.blue, child: Center( child: InkWell( child: Text( 'Book Ticket', style: TextStyle( color: Colors.white, fontSize: 18.0, fontWeight: FontWeight.bold, ), ), onTap: () { print('Ticket Booked!'); }, ), ), ) ], ), ), ), ], ), ), ), ); } }
|
Output:
 |
Conclusion: In this way, you can create a Movie Ticket UI the easiest way in Flutter.