How to Create Custom Shape or Clipper in Flutter
Learn how to create custom shapes and clippers in a Flutter application to build beautiful and dynamic UIs using simple techniques. | RRTutors
In Flutter create a custom shape widget really increases the user experience and in this tutorial, we will see how you can create a custom shape/clipper in the easiest way.
Let's start
Step 1: Create a new Flutter Application
Step 2: Now for creating custom shape Flutter has a widget called ClipPath, A Widget that clips its child using a path and calls a callback on a delegate whenever the widget is to be painted. The callback returns a path and the widget prevents the child from painting outside the path.
so in this tutorial, we will see how you can get custom clippers for clippath, after creating a new application add a line like this to your package's pubspec.yaml
|
Once you installed this package we will get access to many custom clipper that can be used in clippath widget in flutter.
for example:
|
ClipPath( clipper: WaveClipperTwo(), child: Container( height: 100, color: Colors.deepOrange, child: Text('Type 2'), ), ), |
for child you can have any widget that you want and that widget will get custom shape. There are many clipper in it as
-
WaveClipperOne
-
OvalBottomBorderClipper
-
ArcClipper
-
MovieTicketClipper
-
MultiplePointedEdgeClipper
-
OvalTopBorderClipper
you can try these clipper in clippath to have different shape for you widget.
Complete Source Code to create Custom shapes in flutter application
|
import 'package:flutter/material.dart'; import 'package:flutter_custom_clippers/flutter_custom_clippers.dart';
void main() => runApp(ClipperDemo());
class ClipperDemo extends StatelessWidget { @override Widget build(BuildContext context) { return MaterialApp( debugShowCheckedModeBanner: false, home: Home(), ); } }
class Home extends StatelessWidget { @override Widget build(BuildContext context) { return Scaffold( appBar: AppBar( title: Text('Clipper Demo'), ), body: ListView( padding: EdgeInsets.all(5.0), children: [ ClipPath( clipper: WaveClipperOne(reverse: true), child: Container( height: 100, color: Colors.cyan, child: Text('Number 1'), ), ), SizedBox( height: 10, ), ClipPath( clipper: WaveClipperTwo(), child: Container( height: 100, color: Colors.deepOrange, child: Text('Type 2'), ), ), SizedBox( height: 10, ), ClipPath( clipper: OvalBottomBorderClipper(), child: Container( height: 100, color: Colors.green, child: Text('Type 3'), ), ), SizedBox( height: 10, ), ClipPath( clipper: OvalRightBorderClipper(), child: Container( height: 100, color: Colors.purpleAccent, child: Text('Type 4'), ), ), SizedBox( height: 10, ), ClipPath( clipper: ArcClipper(), child: Container( height: 100, color: Colors.yellowAccent, child: Text('Type 5'), ), ), SizedBox( height: 10, ), ClipPath( clipper: MovieTicketClipper(), child: Container( height: 100, color: Colors.red, child: Text('Type 6'), ), ), SizedBox( height: 10, ), ClipPath( clipper: MovieTicketBothSidesClipper(), child: Container( color: Colors.lightBlueAccent, height: 100, child: Text('Type 7'), ), ), SizedBox( height: 10, ), ClipPath( clipper: MultiplePointedEdgeClipper(), child: Container( height: 100, color: Colors.greenAccent, child: Text('TYpe 8'), ), ), SizedBox( height: 10, ), ClipPath( clipper: OvalTopBorderClipper(), child: Container( height: 100, color: Colors.pink, child: Text('Type 9'), ), ), ], ), ); } }
|
Output:
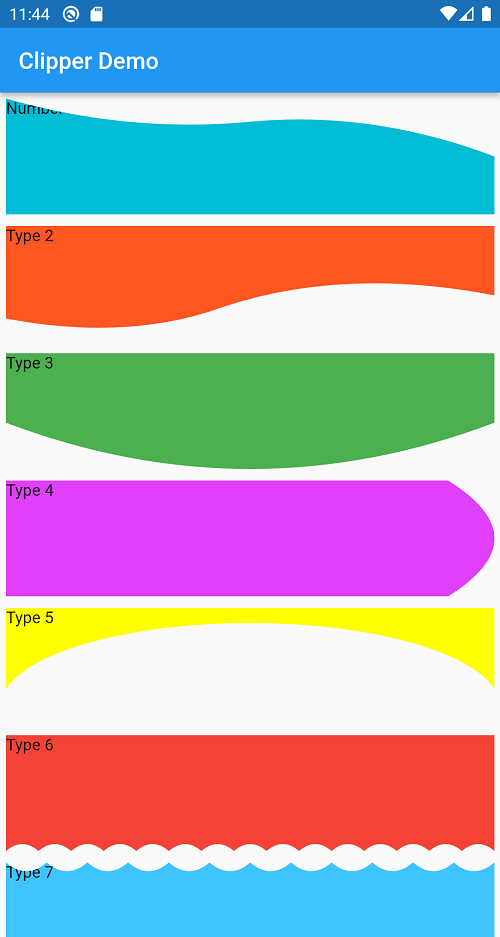
Conclusion: In this way, we have learned how we can get custom shapes and clippers for widgets in Flutter.