Change Language Text Based on Device Language in Flutter
Improve your app's reach by adding multiple language support in Flutter. Learn to change text language based on device settings in this guide at rrtutors.com.
Giving multiple language support in any application will increase large member of audience for the application.So in Flutter Localization example we will cover how do we change the Text Language based on device Language.
What is Localization in flutter, Flutter provides widgets to implmenet internationalization support for the applciations. The package flutter_localizations will be used to handle the localization text.
This localization package contains delegate methods which will called when device language is changed.
So Let's start How do we implement internationalization support in flutter.
Step 1: Create Flutter application
Step 2: Add required dependencies in pubspec.yaml file
dependencies:
  flutter:
    sdk: flutter
  flutter_localizations:
    sdk: flutter
  intl: ^0.17.0
|
and add below lines to generate files for localization languages
flutter: generate: true |
Step 3: Now create a yaml file under project root folder l10.yaml and add below code
arb-dir: lib/l10n template-arb-file: app_en.arb output-localization-file: app_localizations.dart |
So this will generate the requested localization files. here
lib/l10n will be our app supported localization types
app_en.arb is template language file for the english under lib/l10n folder
app_localizations.dart is the generated app localization class which will be used to set the text for app based on language
Add sample localization text foe languages english and spanish
app_en.arb
{
    "helloWorld": "Hello World!",
    "@helloWorld": {
      "description": "The conventional newborn programmer greeting"
    }
}
|
app_es.arb
{
    "helloWorld": "¡Hola Mundo!"

}
|
Now let's run application you will see few generated files under .dart-tool folder like below
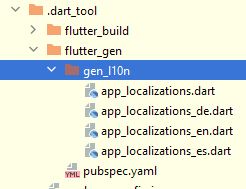 |
here app_localizations.dart file which will be used to apply the text based on the language
Step 4: Let's create MaterailApp widget for our application
Here we need to add supported languages and localization delegetes
supportedLocales: L10n.all, localizationsDelegates: [ AppLocalizations.delegate, GlobalMaterialLocalizations.delegate, GlobalCupertinoLocalizations.delegate, GlobalWidgetsLocalizations.delegate ], |
L10n.all will come from the class
import 'dart:ui';

class L10n{
  static final all=[
    const Locale('en'),
    const Locale('es'),
  ];
}
|
Now apply text for the widgets by
Container( child:Text(AppLocalizations.of(context)?.helloWorld) ) |
AppLocalizations.of(context)?.helloWorld will gives the text based on the language.
Step 5: Run application
 |
 |
Our main.dart file will be like below
import 'dart:math';

import 'package:flutter/material.dart';
import 'package:flutter_localizations/flutter_localizations.dart';

import 'l10n/l10.dart';
import 'package:flutter_gen/gen_l10n/app_localizations.dart';

void main() async{
  WidgetsFlutterBinding.ensureInitialized();
  runApp(MyApp());
}

class MyApp extends StatelessWidget {
  // This widget is the root of your application.
  @override
  Widget build(BuildContext context) {
    return MaterialApp(
      title: 'Flutter Demo',
      theme: ThemeData(

        primarySwatch: Colors.blue,
      ),
      supportedLocales: L10n.all,
      localizationsDelegates: [
        AppLocalizations.delegate,
        GlobalMaterialLocalizations.delegate,
        GlobalCupertinoLocalizations.delegate,
        GlobalWidgetsLocalizations.delegate
      ],

      home: MyLocale(),
    );
  }
}

class MyLocale extends StatelessWidget{
  @override
  Widget build(BuildContext context) {
    return Scaffold(
      appBar: AppBar(title: Text("${AppLocalizations.of(context)?.app_title}"),),
      body: Center(
        child: Container(
            child:Text("${AppLocalizations.of(context)?.helloWorld}",style:TextStyle(fontSize: 30))
        ),
      ),
    );
  }
}
|