Flutter Payment Gateway - How to integrate Razorpay Payment Gateway
Flutter Payment Gateway inegration with Razorpay. Make Easy online payment integration process with razorpay. create API key...
In this flutter example we will learn how to integrate Razorpay payment gateway. Razorpay provided simple and easy Payment Gateway to integrate. They provided documentation to any one can integrate inside application with minimal knowledge.
To integrate Razorpay first we need to create an application at Razorpay console and copy the keys to use inside application.
- Go to the razorpay.com website and create application, it will be enabled with the testing mode.
- Then copy the keys which are showned in Dashborad
Now we have all required keys to integrate in flutter mobile application.
Let's get started
Step 1: Create Flutter application
Step 2: Add Razorpay dependencies
dependencies:
  flutter:
    sdk: flutter
  razorpay_flutter: ^1.2.7
|
Step 3: Design your Checkout page and import required dependencies
|
Step 4: Declare and initaite Rayzorpay instance
_razorpay = Razorpay();
|
Step 5: Handle Razorpay Events
When we start payment process it razorpay emits listeners based on payment result. To track these events we have to listen these events by
_razorpay.on(Razorpay.EVENT_PAYMENT_SUCCESS, _handlePaymentSuccess);
_razorpay.on(Razorpay.EVENT_PAYMENT_ERROR, _handlePaymentError);
_razorpay.on(Razorpay.EVENT_EXTERNAL_WALLET, _handleExternalWallet);
|
Step 6: Now we have prepare our order by required information about orderId,Order details, price etc...
var options = {
  'key': 'YOUR_API_KEY',
  'amount': 100,
  'name': 'RRTutors',
  'description': 'Flutter-EBook',
  'prefill': {'contact': '9879879879', 'email': 'test_987@razorpay.com'},
  'external': {
    'wallets': ['paytm']
  }
};
|
In the above order create replace your API_KEY.
Step 7: Initiate Payment
To initiate payment on button press we need to call open() method with order detaile which is create above
try {
  _razorpay.open(options);
} catch (e) {
  debugPrint('Error: e');
}
|
Step 8: Handle Payment status on the listeners which we added in the step 5
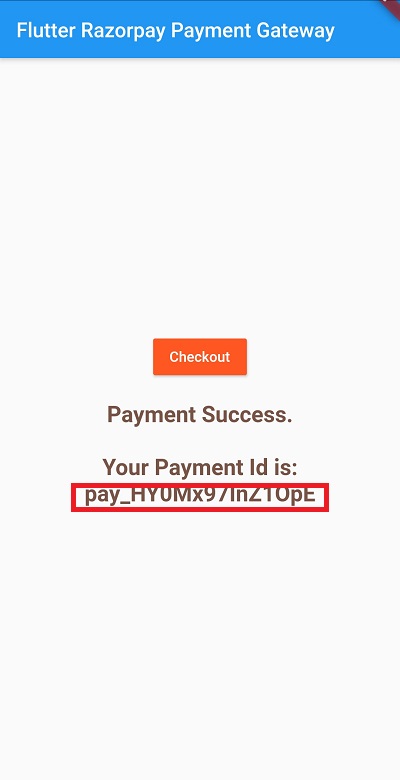
void _handlePaymentSuccess(PaymentSuccessResponse response) {
  print("Payment Process On response success ${response.paymentId}");
  setState(() {
    PAYMENT_STATUS="Payment Success.\n\nYour Payment Id is: ${response.paymentId}";
  });
}

void _handlePaymentError(PaymentFailureResponse response) {

  print("Payment Process On response Error ${response.message}");
  setState(() {
    PAYMENT_STATUS="Payment Failed.  ${response.message}";
  });
}

void _handleExternalWallet(ExternalWalletResponse response) {
  print("Payment Process On response Waller ${response.walletName}");
  setState(() {
    PAYMENT_STATUS="Payment Done with wallet information .  ${response.walletName}";
  });
}
|
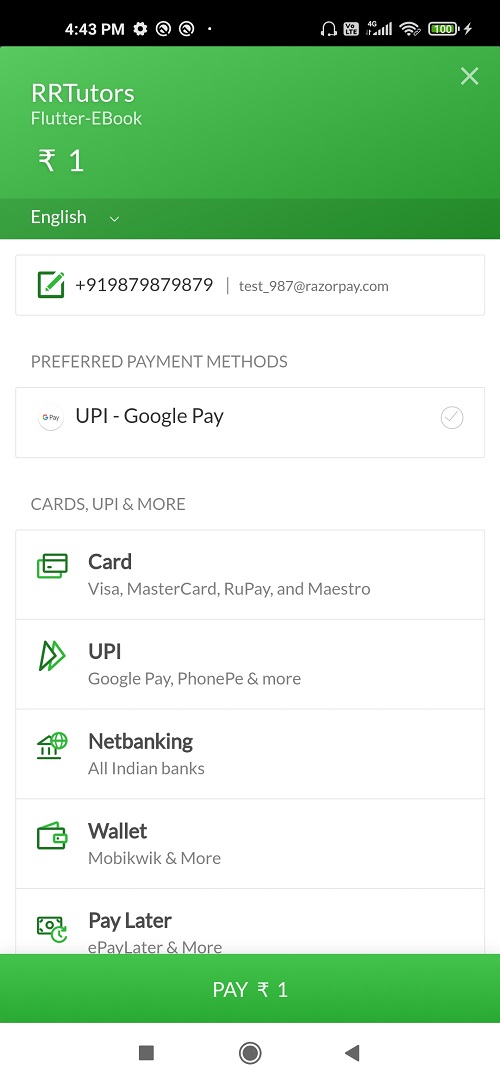
Step 9: Run application and press checkout button, it will open Razorpay payment screen with all payment options like UPI, Wallet and online payment options.
 |
 |
Complete code
import 'package:flutter/material.dart';
import 'package:razorpay_flutter/razorpay_flutter.dart';
void main() {
  runApp(CheckoutScreen());
}
class CheckoutScreen extends StatefulWidget{
  @override
  State<StatefulWidget> createState() {
    // TODO: implement createState
    return CheckoutScreenState();
  }

}

class CheckoutScreenState extends State<CheckoutScreen> {
  late Razorpay _razorpay;
   String PAYMENT_STATUS="";
   @override
  void initState() {
    // TODO: implement initState
    super.initState();
    _razorpay = Razorpay();
    _razorpay.on(Razorpay.EVENT_PAYMENT_SUCCESS, _handlePaymentSuccess);
    _razorpay.on(Razorpay.EVENT_PAYMENT_ERROR, _handlePaymentError);
    _razorpay.on(Razorpay.EVENT_EXTERNAL_WALLET, _handleExternalWallet);
  }
  @override
  Widget build(BuildContext context) {
    return MaterialApp(
      title: 'Flutter Demo',
      theme: ThemeData(

        primarySwatch: Colors.blue,
      ),
      home: Scaffold(
        appBar: AppBar(title: Text("Flutter Razorpay Payment Gateway"),),
        body: Container(
          width: double.infinity,
          child: Column(
            mainAxisAlignment: MainAxisAlignment.center,
            crossAxisAlignment: CrossAxisAlignment.center,
            children: [

              MaterialButton(
                color: Colors.deepOrange,
                  textColor: Colors.white,
                  onPressed: (){
                    createOrder();
                    },
                  child: Text("Checkout")),
              SizedBox(height: 20,),
              Text(PAYMENT_STATUS,style: TextStyle(color: Colors.brown,fontWeight: FontWeight.bold,fontSize: 22,),textAlign: TextAlign.center,),
            ],
          ),
        ),
      ),
    );
  }

  @override
  void dispose() {
    // TODO: implement dispose
    super.dispose();
    _razorpay.clear();

  }
  void _handlePaymentSuccess(PaymentSuccessResponse response) {
    print("Payment Process On response success ${response.paymentId}");
    setState(() {
      PAYMENT_STATUS="Payment Success.\n\nYour Payment Id is: ${response.paymentId}";
    });
  }

  void _handlePaymentError(PaymentFailureResponse response) {

    print("Payment Process On response Error ${response.message}");
    setState(() {
      PAYMENT_STATUS="Payment Failed.  ${response.message}";
    });
  }

  void _handleExternalWallet(ExternalWalletResponse response) {
    print("Payment Process On response Waller ${response.walletName}");
    setState(() {
      PAYMENT_STATUS="Payment Done with wallet information .  ${response.walletName}";
    });
  }


  void createOrder() async
  {
    var options = {
      'key': 'YOUR_API_KEY',
      'amount': 100,
      'name': 'RRTutors',
      'description': 'Flutter-EBook',
      'prefill': {'contact': '9879879879', 'email': 'test_987@razorpay.com'},
      'external': {
        'wallets': ['paytm']
      }
    };

    try {
      _razorpay.open(options);
    } catch (e) {
      debugPrint('Error: e');
    }
  }


}
|
Conclusion: we integrated Razorpay gateway in flutter with Test mode. Once you done with your testing, replace your test keys with production key and make live payments for your application.