How do i create Multi Selection GridView in Flutter
Multi-Selection GridView in Flutter| Implement multi-selection in Flutter’s GridView using gridView.builder constructor with this guide on rrtutors.com.
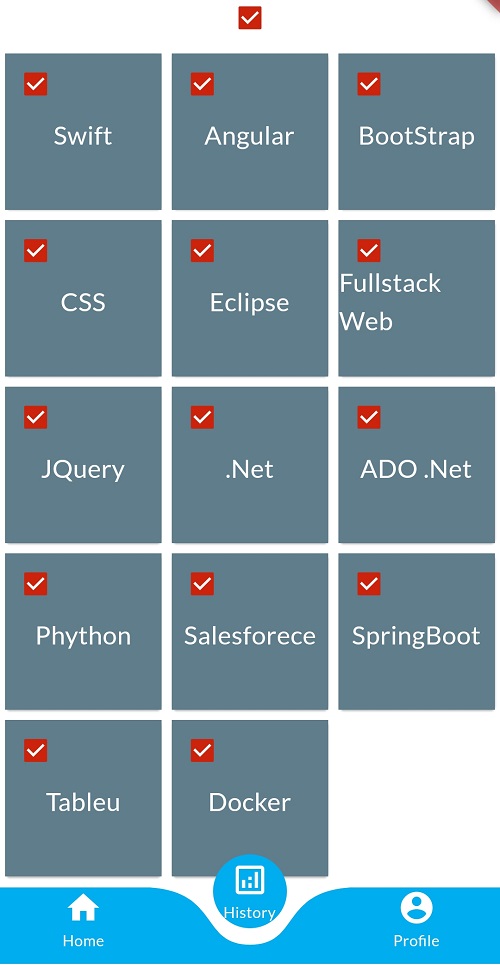
In this Flutter GridView example we are creating simple multi selection GridView. Here we are creating a Statefull widget to show the list of courses inside GridView with multi selection option.
Here the GridView child items created using Stack widget with CheckBox and Text widget, checkbox widget will used to show the selection option.
We are adding a checkbox in the top to select all items inside GridView or deselect the items.
Let's get started
Step 1: Create Flutter application
Step 2: Create a class called Course to manage the selected state of the each GridView items
class Course{ String name; bool selected; Course(this.name,this.selected); } |
Step 3: Create GridView and checkbox UI
Scaffold(body: SafeArea( child: Column( mainAxisSize: MainAxisSize.min, children: [ Checkbox(value: selectAll, onChanged: (bool? value){ setState(() { selectAll=value!; corcess.forEach((element) { element.selected=value; }); }); }), GridView.builder( shrinkWrap: true, itemBuilder: (ctx,index){ return prepareList(index); }, gridDelegate: SliverGridDelegateWithFixedCrossAxisCount (crossAxisCount: 3), itemCount: corcess.length, ), ], ), ), |
Step 4: Create GridView child items
Widget prepareList(int k) { return Card( child: Hero( tag: "text$k", child: Material( child: InkWell( onTap: (){}, child: Container( color: Colors.blueGrey, height: 100, child: Stack( children: [ Center(child: Text(corcess[k].name,style: TextStyle(color: Colors.white,fontSize: 20),)), Positioned(child: Checkbox(value: corcess[k].selected, onChanged: (bool? value) { setState(() { if(!value!) selectAll=false; corcess[k].selected=value!; }); },)) ], ), ), ), ), ), ); } |
Here we can update our UI as per requirement, here i just adding the Text of the course name
Step 5: Run application and you can see Multi Selection GridView items as output.
 |
Complete code for Multi Selection GridView
import 'package:flutter/cupertino.dart'; import 'package:flutter/material.dart'; class MultiSelectscreen extends StatefulWidget{ @override _MultiSelectscreenState createState() => _MultiSelectscreenState(); } class _MultiSelectscreenState extends State<MultiSelectscreen> { List<Course> corcess=new List.empty(growable: true); bool selectAll=false; @override void initState() { // TODO: implement initState super.initState(); corcess.add(Course("Swift",false)); corcess.add(Course("Angular",false)); corcess.add(Course("BootStrap",false)); corcess.add(Course("CSS",false)); corcess.add(Course("Eclipse",false)); corcess.add(Course("Fullstack Web",false)); corcess.add(Course("JQuery",false)); corcess.add(Course(".Net",false)); corcess.add(Course("ADO .Net",false)); corcess.add(Course("Phython",false)); corcess.add(Course("Salesforece",false)); corcess.add(Course("SpringBoot",false)); corcess.add(Course("Tableu",false)); corcess.add(Course("Docker",false)); } @override Widget build(BuildContext context) { return Scaffold(body: SafeArea( child: Column( mainAxisSize: MainAxisSize.min, children: [ Checkbox(value: selectAll, onChanged: (bool? value){ setState(() { selectAll=value!; corcess.forEach((element) { element.selected=value; }); }); }), GridView.builder( shrinkWrap: true, itemBuilder: (ctx,index){ return prepareList(index); }, gridDelegate: SliverGridDelegateWithFixedCrossAxisCount (crossAxisCount: 3), itemCount: corcess.length, ), ], ), ), ); } Widget prepareList(int k) { return Card( child: Hero( tag: "text$k", child: Material( child: InkWell( onTap: (){}, child: Container( color: Colors.blueGrey, height: 100, child: Stack( children: [ Center(child: Text(corcess[k].name,style: TextStyle(color: Colors.white,fontSize: 20),)), Positioned(child: Checkbox(value: corcess[k].selected, onChanged: (bool? value) { setState(() { if(!value!) selectAll=false; corcess[k].selected=value!; }); },)) ], ), ), ), ), ), ); } } class Course{ String name; bool selected; Course(this.name,this.selected); } |